The Windows Printer Test Page serves as a critical diagnostic utility for verifying the integrity of your imaging subsystem and print spooler functionality. By initiating this hardware-level handshake, users can audit essential metadata, including the driver version, port monitor settings, and environment variables like the OS architecture. Beyond basic connectivity checks, this technical guide focuses on analyzing output for artifacts, color calibration accuracy, and nozzle alignment. Whether you are troubleshooting a local USB interface or a networked TCP/IP port, evaluating the test page helps isolate bottlenecks within the graphics device interface (GDI) or PostScript rendering process, ensuring peak hardware performance.
Windows Printer Test Page Overview
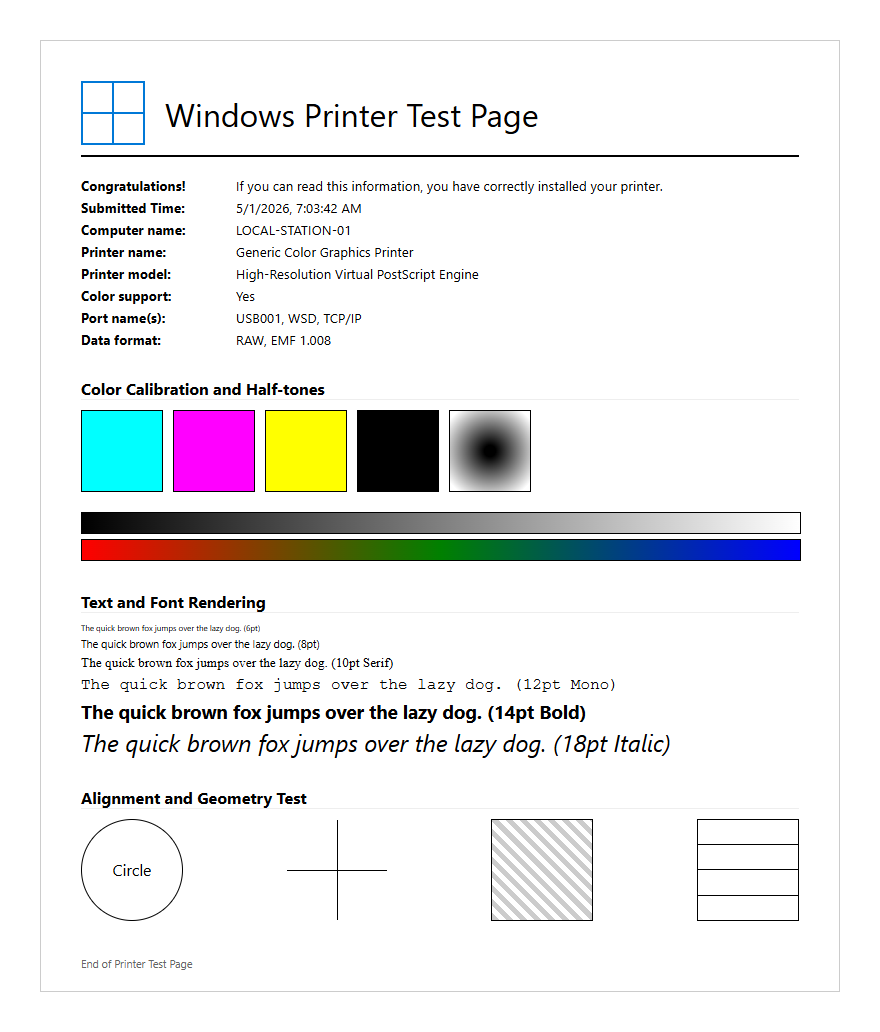
The Windows Printer Test Page serves as a critical diagnostic baseline for establishing the functional relationship between the operating system and the printing hardware. It is not merely a proof of connectivity; it is a structured document that provides essential metadata regarding the print environment. This page confirms that the Windows Print Spooler service is communicating effectively with the device driver, ensuring that the Graphical Device Interface (GDI) or XML Paper Specification (XPS) commands are being rendered correctly. When you initiate this print job, the OS sends a standardized set of instructions designed to exercise the printer's primary capabilities, including text rendering and basic color reproduction.
- Driver Name: Identifies the specific software package governing the hardware.
- Port Name: Specifies the communication channel, such as USB001, TCP/IP, or WSD.
- Data Format: Indicates the RAW or EMF spooling format utilized.
- Print Processor: Details the engine responsible for converting document data into a printer-ready format.
Analyzing this overview section allows technicians to verify the driver version and environment settings at a glance, facilitating faster resolution of compatibility conflicts within the Windows subsystem.
Step By Step Printing Guide
Navigating the Windows interface to produce a test page requires access to the administrative layer of the peripheral management system. Whether you are using a local USB connection or a networked IPP (Internet Printing Protocol) device, the procedure remains largely standardized across modern Windows iterations. Following this sequence ensures that the command bypasses application-specific settings, testing the core driver functionality directly from the system's "Devices and Printers" repository.
- Open the Control Panel or the Settings app and navigate to the "Devices and Printers" or "Printers & Scanners" menu.
- Locate your specific hardware model from the list of installed peripherals.
- Right-click the icon (or click the entry) and select Printer Properties. Note: Do not confuse this with "Preferences."
- Within the "General" tab, locate the button labeled Print Test Page at the bottom right.
- Monitor the Print Queue to ensure the status transitions from "Spooling" to "Printing" without error flags.
Once the document exits the output tray, the system will prompt you with a confirmation dialog. Retain this dialog until you have physically inspected the page for hardware-level defects or rendering errors.
Interpreting Your Print Results
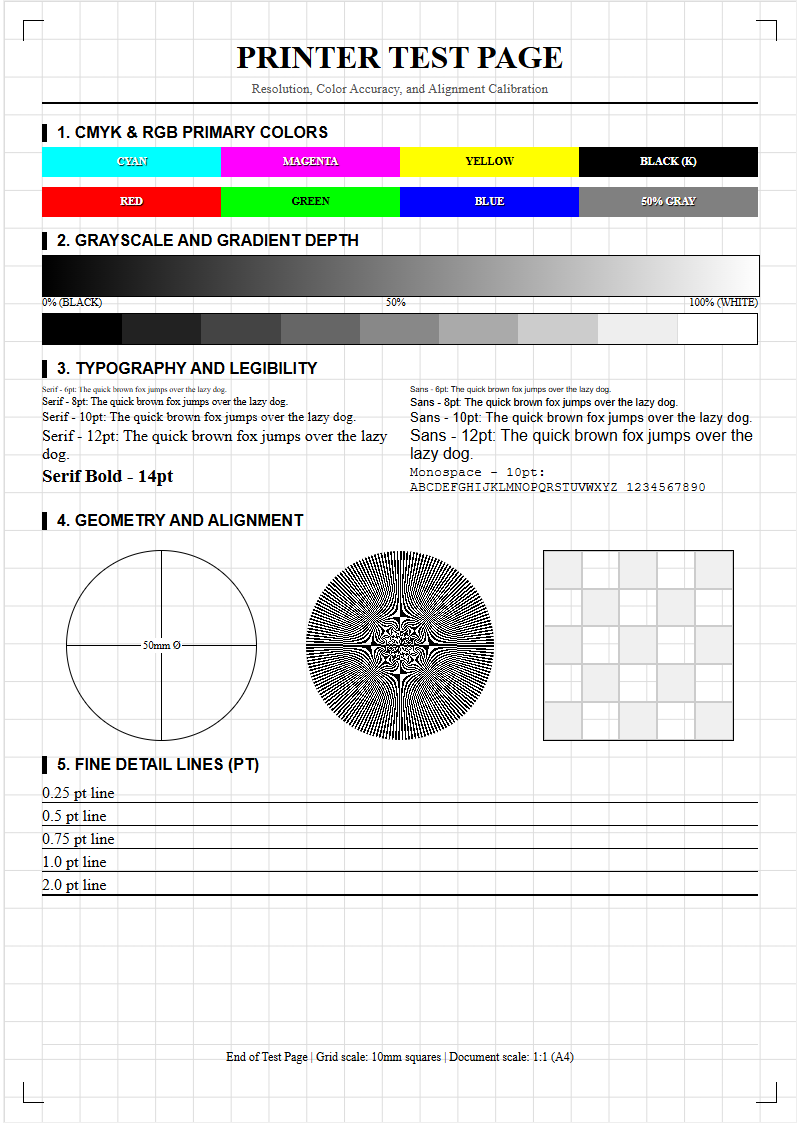
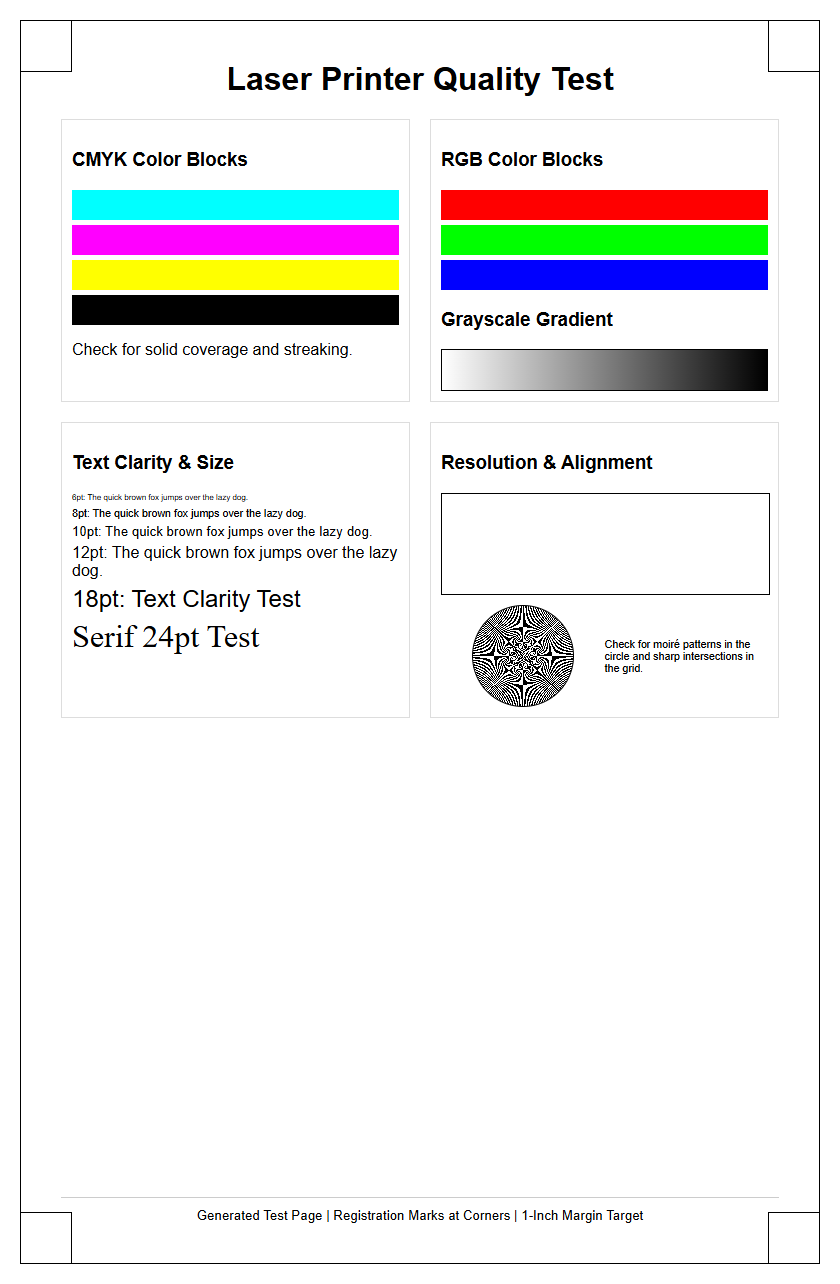
The visual output of a Windows Printer Test Page provides an immediate health report of the mechanical and logical components of your device. A successful print demonstrates that the fuser unit, printhead, and toner/ink delivery systems are synchronized with the software instructions. Technicians look for the clarity of the Windows logo, the sharpness of the fine print, and the consistency of the color gradients. Discrepancies in these areas often point toward specific failures in the imaging process or the driver's color mapping table.
| Visual Element | Expected Result | Indicated Issue |
|---|---|---|
| Text Sharpness | Crisp, legible edges | Low DPI or driver mismatch |
| Color Gradients | Smooth transitions | Clogged nozzles or low toner |
| Solid Blacks | Even saturation | Fuser failure or drum wear |
| Margin Alignment | Perfectly centered | Paper feed roller misalignment |
The presence of "ghosting" or repetitive streaks usually indicates a hardware fault in the drum or transfer belt, whereas garbled text or "mojibake" characters suggest a corrupt PostScript or PCL6 driver translation error.
Troubleshooting Common Hardware Issues
If the Windows Printer Test Page fails to emerge or displays significant artifacts, the focus must shift to the physical layer. Hardware troubleshooting involves isolating mechanical failures from firmware-level errors. One of the most frequent culprits is a paper path obstruction or a dirty sensor, which can trigger a "Paper Jam" status despite no visible blockage. Additionally, the communication interface-be it a physical cable or a wireless transceiver-must be validated for integrity to ensure the data packets reach the printer's internal buffer without corruption.
- Power Cycling: Perform a hard reset to clear the internal RAM and reset the fuser's temperature sensors.
- Consumable Check: Verify that the CMYK cartridges are properly seated and that the protective chips are making contact.
- Roller Inspection: Clean the pickup rollers with isopropyl alcohol to prevent "skewing" or feed failures.
- Firmware Verification: Ensure the hardware's internal logic is compatible with the version of Windows currently hosting the spooler.
Addressing these hardware fundamentals often resolves issues that appear as software errors, such as the "Printer in Error State" notification that frequently halts the test page process.
Calibrating Color Accuracy
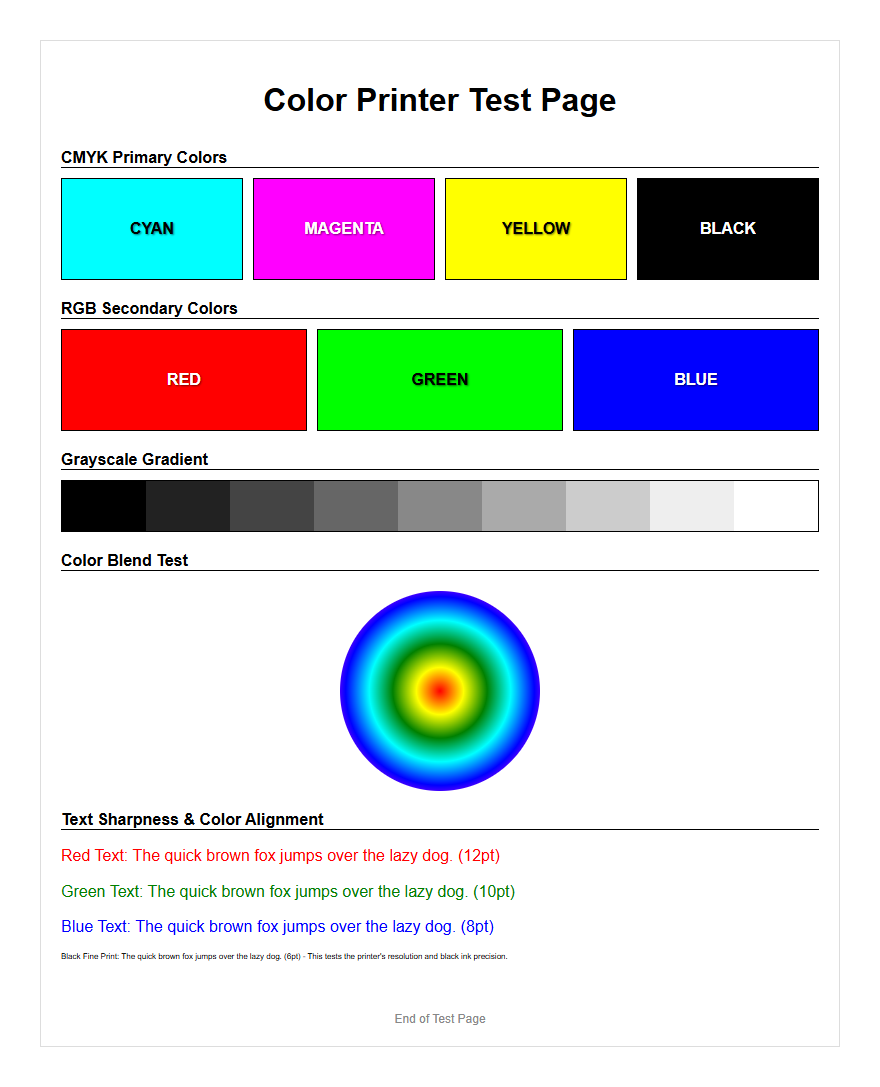
Color fidelity is managed through the interaction of Windows ICC (International Color Consortium) profiles and the printer's internal lookup tables. When a test page displays muted tones or incorrect hues-such as a magenta shift in blue regions-it indicates a breakdown in the RGB-to-CMYK conversion process. Calibration ensures that the digital values assigned by the Windows Graphics Engine match the physical output of the ink or toner. This is particularly vital for professional environments where brand colors must remain consistent across different output devices and media types.
To enhance accuracy, users should access the "Color Management" tab within the printer properties. Here, you can manually assign a specific .icc profile tailored to your paper stock, such as glossy photo or matte bond. Furthermore, many modern drivers include a "Calibration" utility that prints a series of color density patterns. By scanning these patterns or visually comparing them to a reference chart, the driver can adjust the voltage applied to the printhead or the dwell time of the laser, effectively compensating for environmental factors like humidity and ambient temperature that affect chemical bonding.
Windows 11 Printing Procedures
Windows 11 introduced a modernized "Settings" interface that streamlines the peripheral management experience, though it abstracts some of the traditional "Control Panel" features. For users on this OS, the print subsystem relies heavily on the Print Support App (PSA) architecture, which aims to replace the legacy v3 and v4 driver models with more secure, app-based interactions. Navigating this environment requires understanding the new "Bluetooth & devices" hierarchy, where printer queues are now managed through a unified dashboard designed for both touch and mouse inputs.
- Press Win + I to open the Settings menu.
- Navigate to Bluetooth & devices and then select Printers & scanners.
- Click on the specific printer to expand its management options.
- Select Print test page from the top of the action list.
- If the printer is offline, use the Run the troubleshooter link provided directly within the same interface to reset the local print spooler.
Windows 11 also provides enhanced visibility into "Print Server Properties," allowing for advanced configuration of form sizes and driver isolation settings, ensuring that one failing driver does not crash the entire print subsystem.
Windows 10 Device Management
In Windows 10, printer management is a hybrid experience between the modern "Settings" app and the legacy "Devices and Printers" applet found in the Control Panel. This dual-layered approach offers granular control over driver properties that might be hidden in newer interfaces. The Windows 10 spooler architecture is robust, supporting a wide array of legacy hardware through the "Universal Print Driver" framework. Managing devices here often involves using the "Win+R" shortcut to execute the control printers command, which remains the fastest way for power users to access the classic management interface.
This OS version is particularly susceptible to "Print Spooler" service hangs following security updates. When a test page fails to initialize, checking the services.msc console to ensure the spooler is "Started" and set to "Automatic" is a primary troubleshooting step. Furthermore, Windows 10 allows for "Let Windows manage my default printer," a feature that can sometimes lead to confusion if the system switches the default device to a virtual PDF printer instead of the physical hardware intended for the test page.
Verifying Driver Installation
A successful test page is the ultimate verification of a proper driver installation. Windows utilizes several driver architectures, including PCL5, PCL6, and PostScript (PS), each handling page description data differently. Verifying the installation involves checking that the Windows Hardware Quality Labs (WHQL) signature is present, which ensures the driver has undergone rigorous stability testing by Microsoft. Without a verified driver, the test page may print multiple pages of "garbage code" or fail to communicate the duplexing and finishing options available on the hardware.
- Version Match: Ensure the driver architecture (x64 vs. ARM64) matches the OS kernel.
- Inf Path: Check the "Driver Path" on the test page to verify the system isn't using a generic "Class Driver."
- Feature Set: Confirm that optional modules like extra trays or finishers are recognized in the "Device Settings" tab.
- Registry Integrity: Ensure the HKLM\System\CurrentControlSet\Control\Print keys are populated correctly.
If the test page identifies the driver as "Microsoft IPP Class Driver," you may be missing manufacturer-specific features, such as high-resolution dithering or proprietary color enhancement technologies, necessitating a manual driver update from the vendor's portal.
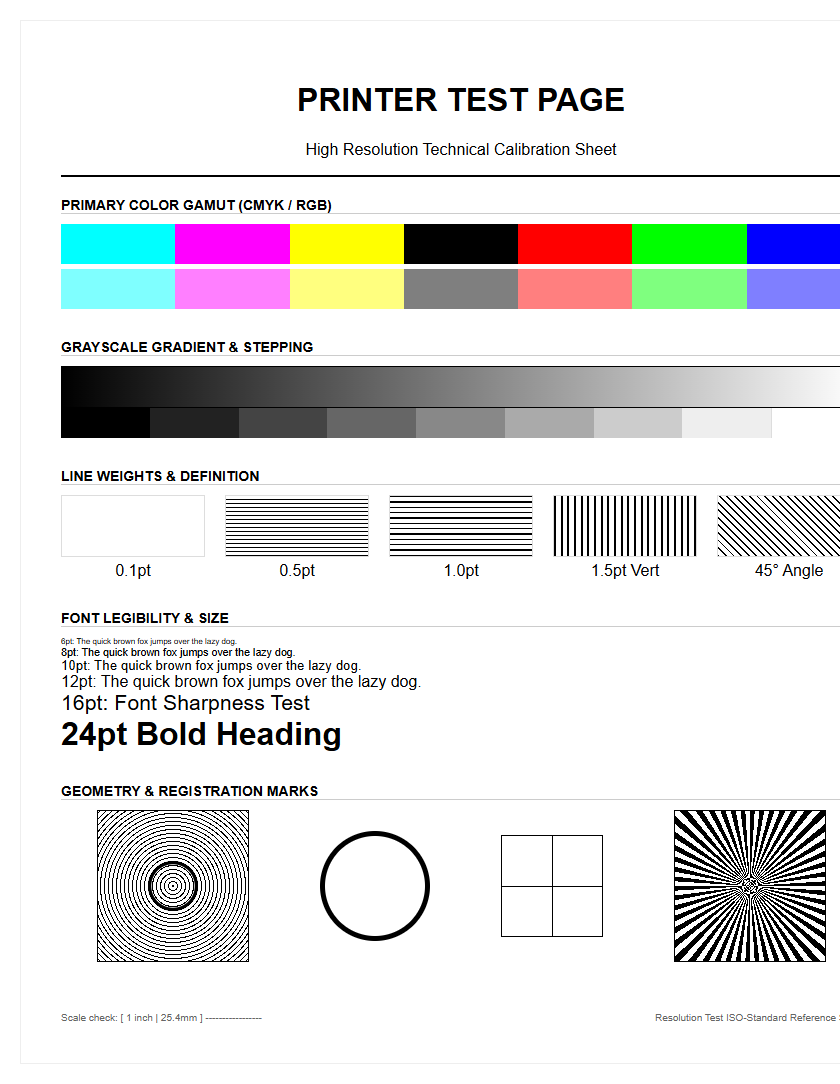
Enhancing Print Output Quality
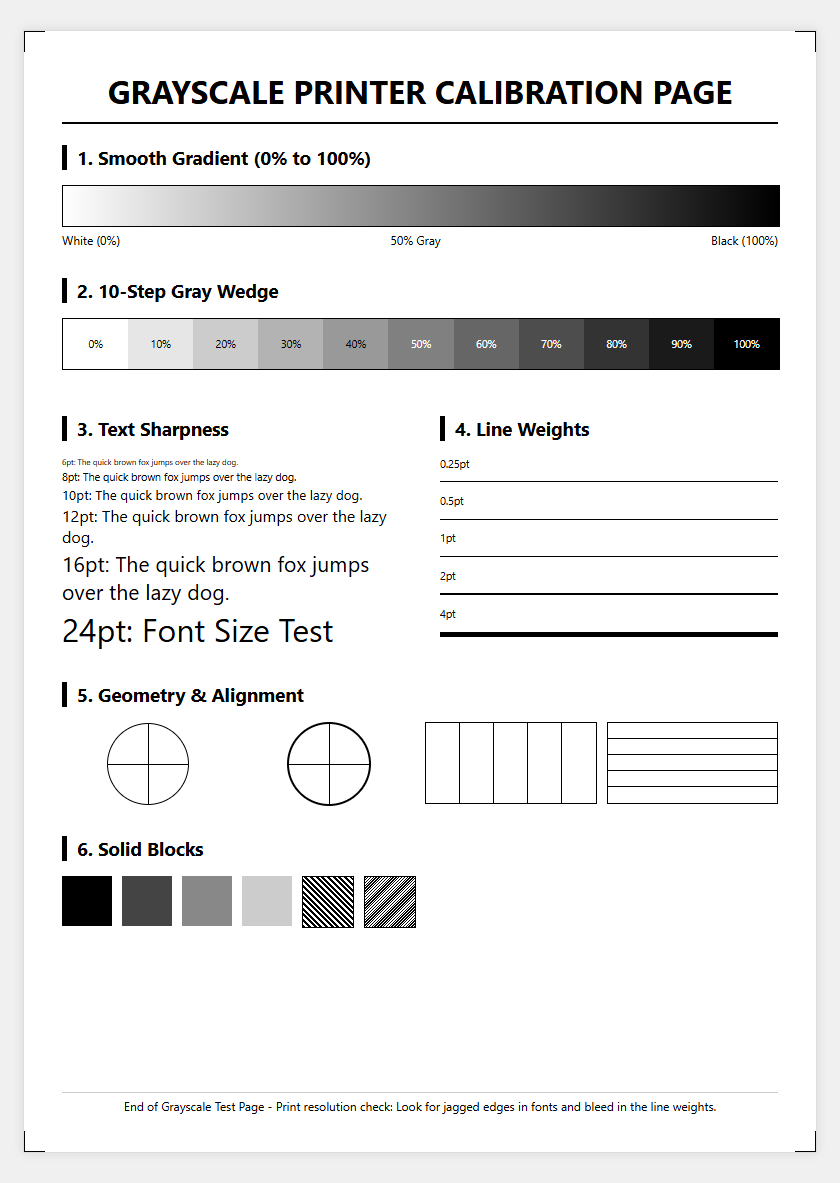
Beyond basic functionality, the Windows test page helps in fine-tuning the output quality for professional-grade results. Output quality is dictated by the resolution, measured in Dots Per Inch (DPI), and the halftoning algorithms used to simulate shades. Users can adjust these variables within the "Printing Preferences" menu. By selecting "High Quality" or "Fine" modes, the Windows spooler sends higher-density data packets, which the printer translates into smaller, more precise ink droplets or toner particles. This is essential when the test page reveals "banding" or pixelation in text characters.
To optimize output, consider the following settings:
- Media Type: Match the software setting to the actual paper weight (e.g., Cardstock, Bond, or Photo).
- Dithering Patterns: Use "Error Diffusion" for photos or "Ordered Dithering" for text-heavy documents.
- Toner Save Mode: Ensure this is disabled during testing to gauge the full saturation capabilities of the hardware.
- Resolution Scaling: Set the output to the hardware's native resolution (e.g., 1200x1200dpi) to avoid interpolation artifacts.
Refining these parameters ensures that the final production prints match the clarity and color fidelity established during the diagnostic test page phase.
Routine Maintenance For Desktop Printers
Maintaining a printer in peak condition requires a proactive approach to both hardware and software hygiene. A periodic Windows Printer Test Page acts as an early warning system, identifying issues before they lead to catastrophic hardware failure or expensive consumable waste. Over time, dust and paper fibers can accumulate on optical sensors and rollers, while stagnant ink can clog microscopic nozzles. Regular maintenance routines extend the MTBF (Mean Time Between Failures) and ensure the device is always ready for high-priority tasks.
- Printhead Cleaning: Run the software-based cleaning cycle if the test page shows missing lines in the color blocks.
- Firmware Updates: Periodically check the manufacturer's site to patch security vulnerabilities and improve spooler compatibility.
- Environment Control: Keep printers in low-humidity environments to prevent paper curling and toner clumping.
- Spooler Purging: Clear the
C:\Windows\System32\spool\PRINTERSfolder occasionally to remove "stuck" temporary files.
By integrating these maintenance steps with regular test page analysis, you create a stable printing environment that minimizes downtime and maximizes the longevity of your imaging investment.

Comments