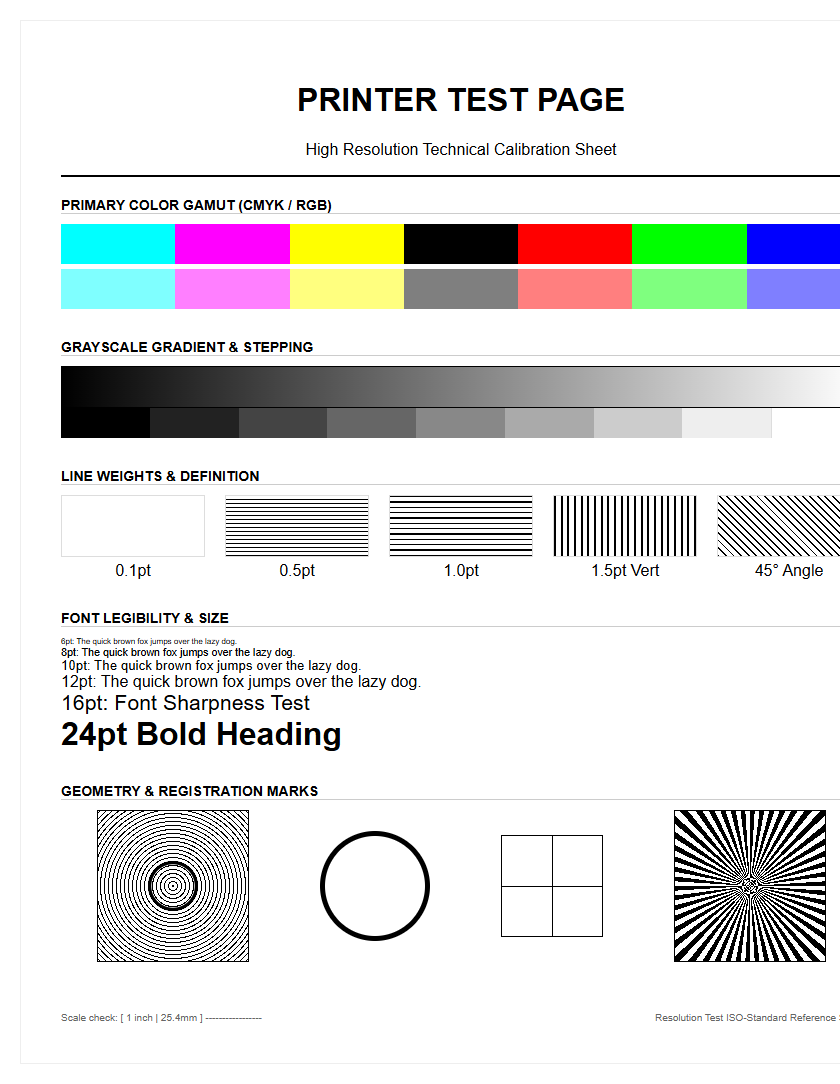
Resolution printer test pages are essential diagnostic tools for fine-tuning your hardware's performance and ensuring technical precision. By utilizing specialized patterns, you can accurately calibrate the DPI (dots per inch) to achieve optimal pixel density across various substrates. These sheets help evaluate line clarity and edge definition, revealing critical issues such as ink bleeding or nozzle misalignment. Assessing output sharpness through radial lines and micro-text ensures your device renders vector graphics and high-frequency details without distortion. Regular use of these benchmarks allows for precise adjustments in dithering algorithms and halftoning, resulting in smooth gradients and professional-grade reproduction quality.
Printer Resolution Standards Explained
Understanding printer resolution requires a grasp of Dots Per Inch (DPI) and how it dictates the spatial frequency of a printed image. While consumer-grade inkjet printers often boast optimized resolutions of up to 4800 x 1200 DPI, the hardware's native resolution is the true indicator of mechanical precision. This involves the physical placement of ink droplets or toner particles on a substrate. When analyzing a resolution printer test page, technical benchmarks are used to differentiate between addressable resolution and visual sharpness.
- Native Resolution: The actual mechanical capability of the print head.
- Optimized Resolution: Software-enhanced interpolation to smooth jagged edges.
- Bit Depth: The amount of color information processed per pixel, impacting tonal range.
- Halftoning: The technique of simulating continuous tones through varying dot sizes.
Higher resolution standards allow for finer dithering patterns, which reduce the visibility of individual dots to the naked eye. This is essential for professional photography and high-precision schematic printing where every picoliter of ink must be accurately placed to maintain geometric fidelity across the document layout.
Interpreting Sharpness Pattern Results
Sharpness patterns on a test page typically feature radial lines, often referred to as Siemens stars, and converging line pairs. These elements are designed to push the printer's imaging engine to its limits. When inspecting these patterns, you should look for the point where the lines blur together, known as the "limiting resolution." If the center of the Siemens star appears as a solid gray blob rather than distinct lines, the hardware has reached its maximum frequency response.
- Examine the convergence point for any signs of moiré patterns or aliasing.
- Identify the specific line-pair-per-millimeter (lp/mm) value where individual strokes remain distinct.
- Check for "filling in," where the ink spreads too far into the white space between lines.
Edge acuity is another critical factor. Sharpness is measured by the transition density between a dark line and the light background. A high-quality print will show a steep contrast curve with minimal feathering. If the lines appear fuzzy or exhibit a "stair-stepping" effect, the printer's raster image processor (RIP) may be struggling with high-frequency data or the paper's absorption rate is too high for the current DPI setting.
Evaluating DPI Accuracy Levels
DPI accuracy is not merely about the number of dots, but the consistency of their placement across the X and Y axes. A resolution test page utilizes grids and high-density blocks to reveal variances in droplet trajectory. If the DPI is inconsistent, images will lose dimensional accuracy, which is catastrophic for technical drawings or architectural blueprints. The following table highlights common DPI benchmarks and their intended applications in professional environments.
| DPI Level | Application Type | Visual Characteristic |
|---|---|---|
| 300 DPI | Standard Text | Clear legible fonts, visible grain in gradients. |
| 600 DPI | Business Graphics | Sharp edges, minimal dithering artifacts. |
| 1200+ DPI | High-End Photo | Continuous tone appearance, microscopic detail. |
Evaluating these levels involves using a magnifying loupe to check for "dot gain," which occurs when ink expands upon contact with the fibers. Effective DPI is often lower than the theoretical maximum due to substrate interactions. Therefore, testing helps in selecting the correct ICC profile to compensate for these physical variables.
Fine Detail Clarity Testing
Fine detail testing focuses on the printer's ability to render microscopic elements without losing structural integrity. This section of a test page often includes intricate map segments, topographical lines, or complex geometric shapes. The goal is to observe the "inter-line spacing" and ensure that the printer can maintain a "1-pixel line" thickness without breakage or skipping. Factors like the "picoliter size" of the ink drops play a massive role here; smaller drops allow for tighter clusters and more nuanced detail.
- Acutance: The subjective perception of sharpness based on edge contrast.
- Resolution Limit: The maximum frequency of detail the system can reproduce.
- Anti-aliasing: How the printer handles diagonal lines to prevent "jaggies."
When clarity is low, fine details appear muddy, and textures lose their tactile visual quality. This is often a result of incorrect print head voltage or a mismatch between the printer's resolution and the file's source resolution. Running these tests ensures that the hardware can resolve the specific spatial frequencies required for high-fidelity output.
Print Head Precision Calibration
Print head calibration is the mechanical synchronization of the nozzles to ensure they fire at the exact micro-second required during the carriage sweep. On a resolution test page, this is checked through vertical and horizontal alignment blocks. If the calibration is off, you will notice "color fringing" or a lack of sharpness where different ink channels overlap. The calibration process compensates for the physical distance between the print head and the paper surface.
- Print the alignment pattern and identify the box with the least amount of visible banding.
- Input the corresponding numerical value into the printer's firmware utility.
- Perform a bi-directional test to ensure the head fires accurately in both directions of travel.
Precision is also affected by the "media advance" mechanism. If the paper moves too far or not far enough between passes, the resolution is compromised by white lines or dark overlaps. Regular calibration mitigates these mechanical tolerances, ensuring that the DPI remains uniform across the entire length of the print, which is vital for large-format rendering.
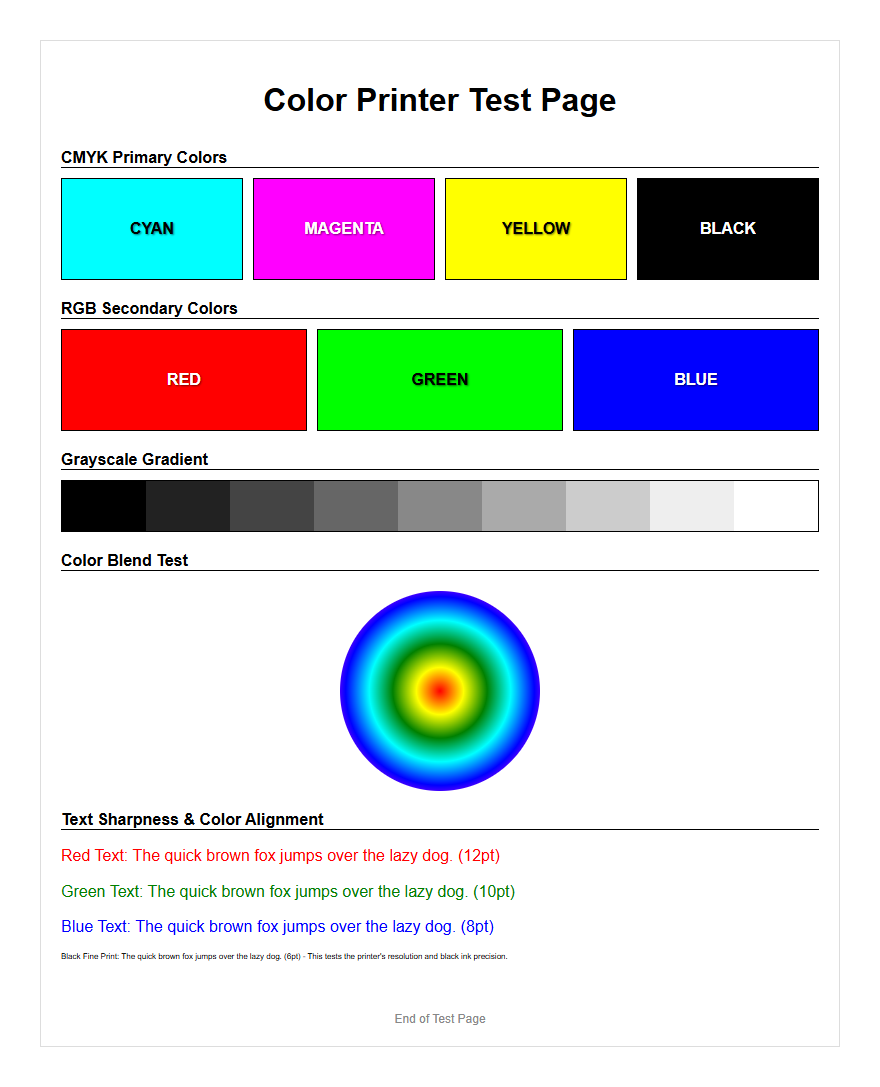
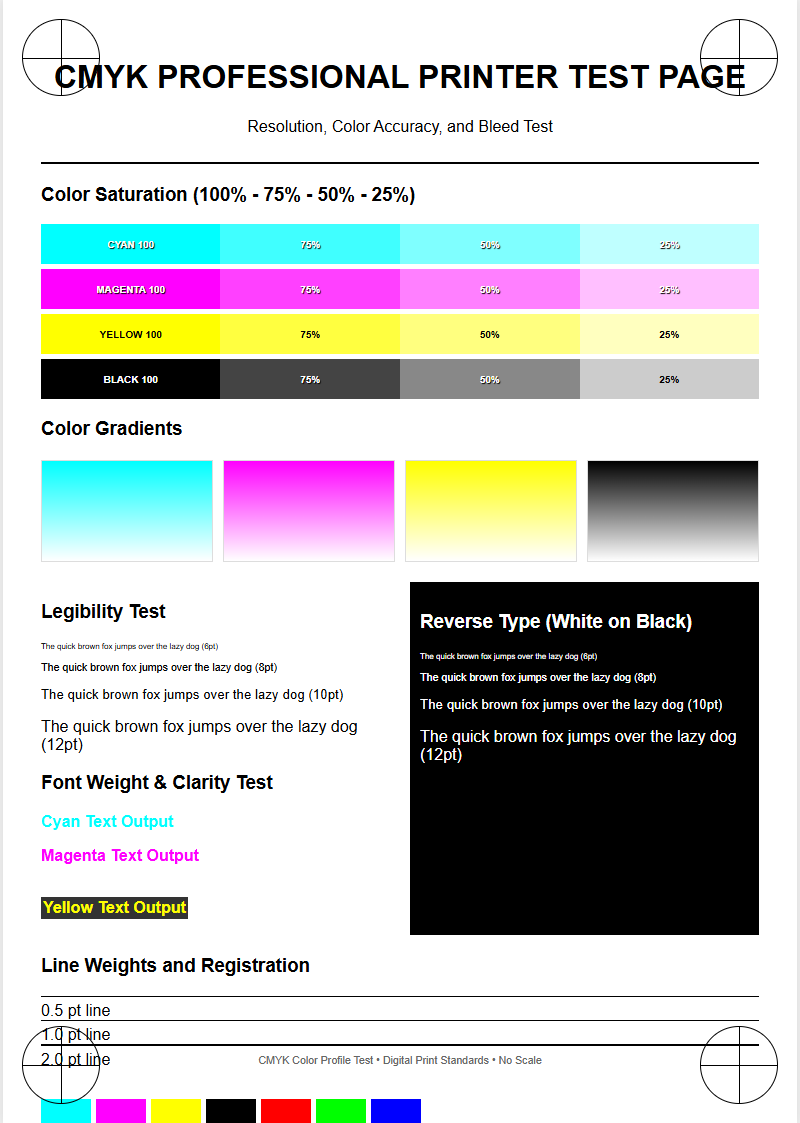
Color Gradient Transition Analysis
Resolution is not strictly about lines; it also concerns the smoothness of color transitions. A test page includes gradient ramps from 0% to 100% saturation for each primary color (CMYK). Analyzing these ramps helps identify "posterization," where smooth gradients are broken into distinct steps or bands. This issue typically arises from insufficient bit depth or a low-resolution halftoning algorithm that cannot effectively simulate the required density levels.
- Smoothness: The absence of visible steps in a color fade.
- Neutrality: The ability to produce a gray scale without color casts.
- Dithering: The arrangement of dots to create the illusion of various shades.
High-resolution printers utilize advanced error-diffusion dithering to hide the patterns. If the test page shows "mottling" or uneven patches in the gradients, it may indicate a clog in specific nozzles or a need for a higher quality paper coating. Fine-tuning the gradient output is essential for achieving photographic realism and professional-grade marketing materials where brand colors must be perfectly represented across a wide tonal range.
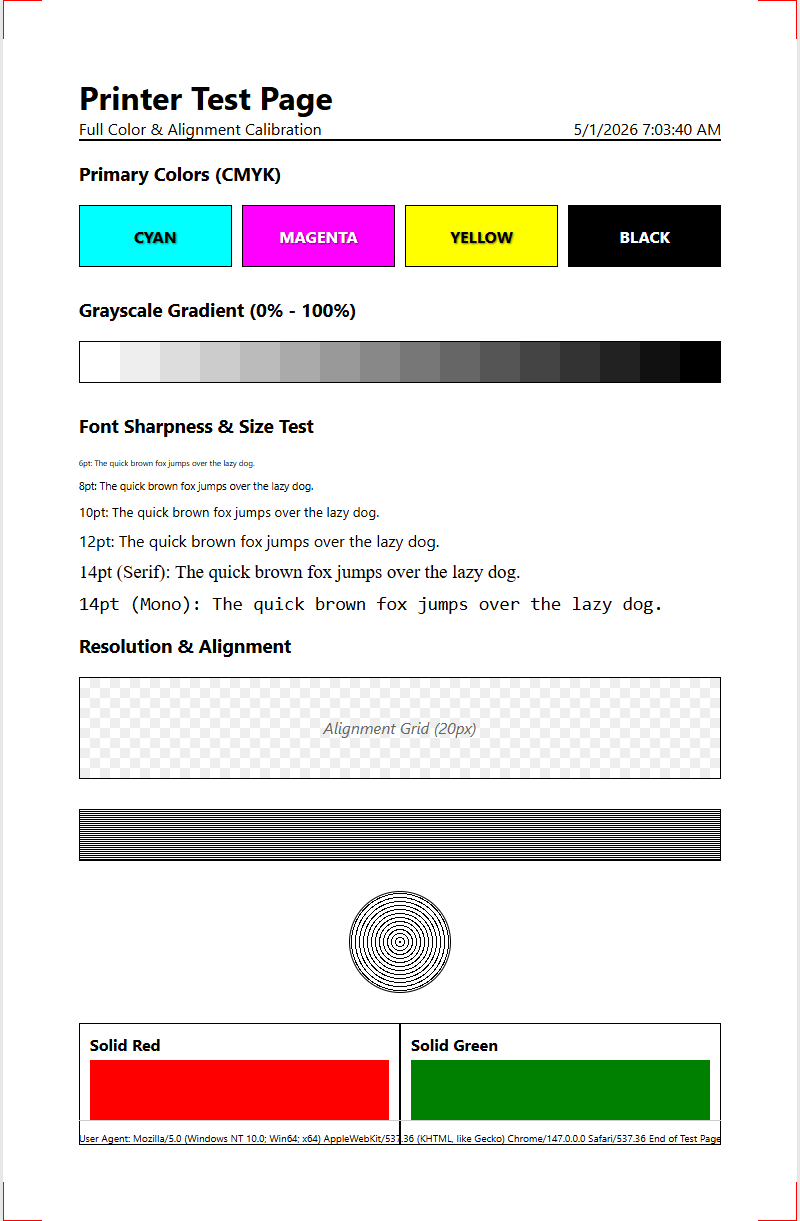
Identifying Horizontal Banding Issues
Horizontal banding is a common resolution-killing artifact characterized by repeating lines across the width of the page. This is usually caused by mechanical inconsistencies in the paper feed or electronic timing errors in the print head firing sequence. A dedicated resolution test page will have large blocks of solid color to make these streaks obvious. By measuring the distance between bands, technicians can pinpoint whether the issue lies with a specific roller or the print head itself.
| Banding Type | Probable Cause | Remedy |
|---|---|---|
| White Lines | Clogged Nozzle | Run cleaning cycle |
| Dark Overlap | Feed Calibration | Adjust paper advance |
| Regular Intervals | Roller Defect | Inspect hardware gears |
Consistent banding degrades the effective resolution by interrupting the continuous flow of the image. For inkjet systems, this often relates to "nozzle deflection," where ink is sprayed at an angle. For laser printers, it may involve a failing drum or a dirty corona wire. Resolving these issues is paramount for maintaining the clarity required for fine-line graphics.
Microtext Legibility Verification
Microtext verification is the ultimate test of a printer's resolution and dot placement accuracy. Test pages often feature font strings ranging from 6pt down to 1pt. At very high resolutions, even 1pt text should remain legible under magnification. This test reveals the "bleeding" characteristics of the ink and the precision of the laser's spot size. If the ink wicks too far into the paper, the small counters in letters like 'e' or 'a' will close up, rendering the text unreadable.
- Font Definition: The clarity of serifs and thin strokes in typography.
- Ink Spread: The lateral movement of ink on the substrate.
- Vibrancy: Maintaining high contrast even at a microscopic scale.
This metric is especially important for security printing, such as IDs or official documents, where micro-printing is used as an anti-counterfeit measure. If a printer fails the microtext legibility test, it indicates that the current resolution settings or substrate combinations are insufficient for high-detail vector work, necessitating a shift to coated media or higher DPI output modes.
Inkjet Nozzle Performance Checks
For inkjet systems, resolution is entirely dependent on the health of the individual nozzles. A nozzle check pattern consists of a series of short, staggered lines for each color channel. A missing line indicates a "dropped" nozzle, while a misplaced line indicates a "deflected" nozzle. Both scenarios result in a loss of resolution, as the intended DPI cannot be achieved if certain "pixels" are missing from the physical print. This is often caused by dried ink or air bubbles in the delivery system.
- Print the nozzle check pattern to identify dead zones.
- Execute a head cleaning cycle to purge air and debris.
- Re-test to ensure all piezoelectric or thermal actuators are firing correctly.
Modern print heads contain thousands of nozzles, and even a 1% failure rate can significantly impact the "apparent resolution" of the final product. Regular nozzle checks prevent the accumulation of clogs, ensuring that the printer maintains its maximum theoretical DPI. This maintenance is the foundation of consistent, high-resolution output for any professional-grade inkjet device.
Maintaining Professional Output Quality
Sustaining high-resolution output requires a holistic approach to printer maintenance and environment control. Humidity and temperature can drastically affect how toner adheres or how ink dries, directly impacting the final DPI. Furthermore, the choice of "substrate"-whether it is bond paper, glossy photo media, or vellum-dictates the maximum achievable resolution. Using a resolution printer test page regularly allows users to monitor "drift" in quality over time and make necessary adjustments to the firmware or physical hardware.
- Media Profiles: Use specific ICC profiles for different paper types.
- Firmware Updates: Ensure the RIP software is optimized for the latest OS.
- Environmental Control: Keep the printer in a dust-free, climate-controlled space.
- Original Consumables: Use manufacturer-spec inks or toners to avoid viscosity issues.
By systematically evaluating each aspect of the test page-from microtext to color gradients-technicians can ensure the printer operates at its peak performance. This proactive testing strategy minimizes waste and guarantees that every document meets the high-resolution standards required for professional excellence and technical precision.


Comments