Ensure your hardware delivers peak performance with a High-Resolution Printer Test Page, an essential diagnostic tool for professional output. This comprehensive utility evaluates CMYK color accuracy by testing the primary ink channels-Cyan, Magenta, Yellow, and Key-to ensure precise gamut reproduction and tonal consistency. By performing a dedicated nozzle check, users can instantly identify clogged jets or horizontal banding issues that compromise clarity. Furthermore, the page incorporates intricate calibration patterns to verify print head alignment and mechanical registration, ensuring pixel-perfect precision. Regularly utilizing these diagnostic grids facilitates proactive maintenance and guarantees high-definition results through systematic hardware optimization and color profiling.
Understanding Printer Diagnostic Patterns
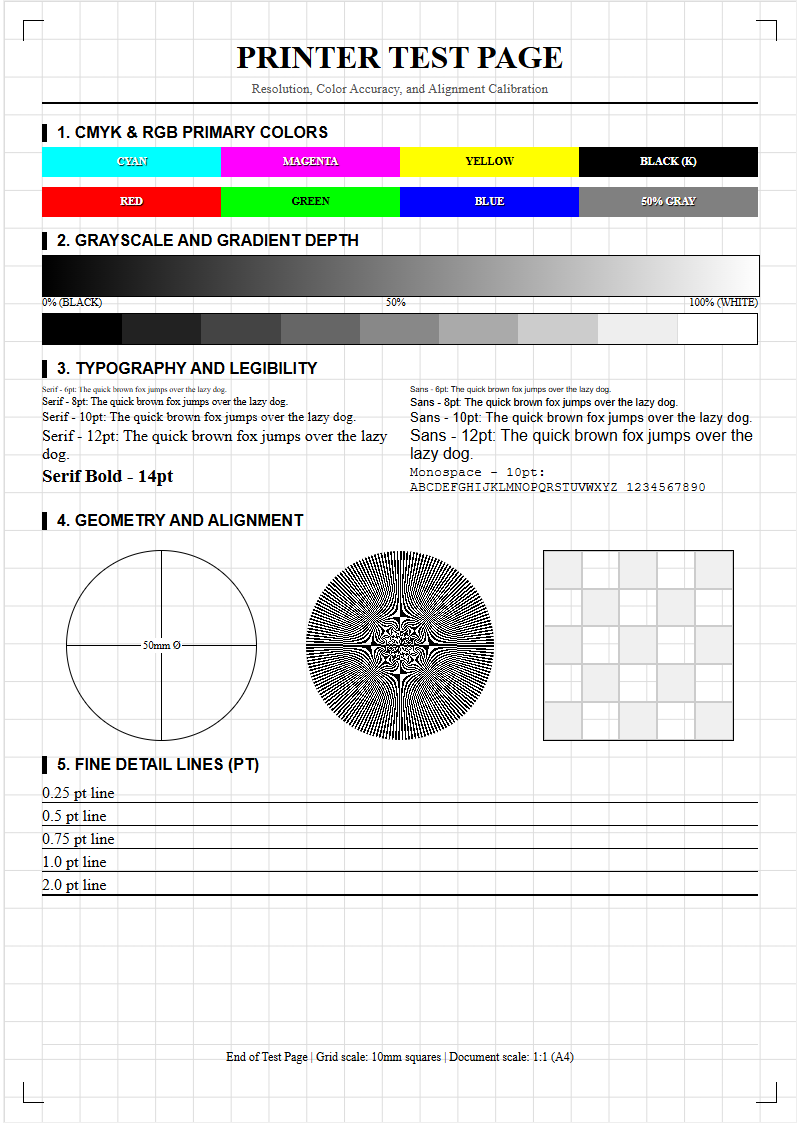
Diagnostic patterns serve as the primary communication tool between the hardware's internal logic and the user. These patterns usually consist of intricate grids, solid color blocks, and fine lines designed to highlight specific mechanical or electronic discrepancies. When you initiate a quality test, the printer generates these symbols to reveal the health of the print head, the precision of the paper feed assembly, and the status of the ink delivery system. A standard test sheet often features a "Nozzle Check" pattern, which displays a series of diagonal or stepped lines for every individual color channel.
Interpreting these patterns requires a keen eye for detail. For instance, a grid that appears wavy or disjointed suggests a mechanical alignment issue, whereas missing segments in a line indicate localized nozzle failures. By analyzing these visual markers, you can differentiate between software-driven errors and physical hardware degradation. Common patterns included in high-quality test pages are:
- Nozzle Grids: To identify blocked or malfunctioning ink emitters.
- Radial Siemens Stars: To test the resolution and sharpness of the printer's output.
- Gradient Ramps: To evaluate the smoothness of color transitions and dithering algorithms.
Inkjet Color Accuracy Calibration
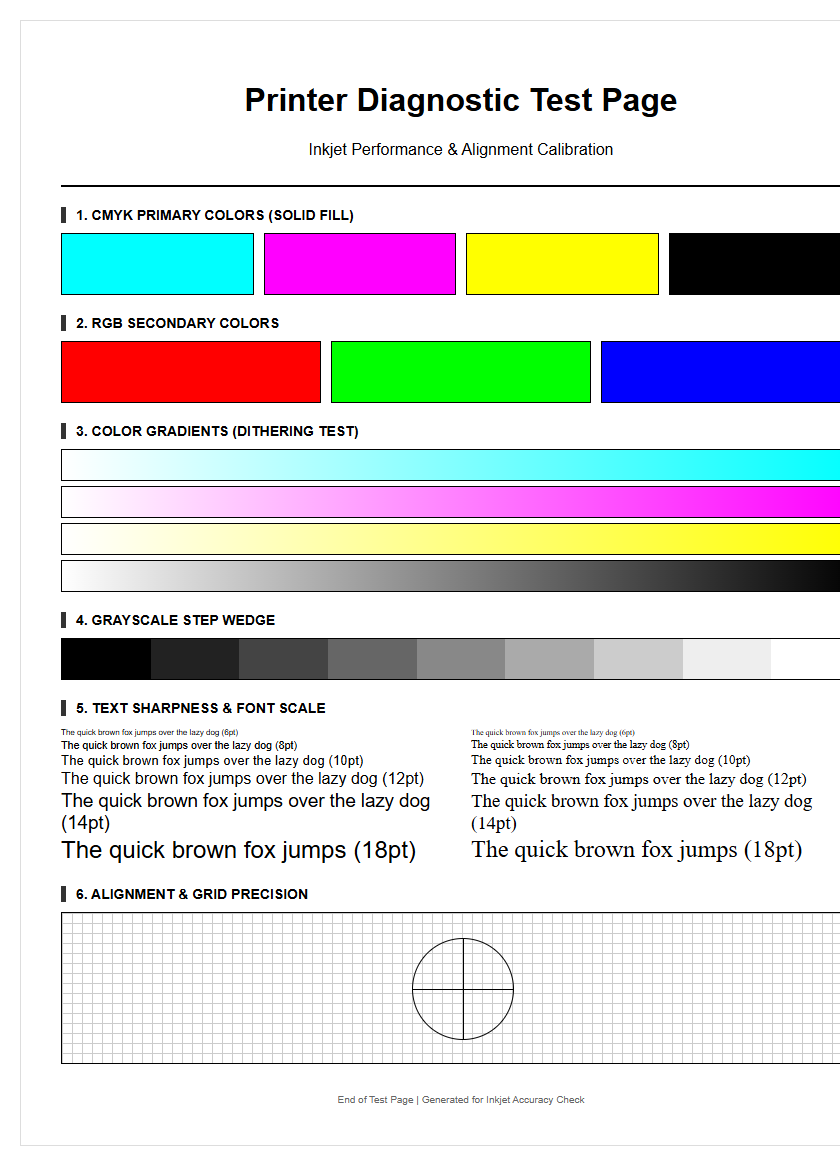
Achieving professional-grade color output requires precise synchronization between the digital file's color space and the printer's physical ink application. Inkjet printers utilize ICC (International Color Consortium) profiles to map digital values to physical droplets. Color accuracy calibration involves printing a series of standardized color swatches and comparing them against a reference target. This process ensures that the Cyan, Magenta, Yellow, and Black (CMYK) inks are blending correctly to reproduce the intended hue, saturation, and brightness levels.
Environmental factors, such as humidity and paper type, significantly impact how ink absorbs into the substrate, potentially shifting the color gamut. During calibration, the printer adjusts its internal lookup tables to compensate for these variables. If the calibration is off, you may notice a "color cast," where the entire image appears too warm or too cool. Utilizing a quality test page allows users to verify that the primary and secondary colors are vibrant and true to the source material. Frequent calibration is essential for workflows involving photography or graphic design, where color fidelity is non-negotiable for professional results.
Identifying Print Head Clogs
One of the most persistent issues in inkjet technology is the clogging of the print head nozzles. These clogs occur when ink dries within the microscopic orifices, often due to inactivity or exposure to air. A quality test page is the most effective tool for identifying the specific location of a clog. By examining the nozzle check section, users can see exactly which color channel is underperforming. If a specific color block shows horizontal white lines, it is a definitive sign of "banding," caused by restricted ink flow in that particular set of nozzles.
There are two primary types of clogs: surface-level dried ink and internal air bubbles. Thermal inkjet heads and piezoelectric heads react differently to these obstructions, but the diagnostic result is the same-missing data on the page. Regular testing prevents the ink from curing inside the delivery system, which can eventually lead to permanent hardware damage. If the test page reveals significant gaps, users should initiate a "Cleaning Cycle" or a "Power Flush" to force fresh ink through the channels and clear the obstruction. Consistently clear test pages are the hallmark of a well-maintained ink delivery system.
Laser Printer Grayscale Resolution
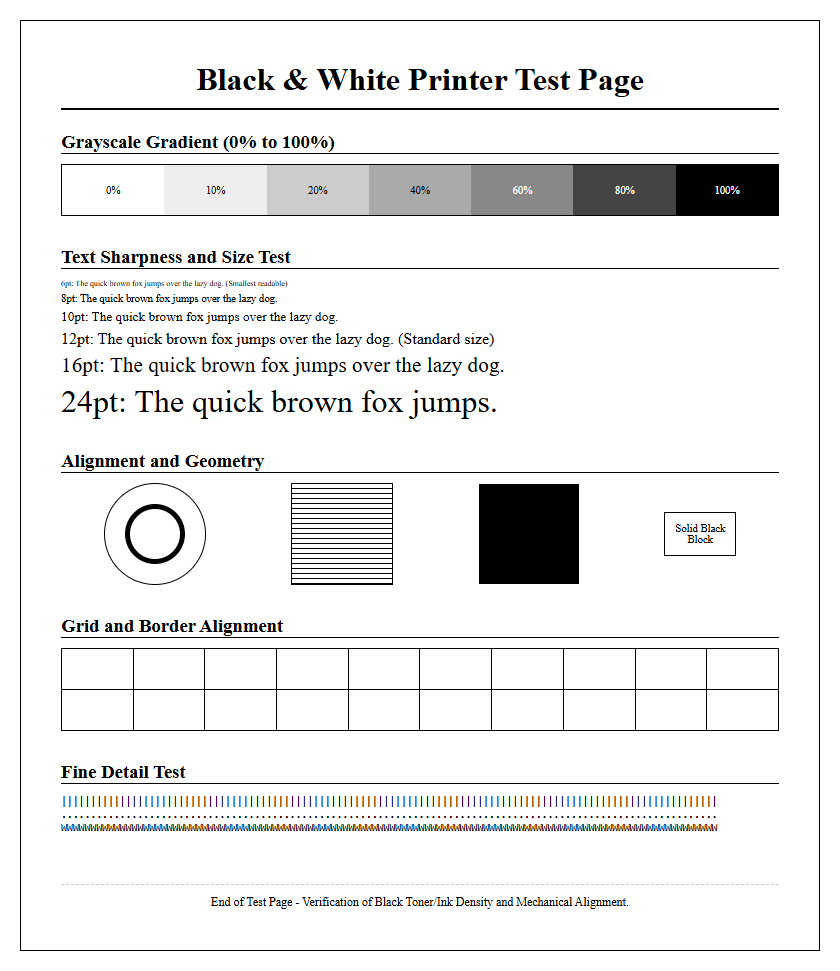
Laser printers handle image reproduction differently than inkjets, utilizing an electrostatic process to apply toner. When testing a laser printer, the grayscale resolution test is critical for evaluating the performance of the drum unit and the laser scanning assembly. This test uses "halftoning" or "dithering" to create the illusion of various shades of gray using only black toner dots. A high-quality diagnostic page will feature a series of gray scales ranging from 0% (pure white) to 100% (solid black) in incremental steps.
If the grayscale bars appear grainy or display uneven density, it may indicate a failing developer unit or a worn-out organic photo-conductor (OPC) drum. Laser printers must maintain a consistent charge to ensure toner adheres correctly to the paper. Issues such as "backgrounding"-where a light gray haze appears in non-printed areas-can also be spotted through these resolution tests. By checking the sharpness of fine text and the smoothness of gray gradients, users can determine if the fuser is reaching the correct temperature to bond the toner effectively or if the laser optics require cleaning.
Common Print Quality Issues
Print quality issues can range from minor annoyances to total hardware failure. A diagnostic page acts as a map to locate the source of these problems. Common symptoms include ghosting, smearing, and spotting, each pointing to a different internal component. For example, "ghosting" occurs when a faint image of previously printed content repeats further down the page, typically indicating a problem with the laser printer's fuser or the drum's discharge lamp. Conversely, smearing in an inkjet printer usually suggests that the ink is not drying fast enough or the media settings are incorrect.
| Symptom | Possible Cause | Component to Inspect |
|---|---|---|
| White Gaps | Clogged Nozzles | Print Head |
| Blurry Text | Misalignment | Encoder Strip / Carriage |
| Speckled Background | Toner Leakage | Cartridge / Waste Bin |
| Faded Output | Low Ink/Toner | Consumables |
By systematically running a test page, users can isolate whether the issue is related to the consumables, the mechanical paper path, or the electronic image processing unit. This targeted approach saves time and prevents the unnecessary replacement of functional parts.
CMYK Color Spectrum Verification
The CMYK color model is the foundation of digital printing, relying on the subtractive properties of ink to create a full spectrum of colors. Verification of this spectrum involves printing overlapping circles or bars of Cyan, Magenta, and Yellow to ensure the "overprint" colors-Green, Red, and Blue-are rendered correctly. A quality test page will also include a "Rich Black" test, which combines all four inks to create a deeper, darker black than what black ink alone can achieve. This is a vital check for high-end graphic production.
If the verification shows that the secondary colors are muddy or shifted, it indicates an imbalance in the ink flow or an incorrect driver setting. Technicians use these spectrum tests to check for "ink density," ensuring that the printer is laying down the appropriate volume of liquid. Too much ink can cause "cockling" (paper wrinkling), while too little ink leads to "desaturation." A successful CMYK spectrum test confirms that the printer is capable of reproducing the full range of colors required for complex imagery and branding materials.
Troubleshooting Vertical Streaks
Vertical streaks are among the most common visual defects in both inkjet and laser printing, often appearing as continuous lines running from the top to the bottom of the page. In laser printers, these streaks are frequently caused by a scratched OPC drum or a dirty "primary charge roller" (PCR). A single scratch on the drum will manifest as a recurring black or colored line in every print. In inkjet systems, vertical streaks might be the result of a "deflected" nozzle, where the ink is being fired at an angle rather than straight down, or debris caught on the print head carriage.
To troubleshoot, examine the diagnostic page to see if the streak is a specific color or affects all colors. A streak that appears across all colors in a laser printer usually points to a fuser issue or a dirty scanner glass if the source was a scan. In inkjet models, streaks can sometimes be resolved by cleaning the "encoder strip," a clear plastic band that helps the print head keep track of its position. If the streak is white (missing ink), it is likely a blocked nozzle or an obstruction in the paper path. Regular maintenance and visual inspections can prevent these streaks from ruining professional documents.
Paper Alignment And Margin Checks
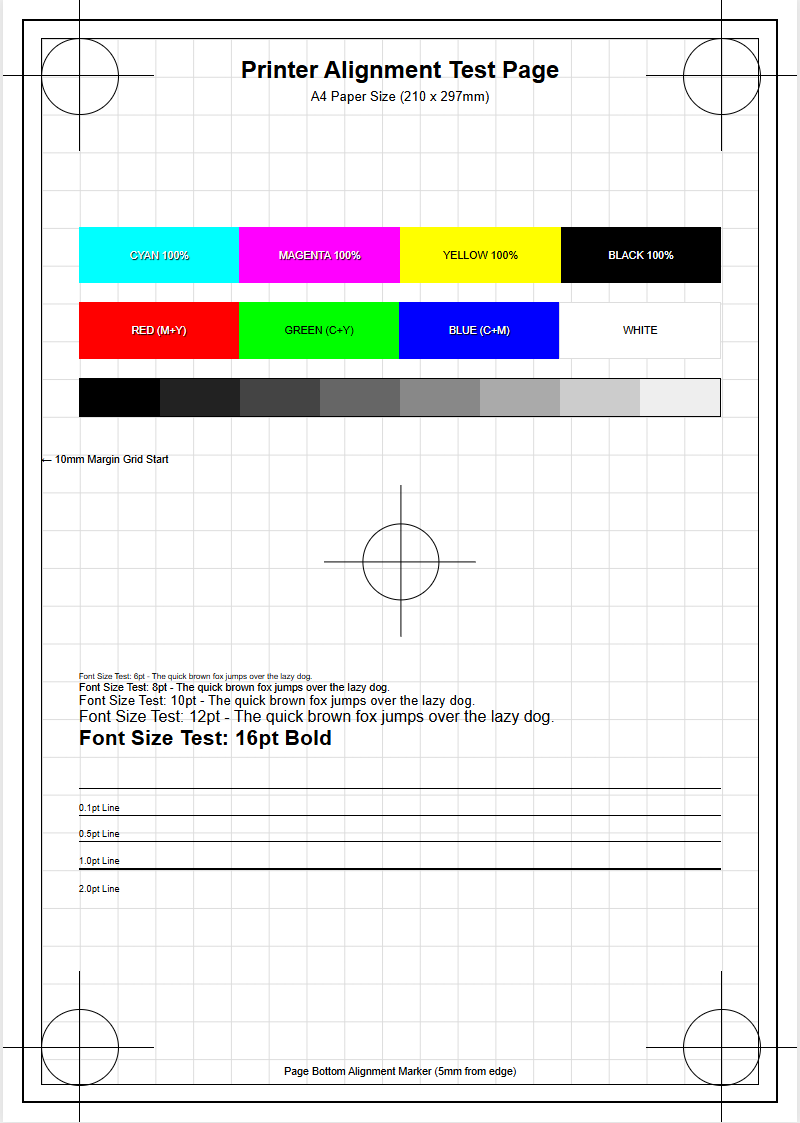
Precise paper handling is essential for professional documents, especially when printing double-sided (duplex) or creating brochures that require specific folds. A quality printer test page includes "registration marks" or "alignment crosses" at the corners and center of the sheet. These marks allow users to verify that the image is perfectly centered and that the margins are consistent on all sides. If the alignment marks are tilted, it indicates a "skew" issue, where the paper is being pulled into the printer at an uneven angle.
Skew is often caused by worn-out "pickup rollers" or improperly adjusted paper guides in the tray. Furthermore, margin checks ensure that the printer's "lead edge" and "trailing edge" sensors are functioning correctly. If the printer starts the image too early or too late, parts of the text may be cut off. For inkjet printers, alignment also refers to the "bidirectional" calibration-ensuring the print head fires accurately while moving both left and right. Using a test page to calibrate these mechanical tolerances ensures that every print is crisp, square, and professional, avoiding the amateur look of crooked or off-center content.
Maintenance Through Periodic Testing
Preventive maintenance is the key to extending the lifespan of any printing device. Periodic testing is a core component of this strategy, acting as a "health check" for the machine's internal components. For inkjet users, printing a test page at least once a week is vital to keep the ink flowing and prevent the print head from drying out. This is particularly important for printers using pigment-based inks, which are more prone to settling and clogging than dye-based alternatives. A simple test page consumes a negligible amount of ink but can save hundreds of dollars in repair costs.
For laser printers, periodic testing helps monitor the wear and tear of the drum, fuser, and rollers. Laser components have specific "duty cycles," and a test page can reveal when these parts are nearing the end of their functional life before they fail during a critical job. Additionally, these tests provide an opportunity to update firmware or recalibrate sensors that may have drifted over time. By incorporating a standard quality test into your routine, you ensure that the hardware remains in peak condition, providing consistent, high-quality results for every document you produce.
Deciphering Diagnostic Print Results
The final step in the testing process is deciphering the data provided by the diagnostic sheet. Beyond just visual patterns, many test pages include technical metadata such as page counts, firmware versions, and error logs. Analyzing this information allows you to perform a comprehensive "system audit." For example, a high "misfeed count" in the error log suggests that the rollers need cleaning or replacement, even if the current test page looks acceptable. The visual "density blocks" on the page should be compared against a known good sample to check for fading.
If the diagnostic results show persistent errors despite cleaning, it may indicate a deeper electronic issue, such as a failing "formatter board" or a communication error between the print head and the logic board. Professional technicians use these results to determine the "Delta-E" (the difference between the intended color and the printed color) to fine-tune the output. Ultimately, the ability to read and act upon these results transforms the test page from a simple piece of paper into a powerful diagnostic tool. Understanding these nuances ensures that you can troubleshoot issues effectively, maintain high standards of quality, and maximize the efficiency of your printing infrastructure.


Comments