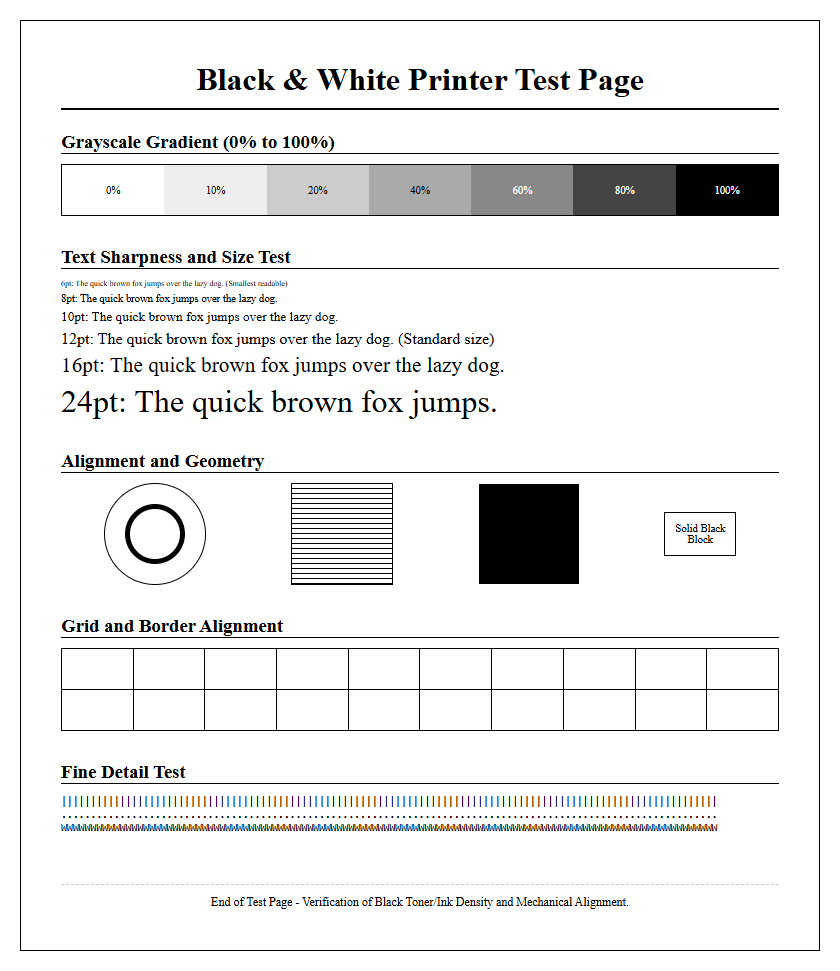
A Black and White Printer Test Page is an essential diagnostic tool for verifying monochrome output quality and hardware precision. By utilizing standardized grayscale ramps, you can accurately evaluate your device's tonal range, ensuring smooth transitions between black and white without visible banding. This process highlights issues with dither patterns and halftone density, which are critical for high-contrast documentation. Additionally, the test file assists in print head calibration, allowing you to identify misaligned nozzles or clogged jets that degrade DPI resolution. Regular testing maintains optimal contrast ratios and text sharpness, ensuring your printer delivers consistent, professional-grade results through precise mechanical alignment.
Black and White Print Quality Assessment
Evaluating a black and white printer test page involves analyzing the spatial frequency and bit depth of the output. High-quality monochrome output requires a precise Dots Per Inch (DPI) setting that ensures sharp transitions between black pixels and the white substrate. When reviewing a test sheet, technicians look for dithering patterns that simulate shades of gray without visible graininess. A robust assessment focuses on the uniformity of solid black areas, ensuring there is no "mottling" or uneven saturation. By examining radial lines, such as a Siemens star, one can detect optical distortions or mechanical vibrations in the printing mechanism.
- Solid Black Density (Dmax) measurement
- Line Pair Per Millimeter (lp/mm) resolution check
- Halftone screen frequency consistency
- Dithering pattern uniformity
This evaluation determines if the laser scanner or inkjet nozzles are firing with micro-precision. The absence of moiré patterns in fine grids indicates that the printer's internal image processor is handling scaling algorithms correctly. Maintaining these standards ensures that technical diagrams and professional documents retain their structural integrity during high-volume production cycles.
Troubleshooting Common Monochrome Printer Problems
Monochrome printing often encounters issues related to the electrophotographic process or ink delivery systems. One prevalent issue is ghosting, where a faint image of previously printed content repeats down the page. This typically indicates a failure in the developer unit or a worn-out drum failing to discharge properly. Another common defect is light or faded prints, which can stem from a depleted toner cartridge, a dirty transfer roller, or an incorrect "Economy Mode" setting in the printer driver. Utilizing a test page helps isolate whether the problem is software-based or a hardware component failure.
| Symptom | Potential Component Failure |
|---|---|
| Ghosting | OPC Drum or Fuser Assembly |
| Faded Output | Transfer Roller or Low Toner |
| Solid Black Pages | Primary Charge Roller (PCR) |
| Repeated Spots | Drum Surface Damage |
Systematic troubleshooting requires checking the paper path for obstructions and ensuring the fuser reaches the necessary temperature for toner adhesion. If the output remains inconsistent, cleaning the laser scanner glass or checking the high-voltage power supply contact points may be necessary to restore professional-grade clarity.
Essential Grayscale Calibration Techniques
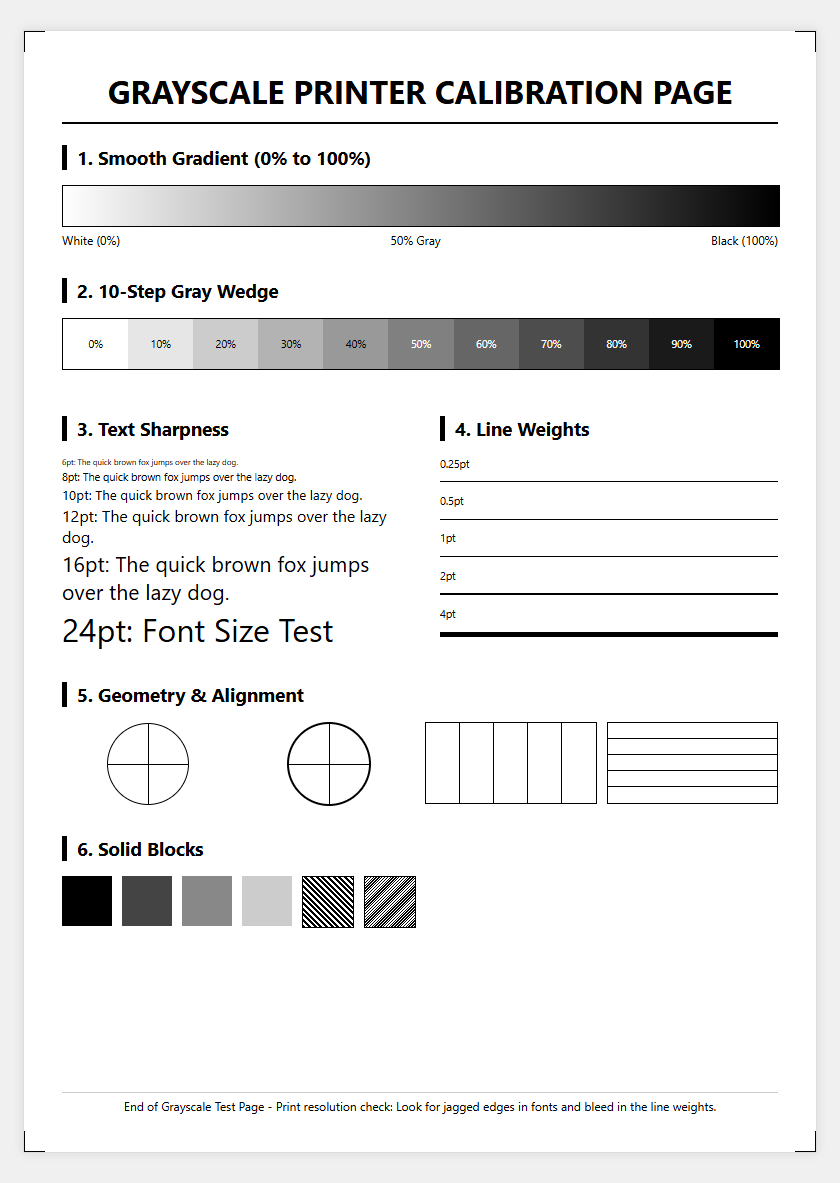
Grayscale calibration is vital for achieving a neutral tonal balance, ensuring that the transition from absolute black to pure white is linear. This process involves adjusting the gamma settings to compensate for "dot gain," where ink or toner spreads beyond its intended boundaries. A printer test page featuring a 256-level grayscale step wedge allows users to identify where clipping occurs in the shadows or highlights. Calibration ensures that mid-tones are not suppressed, which is essential for printing medical imaging, architectural blueprints, or monochromatic photography.
- Print a standardized grayscale ramp test sheet.
- Measure step increments with a densitometer if possible.
- Adjust the printer driver's halftone settings to correct non-linearities.
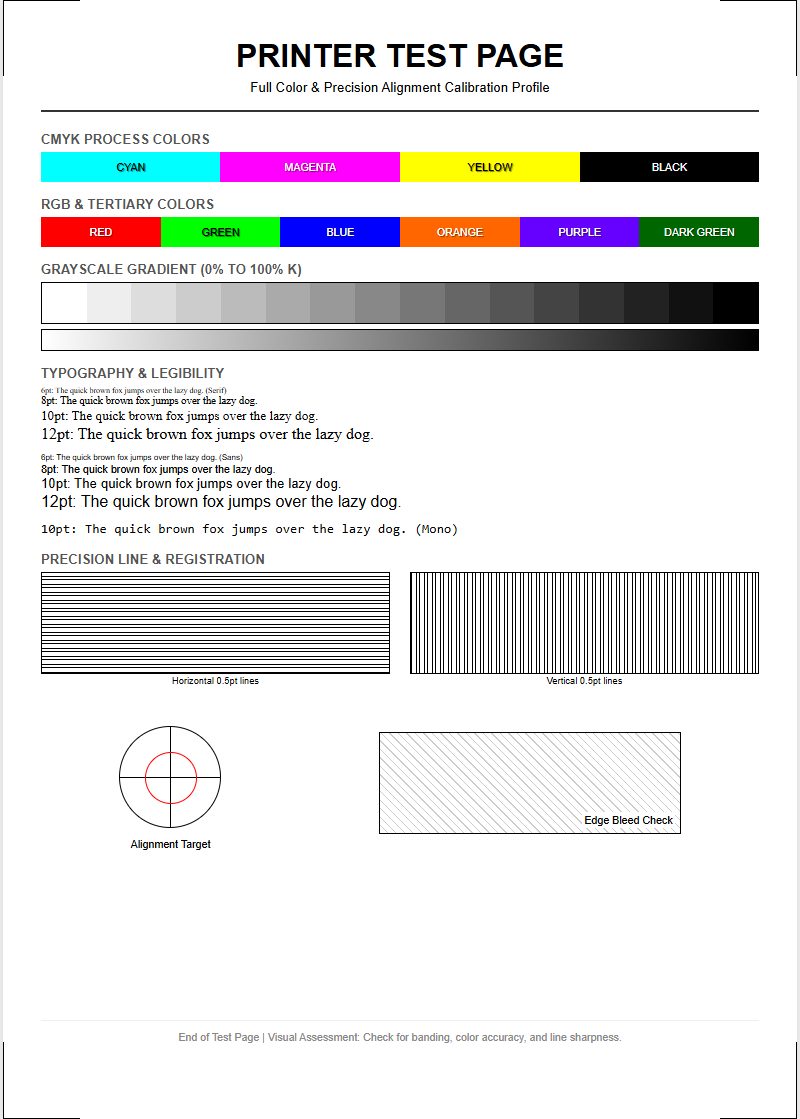
- Verify that "Composite Black" (using color inks) is disabled for true monochrome.
Properly calibrated monochrome printers produce consistent output across different media types. By fine-tuning the screening algorithm, users can minimize "banding" effects in large gradient areas. This technical refinement ensures that the subtle textures in a document are preserved, providing a professional aesthetic that matches the digital source file's intended luminosity levels.
Improving Text Sharpness and Font Clarity
Text sharpness is the primary metric for document readability, especially when dealing with small font sizes or intricate serif typefaces. Improving clarity involves optimizing the interaction between the print head and the media. In laser printers, this means ensuring the fuser assembly provides even heat and pressure to bond the toner. For inkjet systems, bidirectional alignment is crucial to prevent "fuzzy" edges caused by mistimed droplet placement. Sharpness is also influenced by the "Edge Enhancement" features in the printer's firmware, which sharpen the boundaries between the black text and white background.
To maximize font legibility, users should consider the following technical factors:
- Selection of high-quality, high-whiteness paper to increase contrast.
- Verification of the native resolution (DPI) of the source document.
- Disabling draft modes that reduce toner/ink saturation.
- Cleaning the print heads or corona wires to remove debris.
A printer test page often includes font samples ranging from 2pt to 12pt. Evaluating these samples under magnification reveals if there is excessive "bleeding" or if the "counters" (the holes in letters like 'e' or 'o') remain clear and well-defined.
Identifying Toner Coverage Discrepancies
Toner coverage discrepancies manifest as uneven darkness across a single page, often caused by an imbalanced distribution of the developer agent. In many cases, a "low toner" warning triggers this behavior, but mechanical issues such as a warped doctor blade can also cause horizontal streaks of varying density. A black and white printer test page with large solid blocks is the most effective tool for identifying these issues. If the left side of the page is significantly lighter than the right, the issue may lie with the laser scanner mirror or an unlevel toner hopper.
Technical indicators of coverage issues include:
- Vertical white lines indicating a physical blockage in the developer.
- Mottled textures suggesting poor electrostatic charge on the drum.
- "Tire tracks" on the page edges caused by fuser roller wear.
- Background "fogging" due to aged toner or high humidity.
Addressing these discrepancies usually requires redistributing the toner by gently shaking the cartridge or replacing the imaging drum. Ensuring that the printer environment is within the recommended temperature and humidity ranges can also stabilize toner flow and improve electrostatic transfer efficiency, resulting in a more uniform and deep black output.
Analyzing Gradients and Shadow Detail
Analyzing gradients on a black and white test page reveals the printer's ability to render complex lighting without stepping or contouring. This is particularly important for documents containing charts, 3D renderings, or photographs. A high-performing monochrome printer should demonstrate smooth transitions from 0% (white) to 100% (black). Shadow detail, specifically in the 80% to 95% gray range, is often the most difficult to maintain; printers with poor calibration often "crush" these blacks, resulting in a loss of detail in dark areas.
When reviewing a gradient test, look for the following characteristics:
- Linearity: Smooth transitions without visible "jumps" in tone.
- Banding: Absence of vertical or horizontal lines within the gradient.
- Dithering Quality: Fine-grained dots that are invisible to the naked eye.
- Black Point: The deepest possible black without "bronzing" or sheen.
Technical adjustments to the "Half-tone" or "Screening" settings in the printer properties can often resolve gradient issues. By selecting a higher LPI (Lines Per Inch) setting, the printer can produce finer details, though this sometimes requires a trade-off with printing speed and total toner consumption.
Resolving Vertical Streaks and Page Smudging
Vertical streaks and smudging are indicative of contamination within the internal paper path or physical damage to the imaging components. Streaks that run the entire length of the page are frequently caused by a scratched Organic Photo-Conductor (OPC) drum or a nicked wiper blade. Conversely, smudging that occurs only when the page is touched suggests that the fuser assembly is not reaching a high enough temperature to permanently melt the toner into the paper fibers. A test page helps determine the "repeat interval" of these marks, which can be cross-referenced with a manufacturer's chart to identify the faulty roller.
| Defect Type | Probable Cause | Resolution Path |
|---|---|---|
| Black Vertical Line | Scratched Drum | Replace Drum Unit |
| White Vertical Line | Blocked Laser/Nozzle | Clean Scanner/Printhead |
| Smudging | Fuser Failure | Replace Fuser Unit |
| Random Splatters | Waste Toner Leak | Empty/Replace Waste Box |
Regular maintenance, including the use of lint-free cloths and isopropyl alcohol on non-sensitive rollers, can prevent these issues. If smudging persists, verifying that the "Paper Type" setting in the driver matches the actual weight of the media is a necessary step, as thicker paper requires slower throughput for proper fuser heat absorption.
Maintaining High Contrast Document Output
High contrast is the hallmark of professional monochrome printing, defined by the stark difference between the deepest blacks and the brightest white of the paper. Maintaining this contrast requires high-quality consumables and precise electrostatic control. The "Optical Density" of the toner must be sufficient to block light completely. Over time, the Primary Charge Roller (PCR) can lose its ability to apply a uniform charge to the drum, leading to "grayed-out" blacks or a "muddy" background that reduces the overall contrast ratio.
To ensure high-contrast results, monitor these technical variables:
- Media Whiteness: Using paper with a high CIE Whiteness index.
- Toner Quality: Utilizing OEM or high-grade chemical toner.
- Voltage Settings: Adjusting transfer voltages for specific media thicknesses.
- Environmental Stability: Keeping the printer in a low-humidity area.
A test page featuring high-contrast geometric shapes can reveal "halo" effects or "overshoot" where the printer attempts to sharpen edges too aggressively. By balancing the density settings with the sharpening algorithms, users can achieve a crisp, punchy output that is ideal for text-heavy documents and high-impact reports.
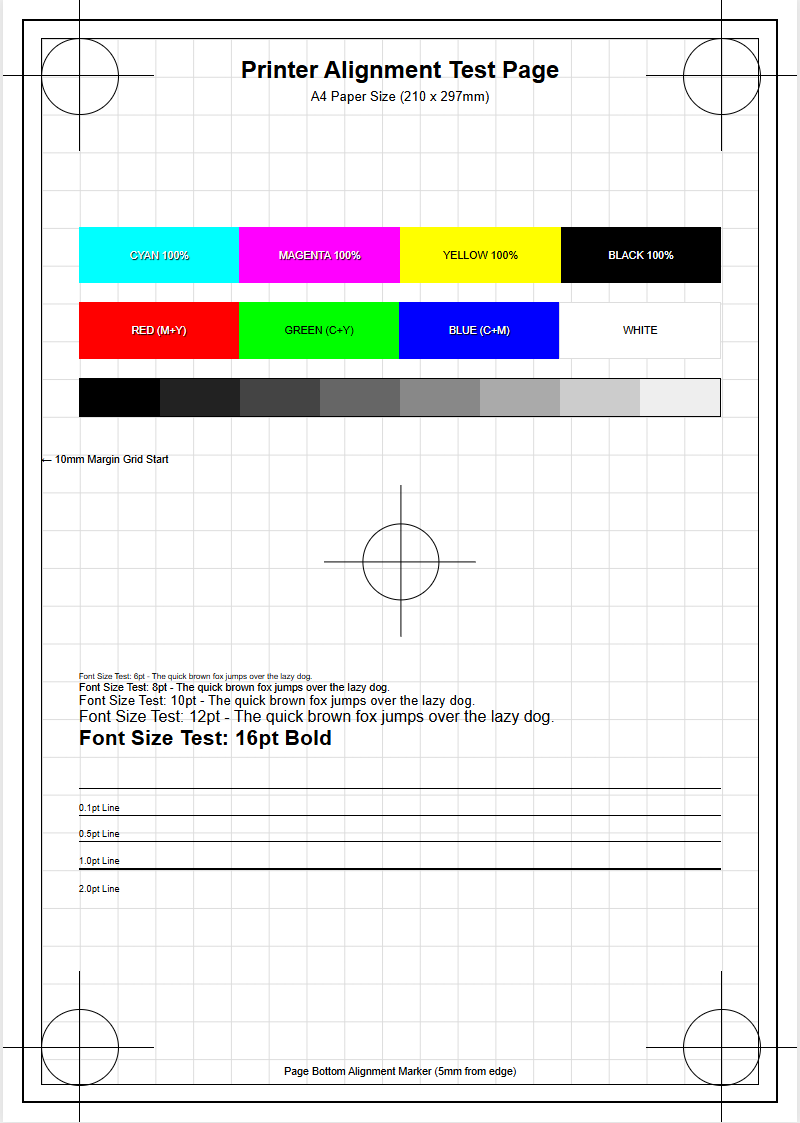
Verifying Component Alignment and Precision
Mechanical precision is essential for accurate margins and double-sided alignment. A printer test page often includes registration marks-small crosses or lines at the corners of the page-to verify that the paper is being fed straight through the assembly. If the image appears tilted, this is known as "skew," and it usually indicates worn-out pickup rollers or an improperly adjusted paper tray. Furthermore, in duplex printing, the "front-to-back" registration must be perfect to ensure that content on both sides aligns correctly, which is critical for brochures and booklets.
To verify alignment, check the following on the test sheet:
- Top and side margin measurements against the digital file.
- Centering of the print area on the physical sheet.
- Alignment of "crop marks" for post-print finishing.
- Parallelism of horizontal lines to the paper edge.
Correcting alignment issues may involve calibrating the "Paper Lead Edge" settings in the printer's service menu. Cleaning the registration rollers and ensuring the paper guides are snug against the stack can also eliminate skewing. For inkjet users, a "Print Head Alignment" cycle is the standard procedure to correct micro-deviations in the horizontal axis.
Optimizing Monochrome Efficiency and Performance
Maximizing the efficiency of a monochrome printer involves balancing output quality with the cost-per-page (CPP) and the total duty cycle of the machine. Utilizing "Draft" or "Toner Save" modes can significantly extend the life of a cartridge, but these settings must be evaluated via a test page to ensure they do not compromise the legibility of important barcodes or fine text. Performance can also be boosted by optimizing the printer's memory (RAM) and ensuring the firmware is updated to the latest version, which often includes improved halftone algorithms and faster processing for complex PDF files.
- Monitor page yield vs. manufacturer specifications.
- Utilize high-capacity cartridges to reduce downtime.
- Set "Auto-Sleep" timers to conserve energy without sacrificing warm-up speed.
- Implement "Pull Printing" to reduce unclaimed, wasted pages.
A test page serves as a benchmark for performance after changes are made. By analyzing the "Time to First Print" and the "Pages Per Minute" (PPM) during a test run, administrators can determine if the network or the printer's internal controller is a bottleneck. This technical oversight ensures the device operates at peak productivity while maintaining the necessary quality for professional use.


Comments