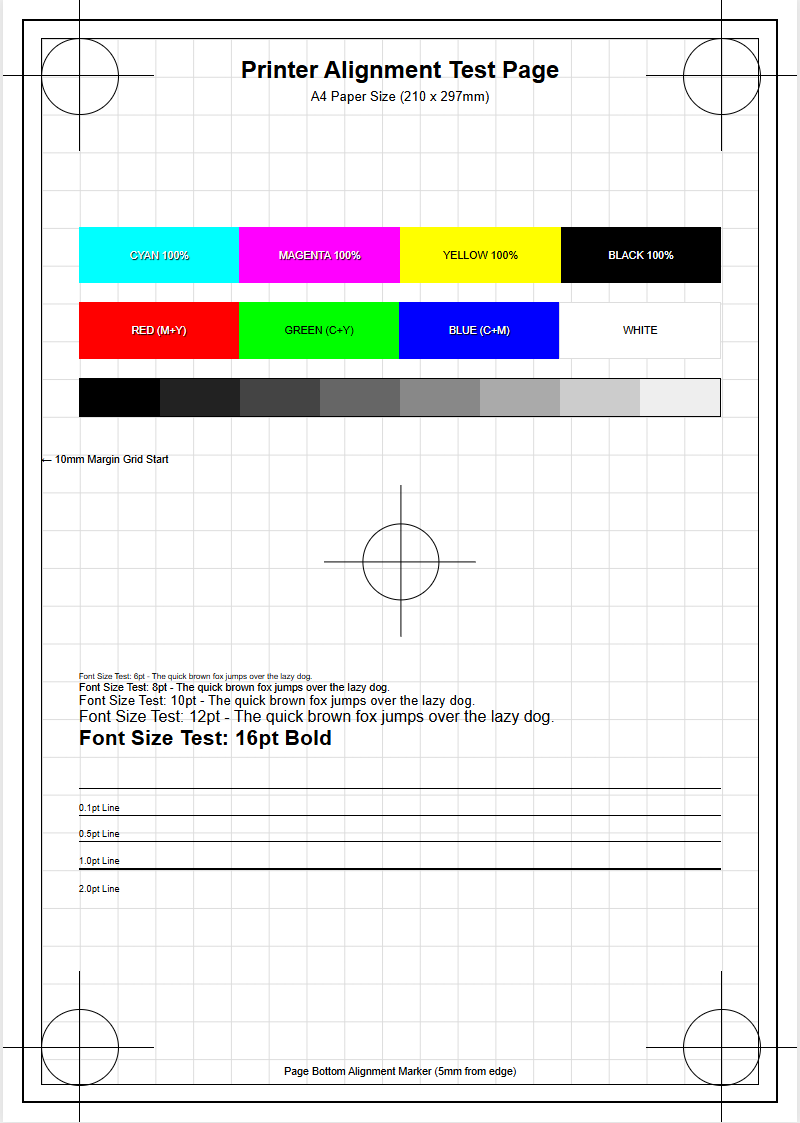
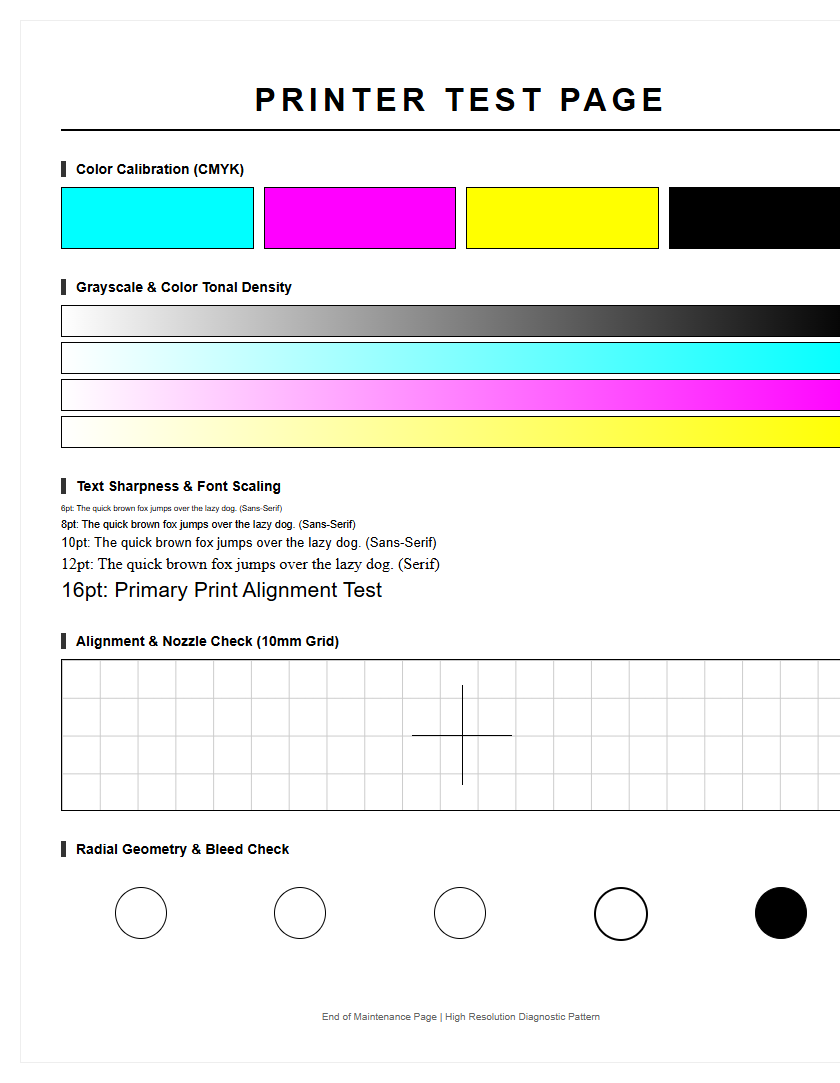
Achieving sharp, professional document quality relies on regular maintenance using an alignment printer test page. This essential diagnostic tool helps synchronize your print head's horizontal and vertical movement, ensuring precise ink droplet placement on the page. To start, navigate to your printer's maintenance utility and select the calibration sequence. The printer will output a series of numbered patterns; your task is to identify the grids with the least amount of banding or overlap. By inputting these values, you update the printer's firmware to correct mechanical tolerances, effectively resolving blurry text and ensuring optimal nozzle performance for every print job.
Understanding Printer Head Alignment
Printer head alignment is a critical maintenance procedure that ensures the print head nozzles are perfectly synchronized with the movement of the paper and the carriage assembly. In inkjet technology, microscopic droplets of ink are ejected at high velocities while the carriage travels laterally across the page. If the mechanical positioning of the print head is even slightly offset, the timing of these ejections will result in misplaced pixels. This lack of synchronization often stems from mechanical vibrations, paper jams, or the natural wear and tear of the drive belt and stepper motors.
Proper alignment involves calibrating the bidirectional communication between the printer's firmware and the physical print hardware. When these components are out of sync, the resulting output lacks professional crispness. Calibration ensures that as the print head moves from left to right and back again, the ink droplets land in the exact same coordinates. Essential factors influencing alignment include:
- Nozzle plate orientation relative to the media.
- Carriage speed and timing of the piezoelectric pulses.
- Voltage regulation within the print head assembly.
- Paper feed precision controlled by the friction rollers.
Common Signs Of Print Misalignment
Identifying misalignment requires a keen eye for visual artifacts that disrupt the continuity of a printed document. The most frequent indicator is "banding," which appears as horizontal or vertical white lines cutting through dense areas of color or text. This occurs when the print head passes do not overlap correctly or leave gaps due to timing errors. Another common symptom is the "ghosting" effect, where text appears to have a faint shadow or double image, indicating that the bidirectional printing passes are not landing on the same spatial coordinates.
Users may also notice that borders or frames on a page appear skewed or staggered rather than perfectly straight. This is particularly evident in high-resolution photo printing where fine details lose their sharpness. To diagnose these issues effectively, look for the following visual cues on your output:
- Jagged or "stepped" vertical lines in tables and charts.
- Inconsistent spacing between lines of text.
- Blurred edges on high-contrast graphics.
- Colors appearing "fringed" due to poor registration of CMYK layers.
Vertical Line Calibration Patterns
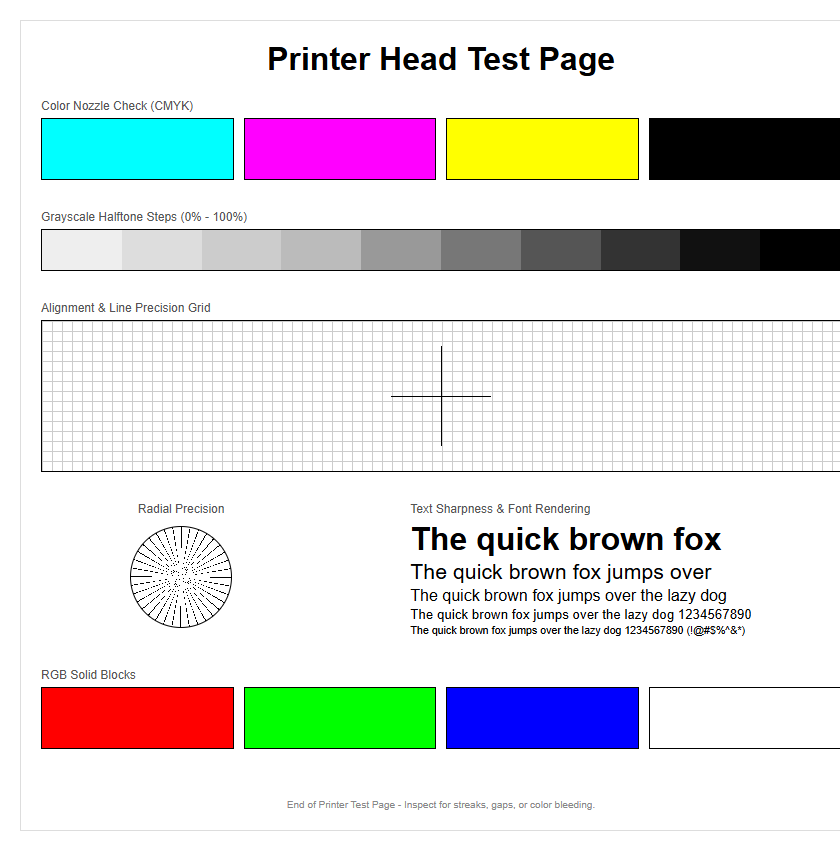
Vertical line calibration is the primary method for correcting "zigzag" distortions in columns and text blocks. During a vertical alignment test, the printer produces a series of numbered patterns consisting of vertical bars or lines. Each pattern represents a micro-adjustment of the print head's timing. The goal is to identify the pattern where the line segments are most perfectly aligned from top to bottom, without any visible breaks or offsets. This ensures that when the carriage moves across the x-axis, the vertical strokes of characters remain linear.
Modern printers often use a "patch" system where several blocks of lines are printed. The user must select the block that appears the smoothest. This data is then fed back into the printer driver to adjust the firing sequence of the nozzles. Key elements of this process include:
- Comparing the top and bottom halves of a segmented bar.
- Eliminating the "staircase" effect in vertical structures.
- Synchronizing the leading and trailing edges of the print head carriage.
- Adjusting for the physical distance between the black and color nozzle banks.
Horizontal Alignment Evaluation Sheets
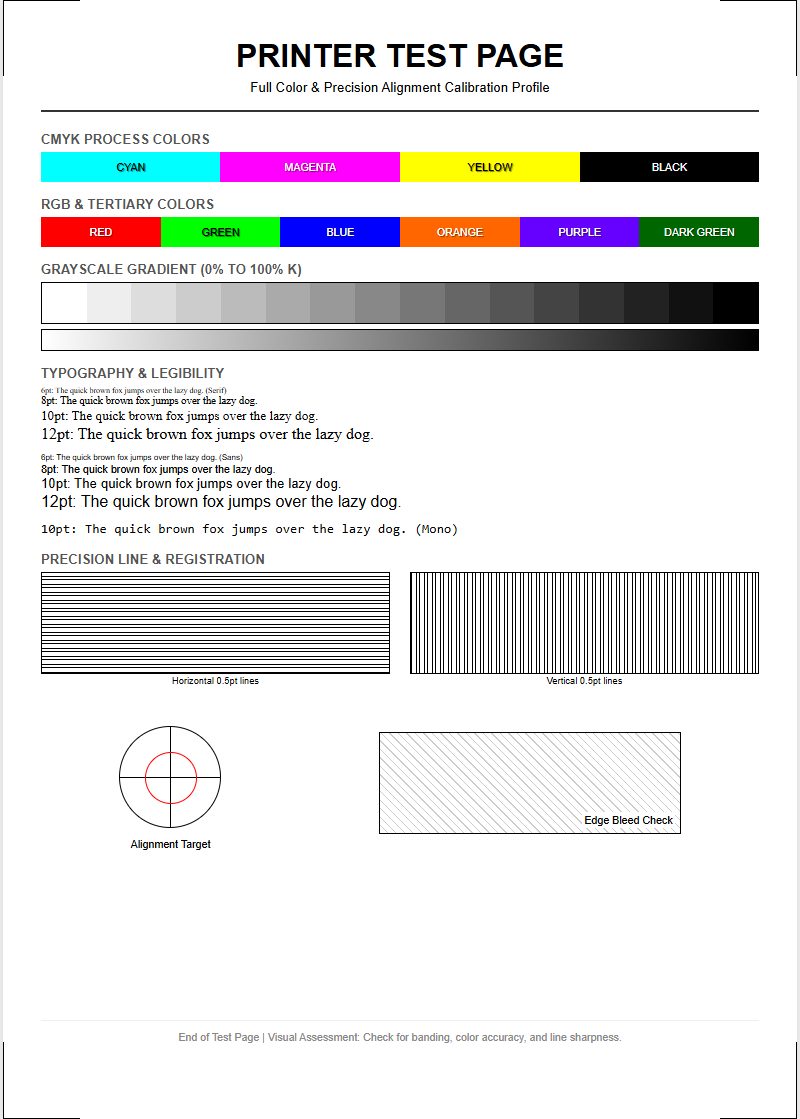
Horizontal alignment focuses on the y-axis, specifically how the paper advances through the printer. If the paper feed rollers move the media too far or not far enough between carriage passes, horizontal white lines or dark overlapping bands will appear. Evaluation sheets for horizontal alignment typically feature solid blocks of color or grayscale gradients. A perfectly aligned printer will produce a smooth, monolithic block of ink without any visible "rungs" on a ladder-like scale.
This calibration is particularly sensitive to the thickness and weight of the media being used. Heavier cardstock may require different horizontal timing than standard 20lb bond paper. When analyzing these sheets, look for the following characteristics:
- Uniform density across the entire printed block.
- Absence of dark "over-inked" horizontal overlaps.
- Consistent margins at the top and bottom of the page.
- Fluid transitions in gradient ramps without mechanical stuttering.
Steps To Improve Print Clarity
Improving print clarity involves more than just software calibration; it requires a holistic approach to printer maintenance. First, ensure that you are using high-quality media designed for your specific printer type, as "feathering" on low-grade paper can mimic misalignment. Next, perform a nozzle check to ensure no individual jets are clogged with dried ink, which can cause streaks that look like alignment errors. If the test page shows missing segments, a cleaning cycle should be initiated before proceeding with alignment.
Furthermore, updating the printer firmware can often resolve persistent alignment bugs by refining the controller's logic. Maintaining the physical environment is also vital, as high humidity can cause paper to swell, affecting the carriage's path. To maximize clarity, follow these steps:
- Use the "High Quality" or "Best" setting in the print dialog.
- Ensure the paper guides are snug against the media to prevent skewing.
- Clean the encoder strip-the thin plastic ribbon behind the carriage-with a lint-free cloth.
- Check ink levels, as low pressure in cartridges can cause inconsistent droplet size.
Manual Versus Automatic Calibration Processes
Calibration methods vary significantly depending on the printer model and its intended use case. Manual calibration requires the user to print a test sheet, visually inspect multiple numbered patterns, and manually input the "best" values into the printer software. This method provides the user with total control but is subject to human error and visual fatigue. In contrast, automatic calibration utilizes built-in optical sensors (usually a small LED and a photodetector) on the print head assembly to read the test patterns as they are printed.
The table below summarizes the key differences between these two methodologies to help users understand which process their device might employ:
| Feature | Manual Calibration | Automatic Calibration |
|---|---|---|
| User Input | High (visual selection) | Low (one-button start) |
| Accuracy | Subjective to eyesight | Highly precise sensors |
| Speed | 5-10 minutes | 2-3 minutes |
| Requirement | Standard paper | High-white or coated paper |
Fixing Blurry Text And Jagged Lines
Blurry text and jagged lines are the primary indicators that the printer's bidirectional alignment is failing. When the print head fires nozzles while moving in both directions, any delay in the firing signal causes the "forward" pass to land slightly to the left or right of the "return" pass. For text, this results in vertical strokes that look fuzzy or double-edged. For vector graphics and lines, this creates a "stair-stepping" effect where diagonal lines appear as a series of disjointed blocks rather than a smooth transition.
To fix these issues, the alignment utility adjusts the "lead time" of the nozzle firing. This compensates for the physical speed of the carriage. Users should also check the "Paper Thickness" or "Platen Gap" settings in the driver, as a gap that is too wide allows the ink droplets to drift further off-course before hitting the page. Ensuring the print carriage rail is properly lubricated can also prevent the subtle "judder" that contributes to jagged line rendering.
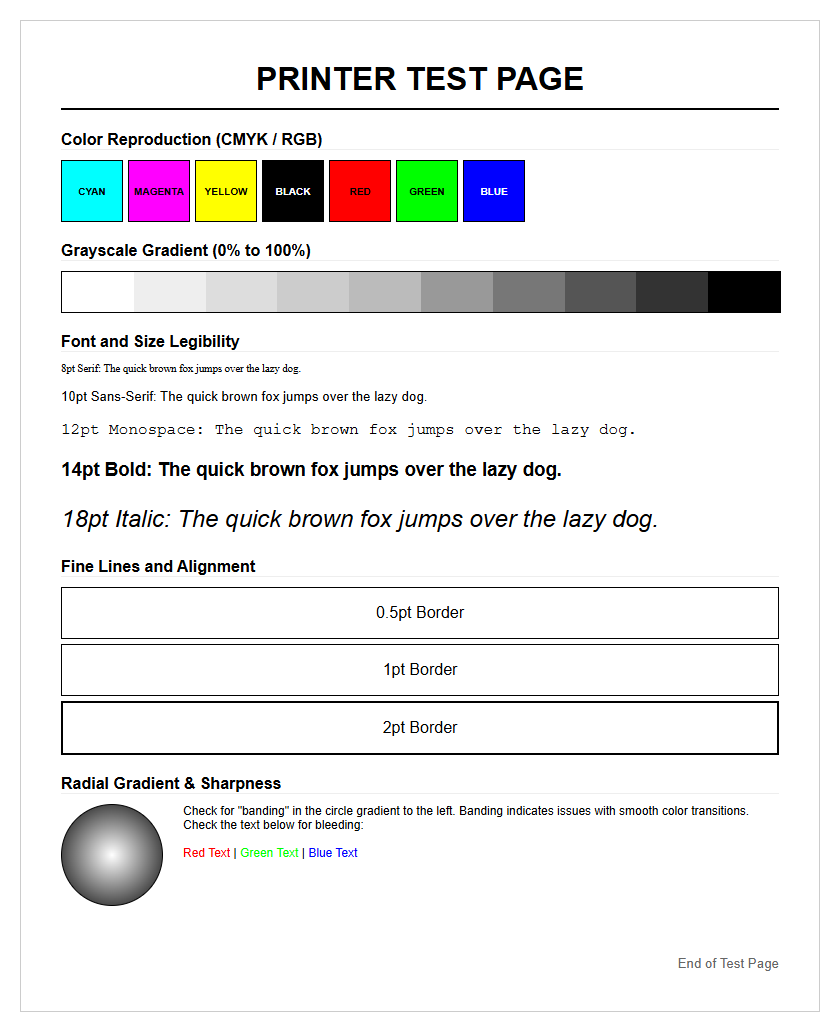
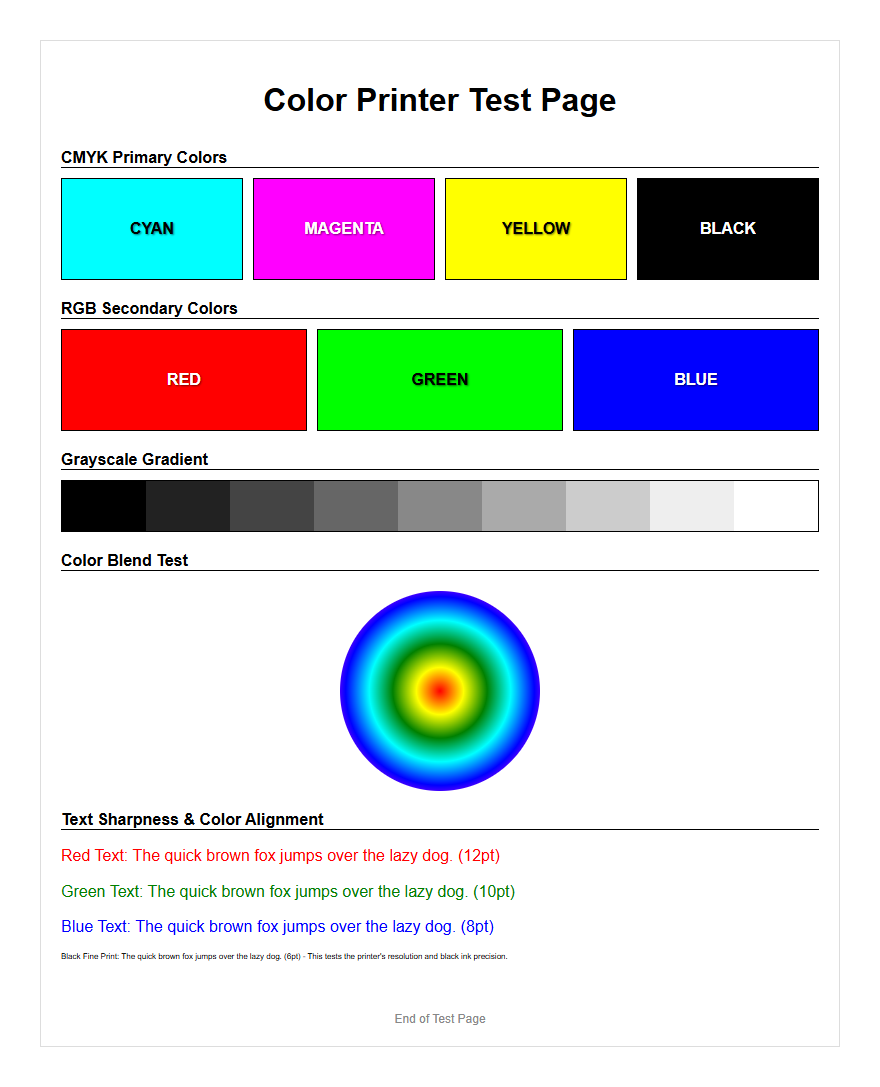
Color Grid Alignment Accuracy
Color grid alignment, also known as registration, is the process of ensuring that the cyan, magenta, yellow, and black (CMYK) nozzles are all printing in exactly the same spot. Because each color is delivered by a separate bank of nozzles, any microscopic physical deviation between the nozzle plates will cause "color fringing." This is most visible in photographs where a halo of one color (often magenta or cyan) appears on the edge of a dark object. A color grid test page prints overlapping boxes of different colors to detect these offsets.
Achieving accuracy in color grids is essential for professional-grade graphics. If the grids do not align, the resulting secondary colors (like green or orange) will look muddy because the base droplets are not mixing correctly on the substrate. Optimization techniques include:
- Running a full-color calibration suite via the printer's utility menu.
- Checking for air bubbles in the ink lines of CISS printers.
- Adjusting the "color-to-color" offset values in advanced driver settings.
- Verifying the integrity of the print head's thermal elements.
Optimizing Inkjet Print Head Performance
The performance of an inkjet print head is dictated by the precise delivery of picoliter-sized droplets. Over time, debris such as paper dust or dried ink can accumulate on the nozzle plate, deflecting the trajectory of the ink. This deflection is often mistaken for misalignment. To optimize performance, the print head must be kept clean and the internal pressure must be equalized. Frequent use is actually beneficial for inkjet heads, as it prevents the ink from stagnating and clogging the microscopic channels.
Furthermore, the "firing frequency" of the print head can be affected by the temperature of the ink. Most modern printers include an internal thermistor to adjust the voltage based on ambient temperature. To maintain peak performance, consider the following maintenance checklist:
- Perform a "Head Cleaning" only when necessary to avoid wasting ink.
- Wipe the capping station and wiper blade to ensure a good seal during idle periods.
- Use the printer at least once a week to maintain nozzle hydration.
- Avoid using "economy" ink which may have higher viscosity and cause firing delays.
Analyzing Printer Alignment Results
After running an alignment test, analyzing the results is the final step in ensuring output quality. Most test pages provide a series of patterns labeled with letters or numbers (e.g., Column A, Pattern 5). The "correct" choice is always the pattern that appears the most uniform, where individual lines or dots have merged into a single, seamless shape. If all patterns on a test page look equally poor, it may indicate a mechanical failure, such as a worn-out carriage drive belt or a dirty encoder strip that prevents the printer from knowing its exact position.
When reviewing your results, use a magnifying glass if necessary to spot subtle overlaps. If the printer allows for "fine-tuning," repeated tests may be needed to achieve perfection. Successful analysis should result in:
- Perfectly straight vertical borders in document tables.
- Crisp, readable text at font sizes as small as 4pt or 5pt.
- Zero visible white space between adjacent blocks of solid color.
- A "pass" status on the printer's internal diagnostic report.

Comments