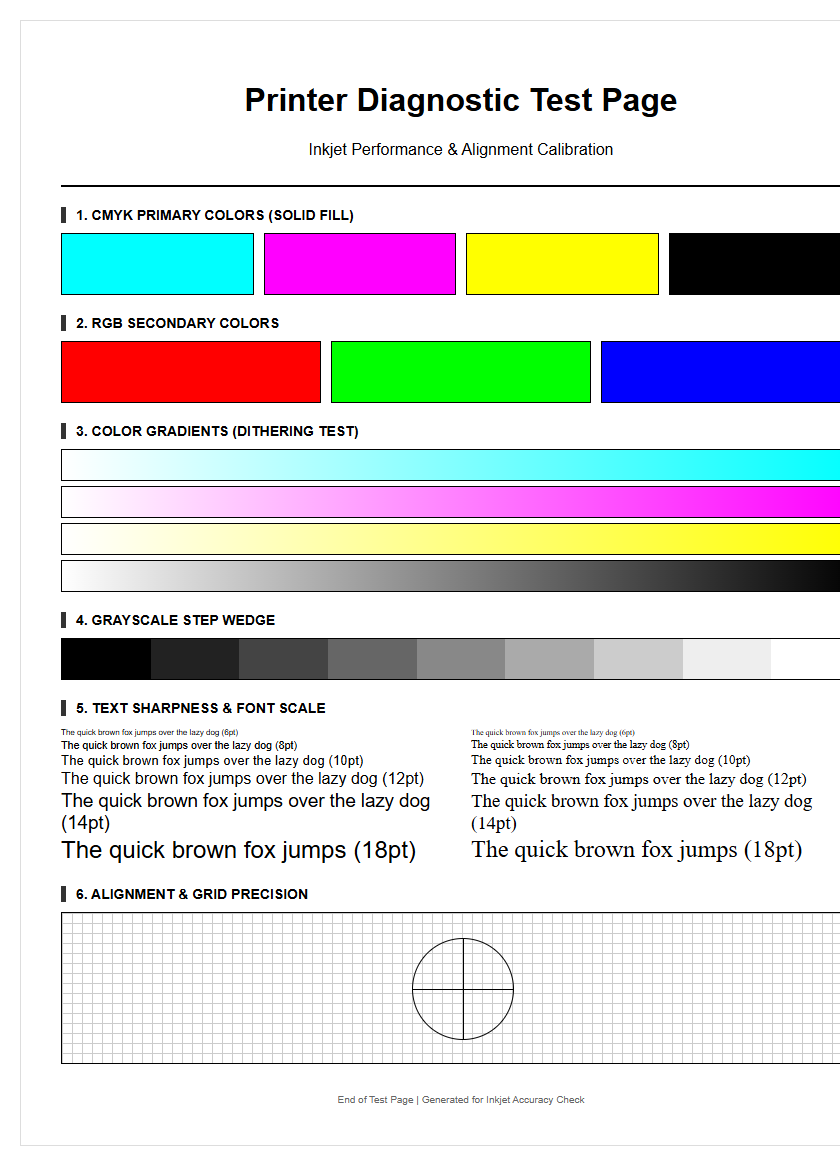
A text printer test page serves as a critical diagnostic tool for assessing hardware performance and output quality. By executing a targeted print job, users can analyze font rendering to ensure crisp edges and proper kerning across various typefaces. This evaluation monitors character alignment, detecting potential mechanical shifts or feed issues that cause skewed lines. For inkjet systems, it measures nozzle precision to identify clogged heads or irregular ink delivery, while laser users can check for consistent toner distribution and DPI accuracy. Utilizing these technical benchmarks helps resolve ghosting or blurring, ensuring your device maintains professional-standard legibility and mechanical synchronization.
Standard Test Page Importance
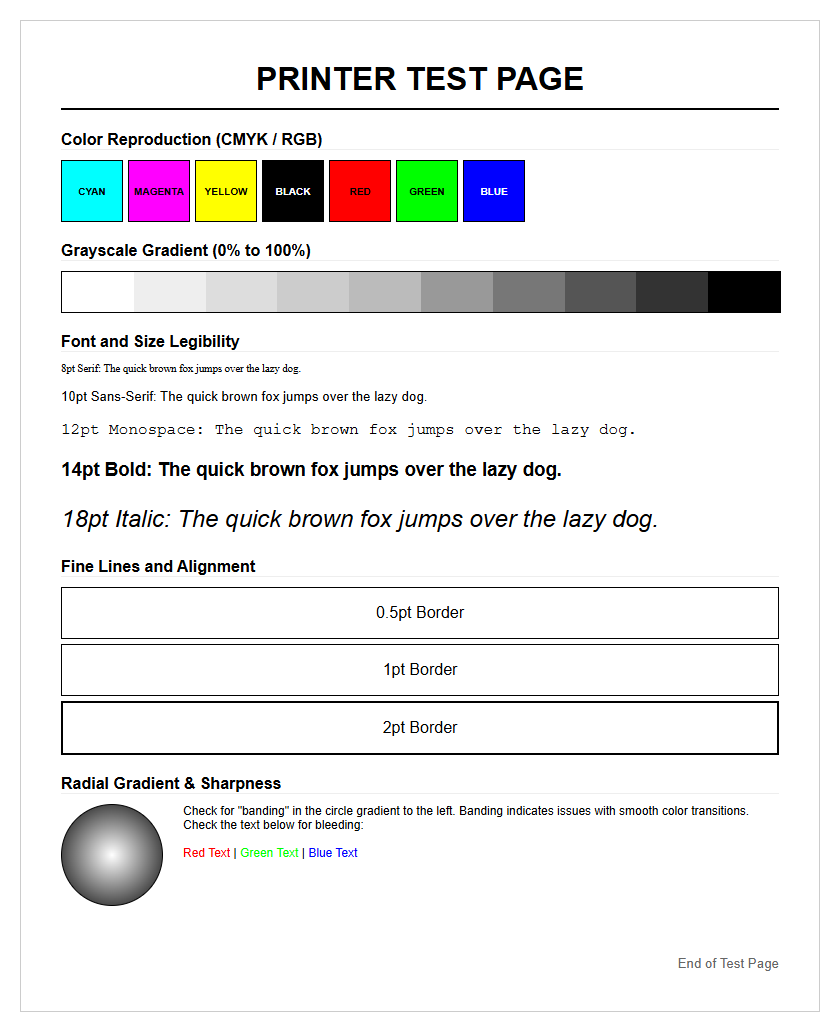
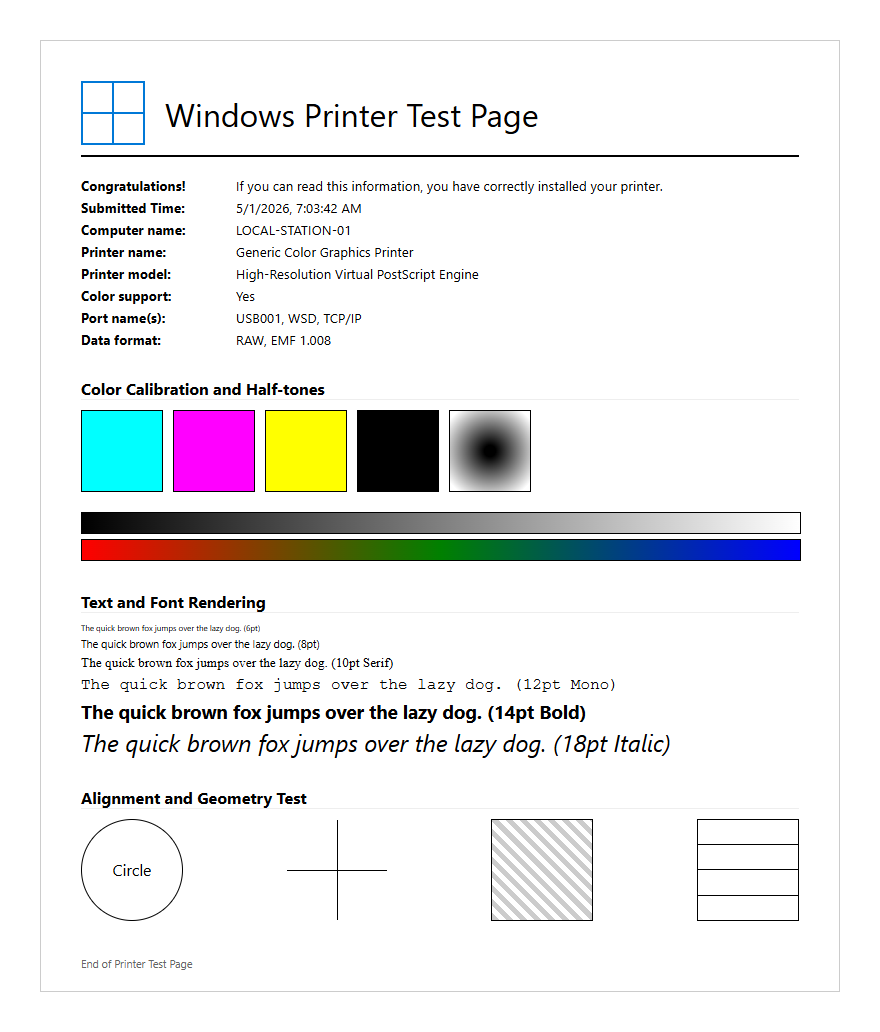
The standard test page serves as the fundamental diagnostic tool for any printing environment, providing a comprehensive snapshot of a device's current operational status. By executing a controlled print job that includes specific graphical elements and font variations, users can identify hardware malfunctions before they compromise critical documents. This process is essential for establishing a baseline of performance, allowing for a side-by-side comparison between the factory-default output and the current state of the printer. Utilizing a standardized file ensures that variables such as software compression or file format errors do not skew the results.
- Identifies clogged ink nozzles or toner distribution issues.
- Verifies driver compatibility and font rendering accuracy.
- Detects mechanical paper feed problems like skewing or slipping.
- Provides a timestamped record of hardware health for maintenance logs.
Regularly generating these pages prevents the wasting of expensive substrates and consumables. In a professional setting, the standard test page acts as the first line of defense in quality control, ensuring that every serif and line weight meets the required technical specifications for high-quality output.
Color Accuracy Verification Methods
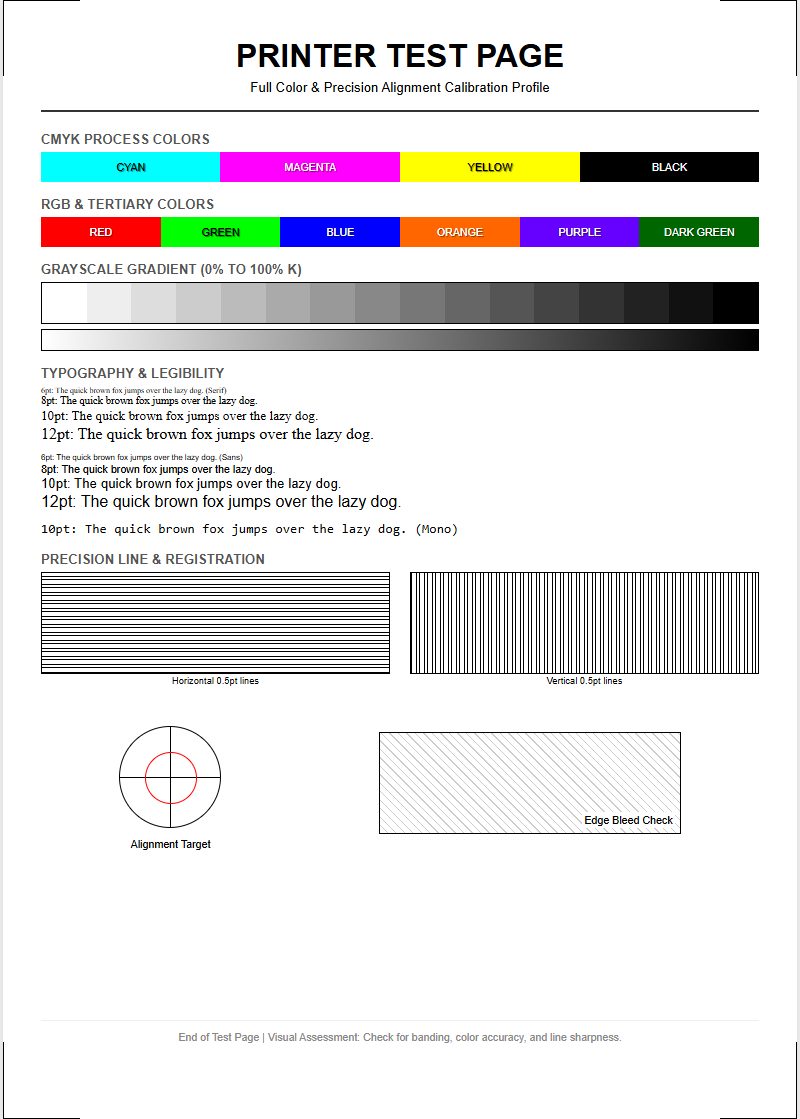
Verifying color accuracy is a sophisticated process that transcends mere visual inspection. It involves comparing the printed output against a known digital reference, often utilizing the Delta-E metric to quantify the difference between the intended color and the actual result. For precise verification, technicians often use spectrophotometers to measure color patches on a test page, ensuring the device adheres to specific ICC profiles. This ensures that the transition from RGB screen data to CMYK physical media remains faithful to the original design intent.
- Print a standardized color gamut chart containing primary and secondary hues.
- Utilize a colorimeter or spectrophotometer to read specific target coordinates.
- Compare measured values against the ISO 12647 printing standards.
- Adjust the printer's Look-Up Tables (LUT) if the variance exceeds acceptable limits.
This systematic approach is vital for industries where brand consistency is paramount. Without these verification methods, subtle shifts in hue could lead to costly reprints. By analyzing the spectral data from a test page, operators can fine-tune the color engine to compensate for environmental factors like humidity or temperature, which often affect ink absorption and drying times.
Ink Saturation Analysis Patterns
Ink saturation analysis patterns are designed to push the limits of a printer's fluid management system. These patterns consist of dense blocks of color and intricate gradients that test how the substrate handles high volumes of liquid or toner without bleeding or cockling. Analyzing these patterns helps in determining the optimal "ink limit" for a specific paper type, ensuring that the shadows remain deep and detailed rather than turning into a muddy, oversaturated mess. This is particularly important for high-resolution inkjet systems where droplet placement precision is critical.
| Saturation Level | Expected Outcome | Diagnostic Indicator |
|---|---|---|
| 100% Solid | Uniform coverage | Detects "banding" or streaks |
| 50% Screen | Distinct dot pattern | Evaluates halftoning quality |
| Overprint | Clean secondary colors | Tests ink trapping efficiency |
By examining the drying characteristics and edge definition within these patterns, technicians can calibrate the print speed and drying temperature. Excessive saturation can lead to "feathering," where ink spreads along the paper fibers, ruining text sharpness and fine detail. Proper analysis ensures the perfect balance between vibrant colors and structural integrity.
Black Text Sharpness Evaluation
The evaluation of black text sharpness is perhaps the most critical component of a printer test page for office environments. This test focuses on the "edge acuity" of characters at various point sizes, typically ranging from a microscopic 2pt font up to a standard 12pt. High-quality text rendering requires precise control over the black (K) channel to prevent "ghosting" or "blurring" around the serifs. Technicians look for crisp, clean lines where the ink or toner meets the white space of the page, ensuring there is no unwanted spray or satellite droplets.
- Legibility of micro-text (fonts below 4pt).
- Consistency of stroke thickness in sans-serif fonts.
- Lack of "wicking" where ink bleeds into the paper grain.
- Alignment of characters along a straight baseline.
When sharpness is compromised, it usually points to an issue with the fuser assembly in lasers or the print head height in inkjets. By analyzing these text blocks under magnification, one can determine if the printer is successfully hitting its rated DPI (dots per inch) or if software interpolation is causing unwanted jagged edges, known as "aliasing."
Print Head Calibration Procedures
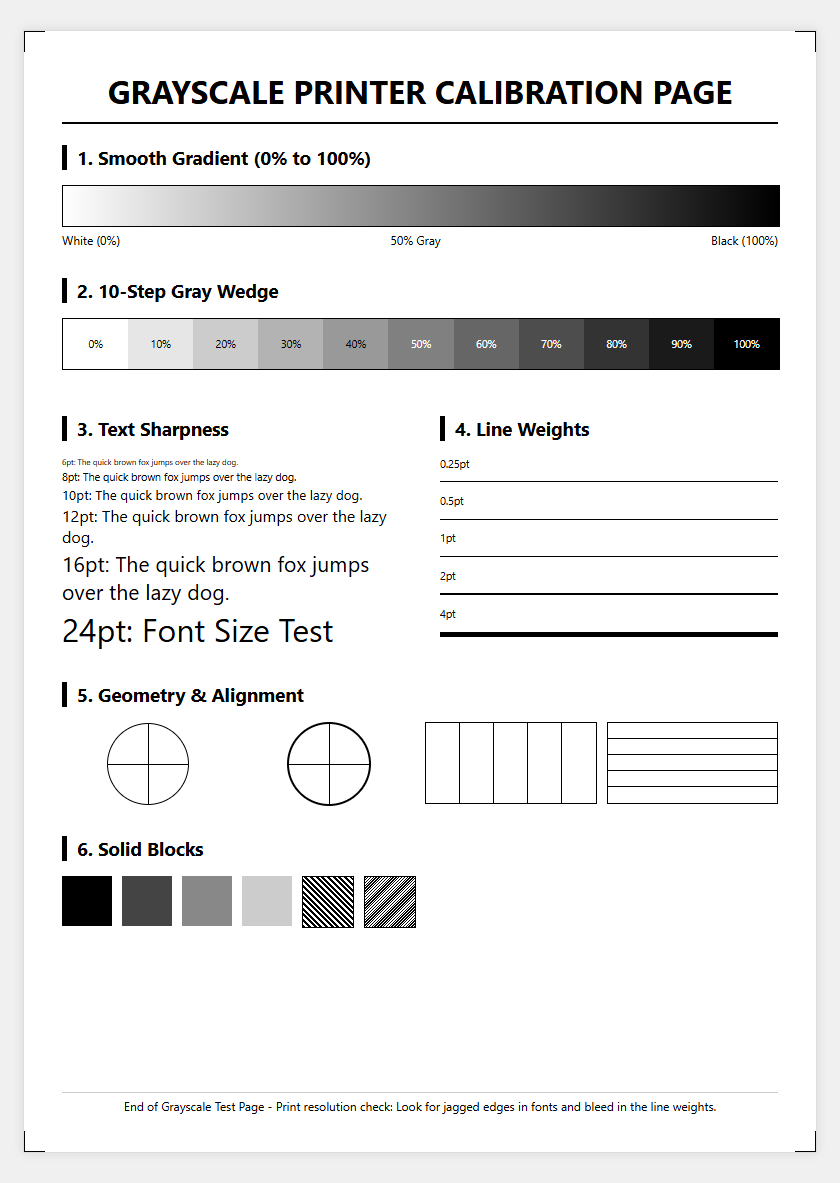
Print head calibration is a mechanical and electronic synchronization process that ensures the print nozzles are perfectly aligned with the media's movement. On a test page, this is often represented by a series of overlapping lines or grids. If the calibration is off, the printer will exhibit "bi-directional banding," where horizontal lines appear uneven because the head is firing at different intervals while moving left-to-right versus right-to-left. Calibration procedures involve printing a series of alignment patterns and selecting the most visually seamless option to update the printer's internal logic.
- Load high-quality, flat-surface paper to ensure accurate readings.
- Initiate the "Alignment" or "Calibration" command from the maintenance menu.
- Inspect the printed vertical and horizontal "comb" patterns.
- Input the numerical value of the pattern with the least amount of visible gap or overlap.
Regular calibration is necessary because the physical movement of the print carriage can cause slight shifts over time. This procedure optimizes the "throw distance" of the ink droplets, ensuring that every dot lands exactly where intended, which is crucial for both photo-realistic images and sharp, readable text.
CMYK Palette Consistency Review
A CMYK palette consistency review involves a rigorous check of the four primary process colors: Cyan, Magenta, Yellow, and Key (Black). A dedicated test page section will feature pure 100% blocks of each color alongside tiered increments (e.g., 20%, 40%, 60%, 80%). This allows the user to see if any specific color channel is underperforming or contaminated. For instance, if the Yellow block shows hints of Cyan, it indicates a "cross-contamination" issue within the print head or a leaky cartridge.
| Color Channel | Common Issue | Technical Fix |
|---|---|---|
| Cyan | Horizontal Streaking | Nozzle cleaning cycle |
| Magenta | Hue Shifting | Replace expired cartridge |
| Yellow | Low Density | Check ink delivery lines |
| Black (K) | Faint Text | Adjust fuser temperature |
Maintaining consistency across these channels is the only way to achieve a neutral grey balance. If one color is slightly more saturated than the others, every image printed will have an unwanted color cast. This review is the primary method for diagnosing electronic delivery issues where the printer's firmware may be miscalculating the voltage required to fire specific nozzles.
Grayscale Depth Performance Testing
Grayscale depth performance testing evaluates the printer's ability to produce a smooth transition from absolute black to pure white. This is often more difficult than color printing because it reveals flaws in "halftoning" and "dithering" algorithms. A high-performing printer should display a "step wedge" of gray tones without any visible "stepping" or "contouring." This test ensures that the printer can handle subtle shadows and highlights in monochrome documents, which is essential for professional reports and architectural blueprints.
- Neutrality: The gray should not look blue, pink, or green.
- Detail: Visibility of detail in the 90% to 95% black range.
- Smoothness: Absence of "noise" or graininess in mid-tone areas.
- Consistency: Uniformity of the gray wash across the entire page.
Technical performance in grayscale is often a reflection of the "dot gain" management. If the dots expand too much upon hitting the paper, the light grays will appear too dark, destroying the dynamic range. By fine-tuning the grayscale depth, users ensure that their monochrome output has the same professional polish as their full-color prints.
Output Quality Diagnostic Techniques
Modern output quality diagnostic techniques involve a combination of automated sensors and manual inspection protocols. Advanced printers often feature built-in optical sensors that scan a test page immediately after it is printed, providing real-time feedback on nozzle health and color density. However, for most users, manual techniques remain standard. This includes using a "loupe" or magnifying glass to inspect dot placement and checking for "mottling"-an uneven, blotchy appearance in solid filled areas. These diagnostics help distinguish between software-driven artifacts and mechanical failures.
- Perform a "nozzle check" to identify specific missing lines.
- Print a "torture test" page featuring complex vectors and gradients.
- Check the reverse side of the page for "bleed-through" or "ink offset."
- Measure line lengths with a ruler to verify the accuracy of the paper feed motor.
These techniques allow for a granular understanding of the printing process. By identifying whether a streak is "fixed" (likely a drum or fuser issue) or "intermittent" (likely a software or data buffer issue), technicians can minimize downtime and avoid unnecessary parts replacement.
Nozzle Maintenance Documentation
Nozzle maintenance is the backbone of inkjet longevity, and documentation of this process is vital for troubleshooting chronic issues. Every test page printed serves as a historical record of nozzle performance. When certain nozzles fail to fire, it creates "voids" or white lines across the page. Documentation involves tracking how many cleaning cycles are required to restore a nozzle to full functionality. This data can indicate when a print head is reaching the end of its service life or if the environment is too dry, causing ink to "crust" at the delivery point.
- Record the date and time of every "Deep Cleaning" cycle.
- Save "Nozzle Check" patterns to monitor recurring clogs.
- Note the ink levels and batch numbers during failures.
- Track the "Total Page Count" to predict wear-and-tear cycles.
Proper documentation prevents the repetitive use of "Power Cleanings," which can be wasteful and actually damage the print head through heat buildup. Instead, it encourages a more measured approach, such as using "Purge Sheets"-documents specifically designed to fire every nozzle in a controlled burst to clear minor obstructions without excessive ink consumption.
Hardware Performance Verification Steps
Hardware performance verification is the final stage in validating a printer's operational readiness. This involves testing the mechanical components that work in tandem with the imaging system. A comprehensive verification ensures that the paper handling, duplexing units, and memory buffers are all functioning within factory tolerances. On a test page, this might be checked through "edge-to-edge" printing tests, which verify that the margins are consistent and the "registration" (the alignment of the print on the page) is perfectly centered.
- Run a multi-page test to check for overheating or speed drops.
- Test different "media weights" to verify fuser pressure or feed tension.
- Engage the duplexer to ensure front-to-back alignment is precise.
- Check the "Error Log" printed on the status page for hidden warnings.
Verification steps confirm that the printer is not just producing a pretty image, but doing so reliably under load. It ensures that the "pick rollers" are not leaving marks and that the "output tray" is handling the finished sheets without causing "smudging" or "scuffing." This holistic view of hardware performance is what separates a well-maintained machine from one prone to failure.


Comments