Achieving professional print quality starts with a Grayscale Printer Test Page to ensure precision across the monochrome spectrum. This diagnostic tool evaluates tonal range accuracy, allowing you to identify banding or crushed blacks within shadow regions. By examining the linear gradient ramps, you can verify how your device handles halftone patterns and dithering algorithms. A robust test target highlights subtle shifts in midtones and ensures highlights retain essential detail without clipping. Utilizing these patterns helps calibrate dot gain and ink density, eliminating unwanted color casts for a perfectly neutral gray balance. Optimizing these parameters ensures consistent, high-fidelity output for all monochrome reproduction tasks.
Grayscale Print Quality Assessment
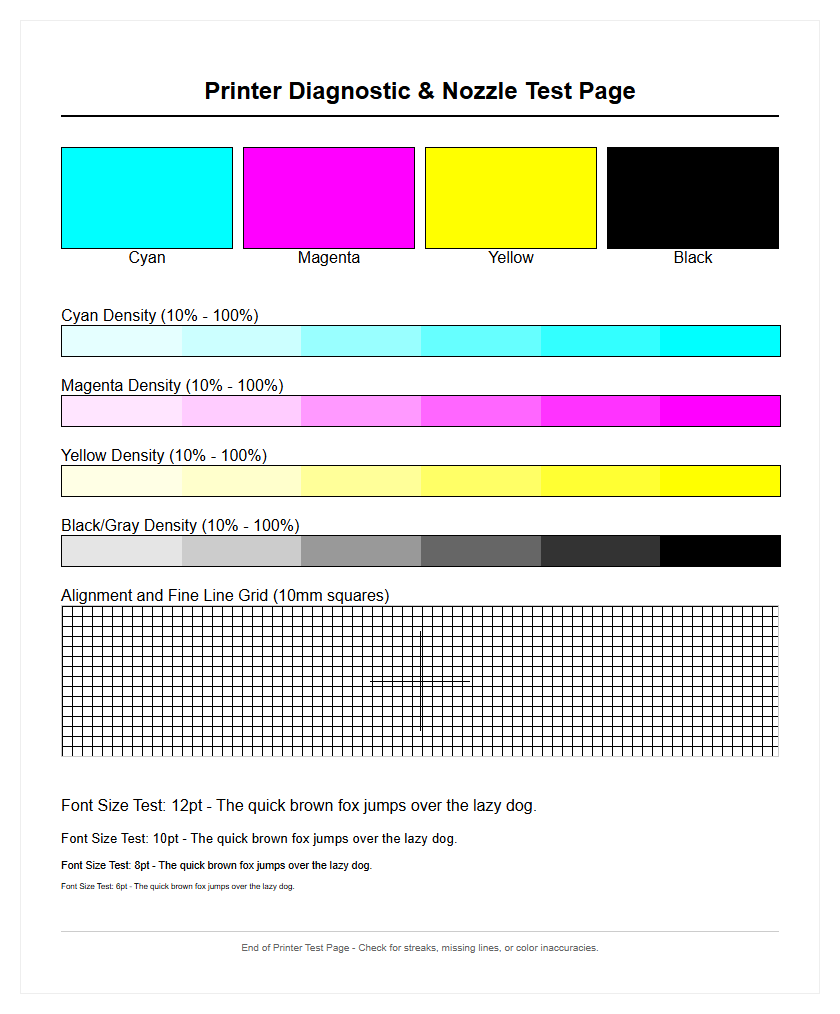
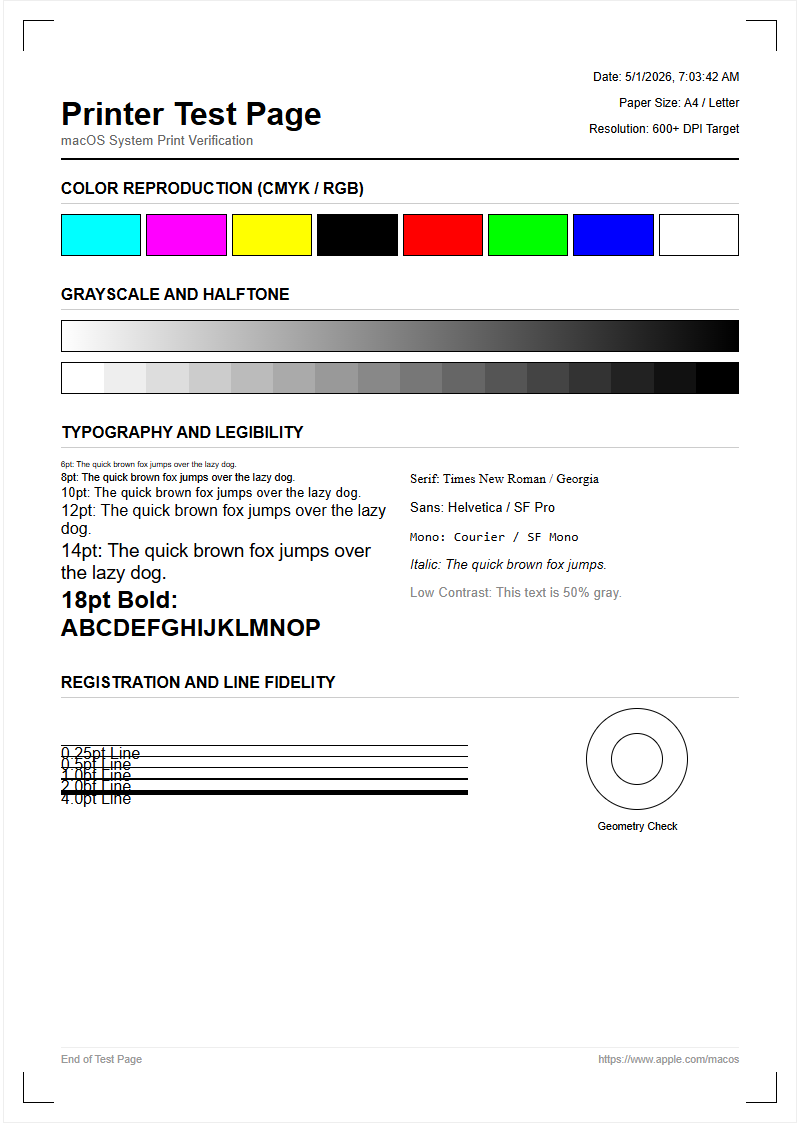
Evaluating the output of a grayscale printer test page is the first step in ensuring professional-grade monochrome reproduction. This assessment focuses on the printer's ability to render a full spectrum of tones, from the deepest "True Black" to the subtlest highlight grays. A high-quality grayscale output should exhibit neutral tones without any visible color casts, such as unwanted shifts toward magenta or cyan. During this process, technicians look for the integrity of dither patterns and the precision of halftoning algorithms which simulate continuous tones using discrete dots.
- Dynamic Range: The ability to distinguish between 95% and 100% black levels.
- Neutrality: Ensuring that gray shades remain visually "cool" or "neutral" rather than "warm."
- Dither Uniformity: Checking for consistent dot placement in mid-tone areas.
By scrutinizing these elements, you can determine if the printer's internal image processor is interpreting grayscale data correctly. This assessment is vital for photographers and architects who rely on precise tonal transitions to convey depth and texture in their professional documentation.
Calibrating Black Ink Density
Black ink density, often measured as Optical Density (OD), dictates the punch and contrast of your printed pages. If the density is too low, the output appears washed out; if it is too high, shadow details are lost in a muddy "black crush." Calibration involves adjusting the ink drop volume in inkjets or the laser intensity and bias voltage in laser printers. This process ensures that the printer utilizes the maximum gamut of the black channel while maintaining efficiency.
- Print a solid black patch at 100% saturation to check for "pinholing" or uneven coverage.
- Use a densitometer or a high-resolution scanner to measure the light reflectance of the patch.
- Adjust the printer driver settings or the RIP (Raster Image Processor) software to compensate for ink absorption based on the paper type used.
Properly calibrated density prevents excessive ink saturation, which can lead to longer drying times and paper cockling. In laser systems, it ensures that the fuser assembly can adequately bond the toner to the substrate without creating "ghosting" artifacts or toner scatter.
Identifying Print Head Clogs
In inkjet systems, a grayscale test page is the most effective diagnostic tool for identifying obstructed nozzles. Print head clogs manifest as missing lines or "white gaps" in solid blocks of gray. Because grayscale printing often uses a mix of black and light-black inks, a clog in a single nozzle can disrupt the entire tonal balance. When inspecting the nozzle check pattern, look for broken segments in the grid which indicate dried ink or air bubbles within the print head capillaries.
- Deflected Nozzles: Lines that are present but crooked, causing "grainy" output.
- Complete Blockage: Entire segments of the test pattern are missing, requiring a deep cleaning cycle.
- Soft Clogs: Often resolved with a simple standard cleaning, usually caused by environmental dust.
Consistent maintenance is required to prevent "permanent" clogs where ink hardens inside the piezo or thermal elements. Running a grayscale test weekly keeps the ink flowing and maintains the viscosity required for precise drop-on-demand firing, ensuring every micron of the page is covered as intended.
Testing Monochrome Gradient Smoothness
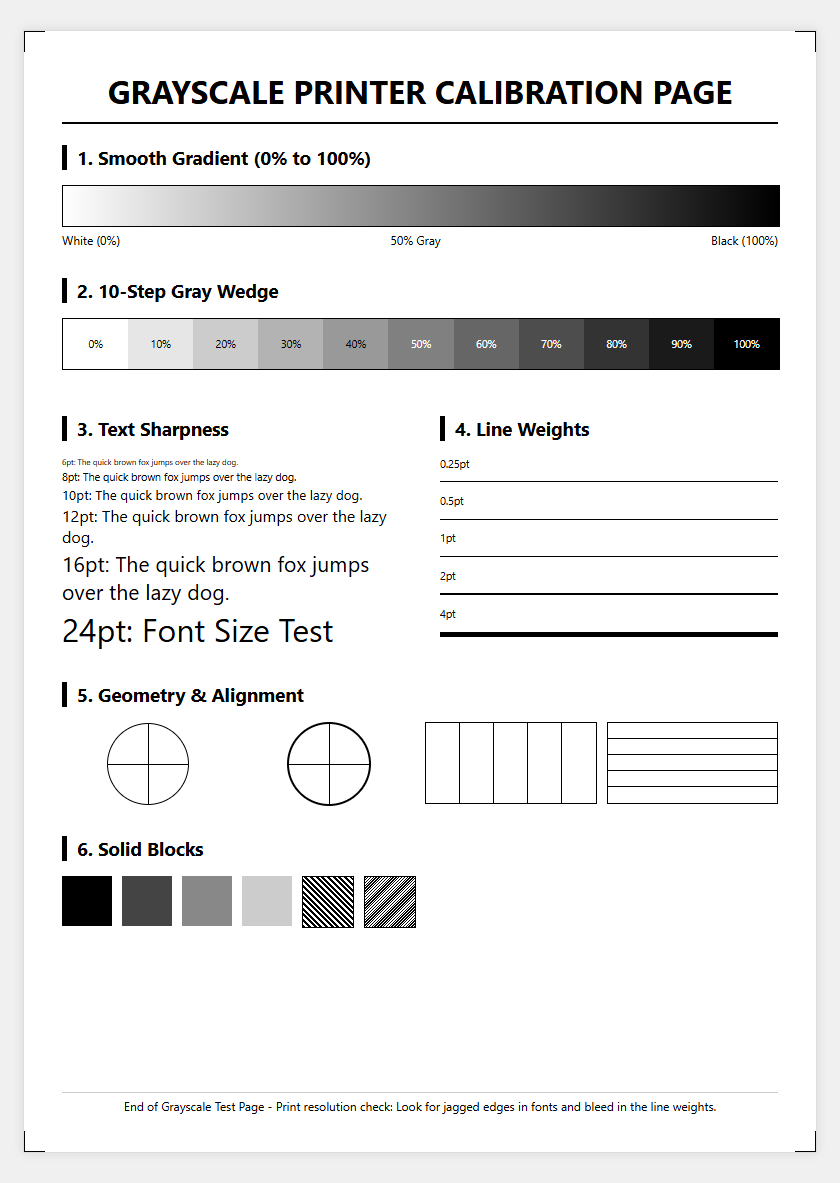
A monochrome gradient test reveals how well a printer handles transitions from light to dark. This is often represented by a "gradient wedge" or a "step scale" on a test page. The goal is to achieve a smooth, "stepless" transition. If the hardware or software fails here, you will see "posterization" or "banding," where the gray levels jump abruptly from one shade to another instead of flowing naturally.
| Gradient Zone | Expected Appearance | Common Issue |
|---|---|---|
| Highlights (0-10%) | Virtually invisible dots | Harsh "cutoff" points |
| Mid-tones (40-60%) | Uniform texture | Mottling or graininess |
| Shadows (80-100%) | Deep, distinct steps | Merging/crushing colors |
Testing smoothness is critical for printing architectural renderings or black-and-white photography. If the gradient shows vertical or horizontal stripes, it may indicate a mechanical issue with the paper feed or a limitation in the printer's bit-depth processing capabilities.
Improving Text Sharpness and Clarity
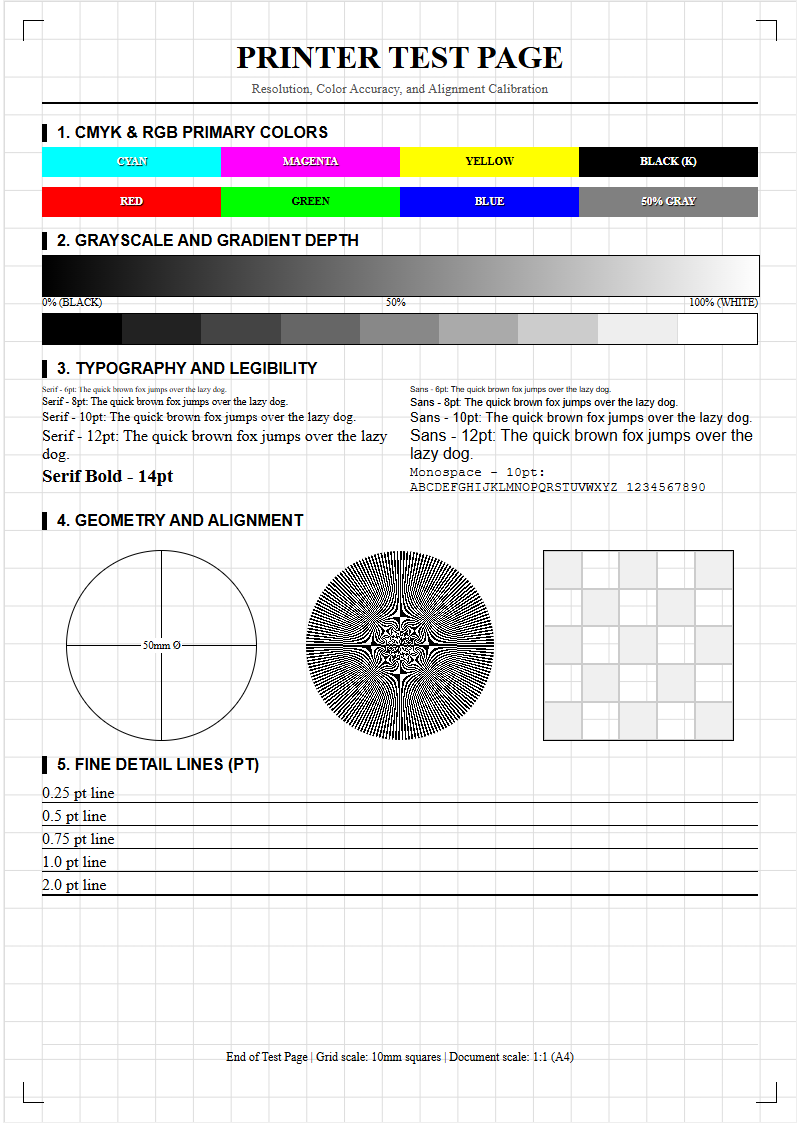
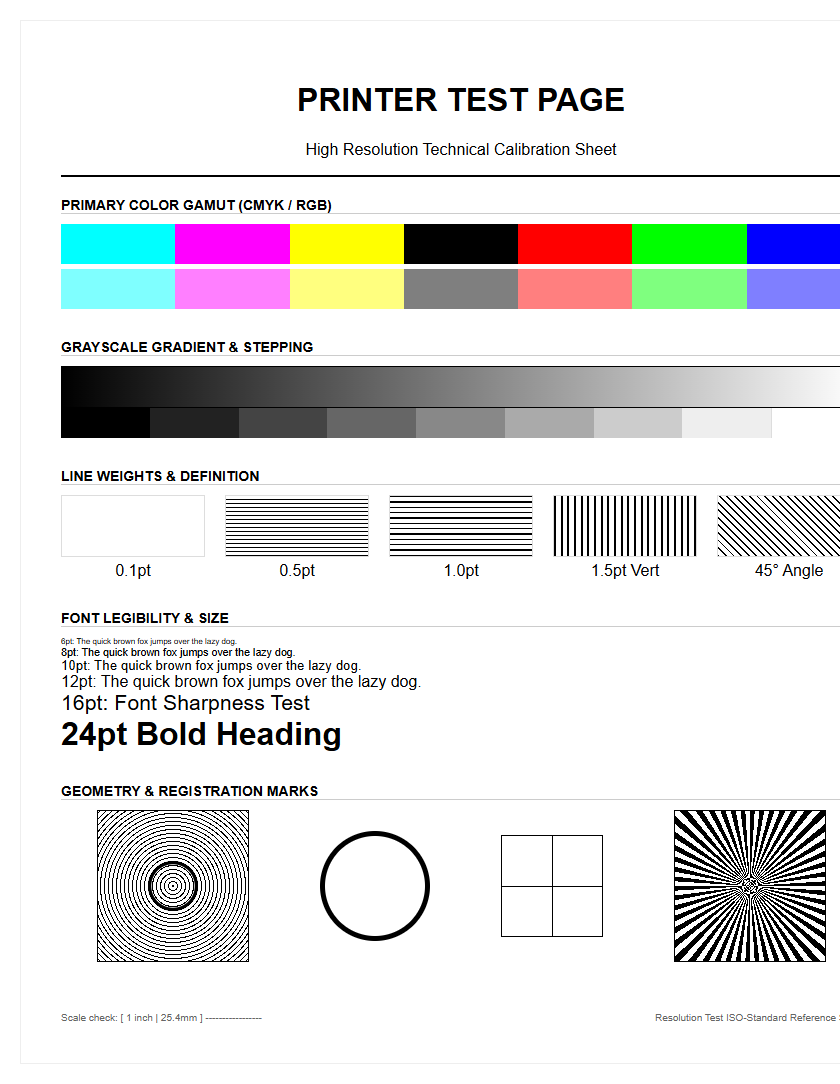
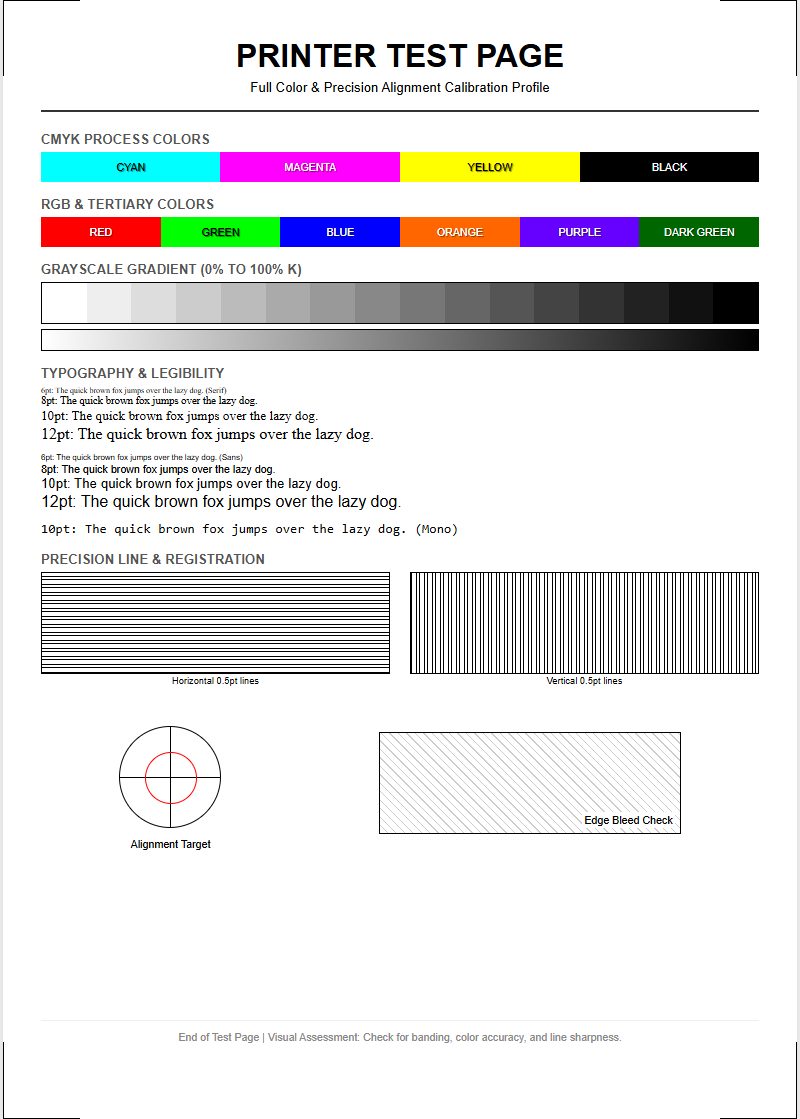
Text sharpness is the hallmark of a well-maintained monochrome printer. A comprehensive test page includes font samples ranging from 4pt to 12pt sizes, featuring both serif and sans-serif typefaces. Clarity is determined by the "edge definition" of the characters. In inkjet printers, poor sharpness is often caused by "feathering," where ink bleeds into the paper fibers. In laser printers, it is caused by "toner scatter" or "fuzziness" around the character outlines.
- Analyze the "counters" (the holes in letters like 'e' or 'a') to see if they are filling with ink.
- Check for "aliasing," where the curved edges of letters appear jagged or "stair-stepped."
- Verify that the fine lines of serif fonts do not disappear at smaller point sizes.
To improve sharpness, ensure you are using the correct media profile. High-resolution settings (e.g., 1200 DPI or higher) allow the printer to place smaller dots, which significantly enhances the legibility of technical documents, legal contracts, and fine-print schematics.
Detecting Streaking and Banding Issues
Streaking and banding are mechanical or fluid-dynamic failures that ruin the professional look of a grayscale document. Banding usually refers to repetitive horizontal lines caused by an inconsistent paper advance mechanism (the "stepper motor"). If the paper moves too far or not far enough between passes, "white bands" or "dark bands" appear. Streaking, conversely, usually refers to vertical lines caused by a dirty corona wire in laser printers or a scratched drum.
- Horizontal Banding: Check the "paper feed adjustment" or "PF" calibration.
- Vertical Streaks: Inspect the fuser, transfer belt, or the scanner glass (if copying).
- Micro-banding: Very fine lines visible only in dark grays, often solved by high-quality print settings.
By identifying the orientation and frequency of these artifacts, users can pinpoint whether the issue is electronic, chemical, or mechanical. A grayscale test page with large blocks of 50% gray is the most effective way to make these defects visible to the naked eye.
Laser Toner Coverage Verification
Laser printers face unique challenges with "toner density uniformity." A coverage verification test involves printing a solid gray "flood" across the entire page. This helps detect issues with the developer unit or the organic photo-conductor (OPC) drum. If the toner is not distributed evenly across the magnetic roller, the print will appear darker on one side and lighter on the other. This is often referred to as "shading" or "fading across the page."
| Component | Coverage Symptom | Resolution |
|---|---|---|
| Transfer Roller | Light, patchy spots | Replace or clean roller |
| Fuser Assembly | Toner smearing/rubbing off | Increase fuser temperature |
| Toner Cartridge | Vertical white voids | Gently shake or replace |
Consistent toner coverage is essential for professional reports. If the coverage is inconsistent, it can indicate that the toner level is low or that the internal mirrors (the "LSU") are dusty and need professional servicing to ensure the laser beam maintains its intensity.
Fine Tuning Grey Level Accuracy
Grey level accuracy ensures that a 50% gray in your digital file actually prints as a 50% gray on paper. This is achieved through a process called "linearization." Without accuracy, your prints may appear too dark (gamma is too high) or too "flat" (contrast is too low). Fine-tuning involves creating an ICC profile specifically for your printer and paper combination. This profile tells the printer exactly how much ink to deposit to achieve a visually accurate gray.
- Metamerism: Ensuring the gray looks the same under different lighting (LED vs. Daylight).
- Luminance: Checking the "brightness" of the gray relative to the white point of the paper.
- Dot Gain: Compensating for how much the ink spreads once it hits the page surface.
By using a spectrophotometer in conjunction with a grayscale test page, you can create a lookup table that corrects any non-linear behavior in the printer's output. This level of precision is mandatory for high-end proofing and professional monochrome art production.
Troubleshooting Faded Monochrome Output
Faded output is a common frustration that can stem from various sources. On a grayscale test page, fading is most noticeable in the blackest regions and the fine text. If the entire page is uniformly light, the printer may be set to "Toner Save" or "Draft" mode, which reduces the DPI and ink volume to save costs. However, if the fading is localized, it likely indicates a hardware component reaching the end of its life cycle.
- Check the "Media Type" setting; using "Plain Paper" settings for "Thick Cardstock" will cause poor transfer.
- Inspect the "Density" slider in the advanced driver properties and increase it by +1 or +2.
- Examine the "Transfer Corona" or "Transfer Belt" for signs of wear or accumulation of paper dust.
In inkjets, fading can occur if the "Ink Low" sensor is triggered, causing the printer to enter a "reserve" mode with reduced flow. Always verify that your consumables are genuine, as third-party toners often have different melting points and magnetic properties, leading to suboptimal density.
Verifying Print Alignment and Resolution
Alignment and resolution verification ensure that the printer's mechanical components are perfectly synchronized. A grayscale test page usually features "registration marks" or "crosshairs" at the corners of the page. If the printer is misaligned, these marks will appear blurry or "doubled." For inkjet printers, this is often a "Bi-Directional" alignment issue, where the head fires differently when moving left than it does when moving right.
- Vertical Alignment: Ensures that vertical lines are straight and not "staggered."
- Horizontal Alignment: Prevents "overlapping" or "gapping" between print passes.
- Resolution Check: Small "line pair" patterns test the limit of the printer's DPI.
Correct alignment is crucial for printing technical drawings where precision is paramount. If the resolution test shows that fine lines are merging into a single gray blob, the printer may be struggling with "dot gain" or mechanical vibration. Regular calibration of the print head alignment via the utility menu will keep the output sharp and the resolution at its theoretical maximum.

Comments