A printer calibration test page serves as a vital diagnostic tool for maintaining professional-grade output across your document workflow. By generating these standardized patterns, you can accurately audit CMYK color profiles and fine-tune print head alignment to eliminate common issues like banding or registration errors. These sheets evaluate critical variables such as ink density, color gamut saturation, and halftone gradients, ensuring your hardware interprets ICC profiles with precision. Regular calibration synchronizes mechanical nozzle performance, optimizing droplet placement for crisp text and vibrant imagery. This proactive approach helps identify clogged nozzles or color shifts early, ensuring consistent spectral response and high-fidelity results for every print job.
Understanding Printer Calibration Basics
Printer calibration is the foundational process of synchronizing your hardware output with digital color standards. It ensures that the specific hues viewed on a calibrated monitor are accurately translated onto physical media. This process primarily involves adjusting the printer's internal color lookup tables (LUTs) and managing ICC profiles to define the color gamut. By establishing a baseline, users can minimize variations in chroma and luminance caused by mechanical wear or environmental shifts.
At its core, calibration addresses the relationship between the printhead's mechanical precision and the chemical properties of the ink or toner. When a calibration printer test page is generated, the device analyzes halftone screens and solid ink densities to determine if the output meets the specified target values. Key technical elements include:
- ICC Profiles: Standardized files that describe the color attributes of a specific device.
- Color Gamut: The entire range of colors that a printer can feasibly produce.
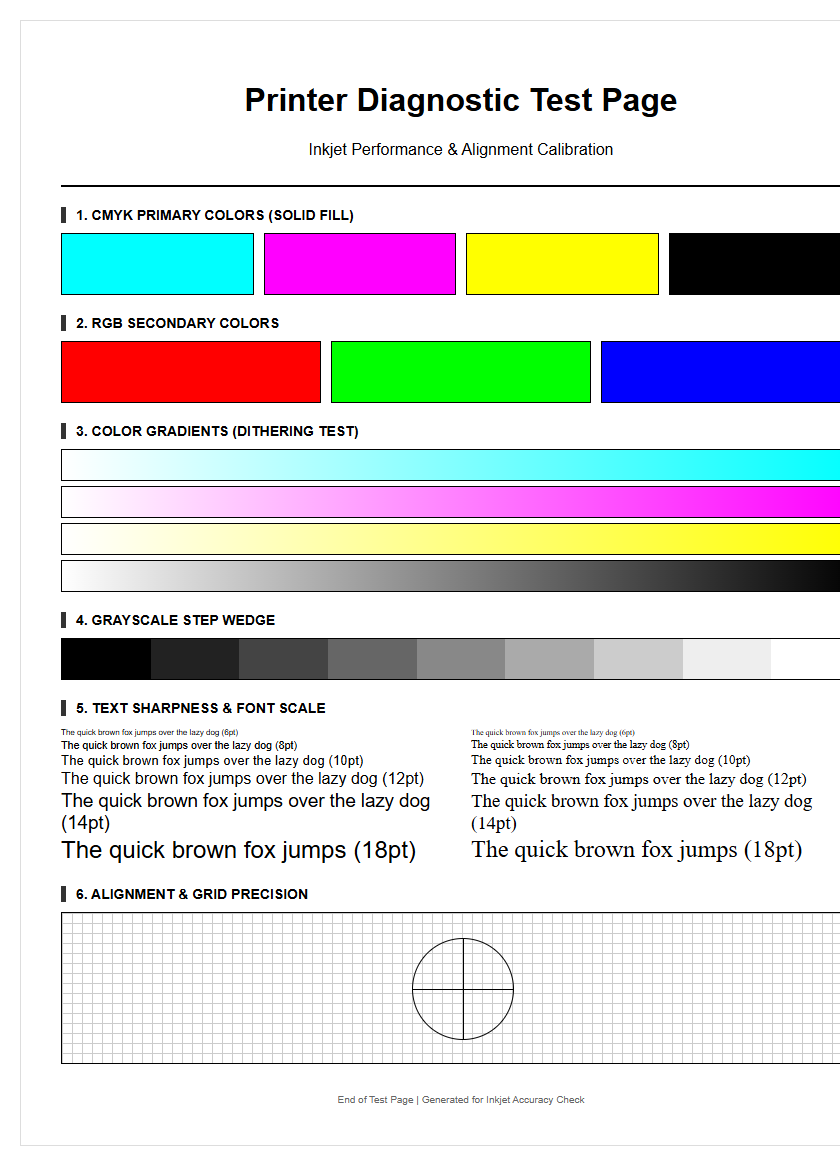
- Dithering: The arrangement of dots to simulate different shades and gradients.
- Spectrophotometry: The measurement of light reflection to quantify color accuracy.
Benefits of Regular Test Prints
Running a calibration printer test page on a regular basis acts as a preventative maintenance strategy for both inkjet and laser systems. These documents provide a snapshot of the current state of the print engine, allowing users to identify minor anomalies before they escalate into hardware failures. Regular testing helps maintain the integrity of the ink delivery system by ensuring that nozzles remain primed and the ink viscosity is optimal for high-resolution output.
Moreover, consistent testing facilitates better resource management by reducing the amount of wasted paper and ink. When a printer is out of alignment or suffers from color shifts, subsequent large-scale print jobs often result in unusable results. By analyzing a test pattern, technicians can verify the registration and dot gain, ensuring that fine lines and text remain crisp. This proactive approach extends the lifespan of consumables like fuser units and transfer belts, as it prevents the overcompensation of toner or ink levels that occurs when the system attempts to correct for poor quality automatically.
Interpreting Color Accuracy Results
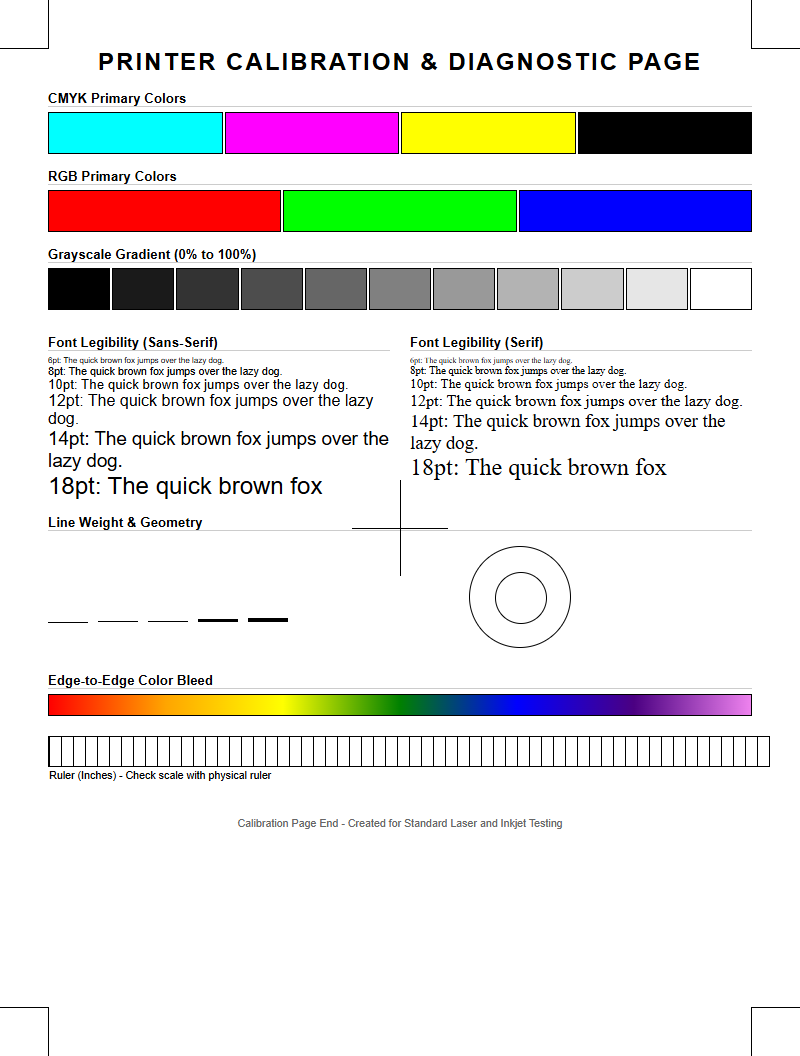
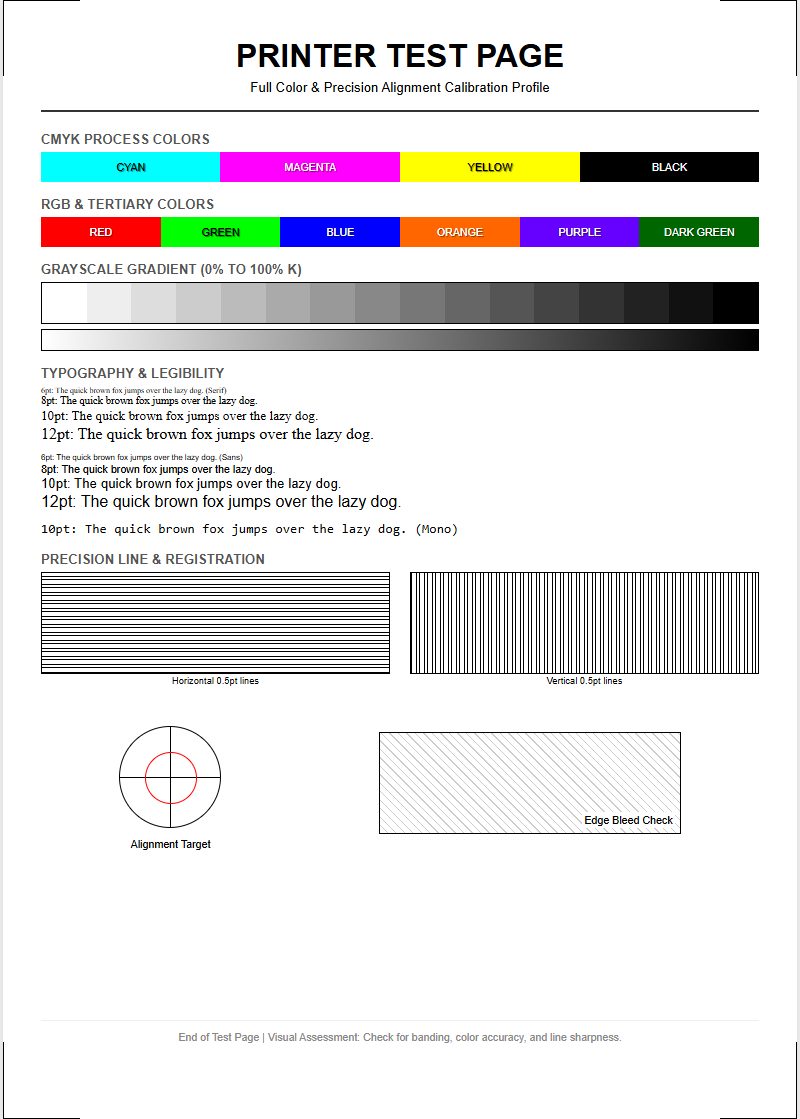
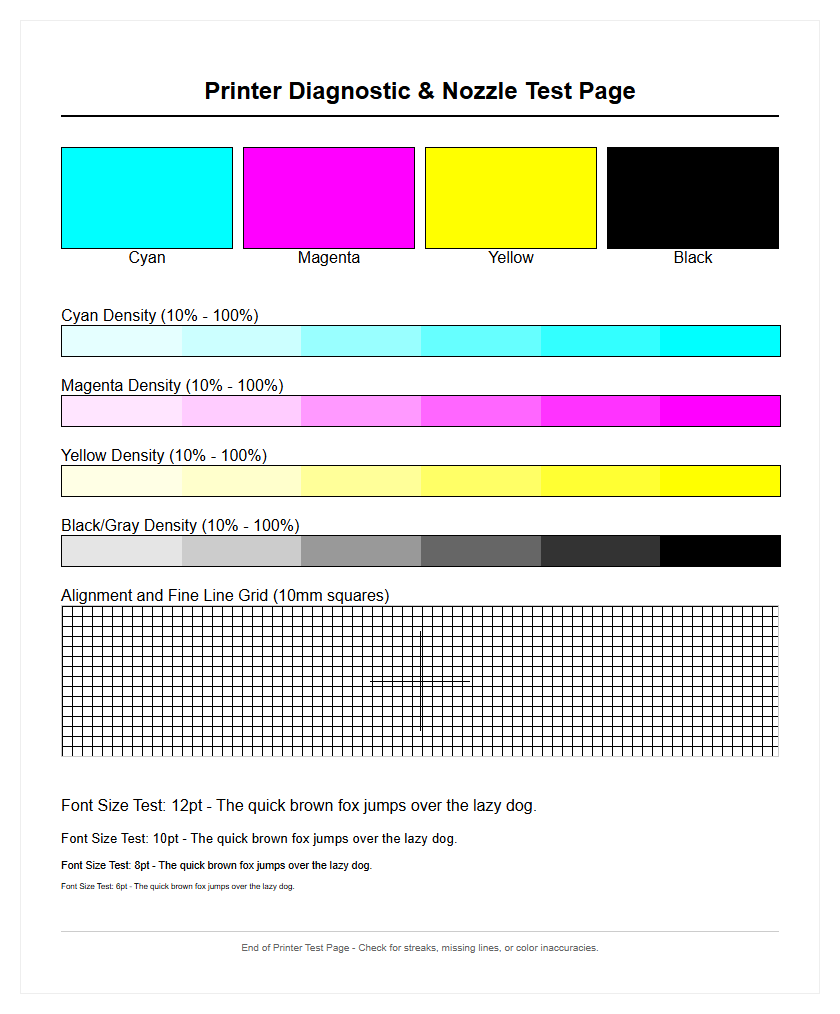
Analyzing the color patches on a calibration printer test page requires a keen eye for technical discrepancies. The primary objective is to verify that the primary (CMYK) and secondary (RGB) colors are rendered without excessive "delta E" variance, which measures the difference between a target color and the actual printed result. If the cyan patches appear too saturated or the magentas lean toward orange, the printer's color management system may require a re-profiling or a manual adjustment of the ink flow levels.
Special attention should be paid to the neutral gray balance. If the gray scale shows a noticeable tint-such as a greenish or reddish cast-it indicates that the CMY inks are not being deposited in the correct proportions to achieve neutrality. High-quality test pages often include a color ramp to check for smooth transitions between light and dark tones. Any "stepping" or visible banding within these gradients suggests a failure in the dithering algorithm or a limitation in the printer's bit-depth processing, necessitating a calibration refresh to restore professional-grade fidelity.
Diagnosing Common Print Quality Issues
A calibration printer test page serves as a diagnostic roadmap for identifying mechanical and digital errors. By scrutinizing the output, users can pinpoint the exact location of hardware degradation. Common issues often manifest as specific visual artifacts that correspond to different internal components. Understanding these visual cues allows for faster troubleshooting and minimizes downtime in high-production environments.
| Visual Symptom | Potential Technical Cause | Recommended Action |
|---|---|---|
| Horizontal Banding | Clogged nozzles or feed calibration | Run cleaning cycle; check paper feed |
| Ghosting Images | Residual charge on OPC drum | Inspect fuser and drum unit |
| Color Bleeding | Excessive ink saturation or media mismatch | Adjust ink density; verify ICC profile |
| Spotting/Voiding | Debris on corona wire or transfer belt | Clean internal components with lint-free cloth |
Improving Inkjet Nozzle Performance
Inkjet nozzle health is critical for achieving the high-resolution detail required in professional photography and graphic design. A nozzle check pattern on a test page will display a series of fine lines for each ink channel. If these lines are broken or missing, it indicates a partial or total blockage within the piezoelectric or thermal printhead. These clogs are often caused by dried ink or trapped air bubbles within the ink delivery lines, which disrupt the precise ejection of droplets.
To improve performance, users should initiate a series of cleaning cycles, which force a high-pressure stream of ink through the nozzles to clear obstructions. If standard cleaning fails, a "power flush" may be necessary, though this consumes more ink. It is also beneficial to check the capping station and wiper blade; these components ensure the printhead remains moist and clean. Maintaining a consistent humidity level in the room can also prevent ink from drying prematurely in the nozzles, ensuring that the droplets maintain a consistent volume and velocity during the printing process.
Steps for Manual Printhead Alignment
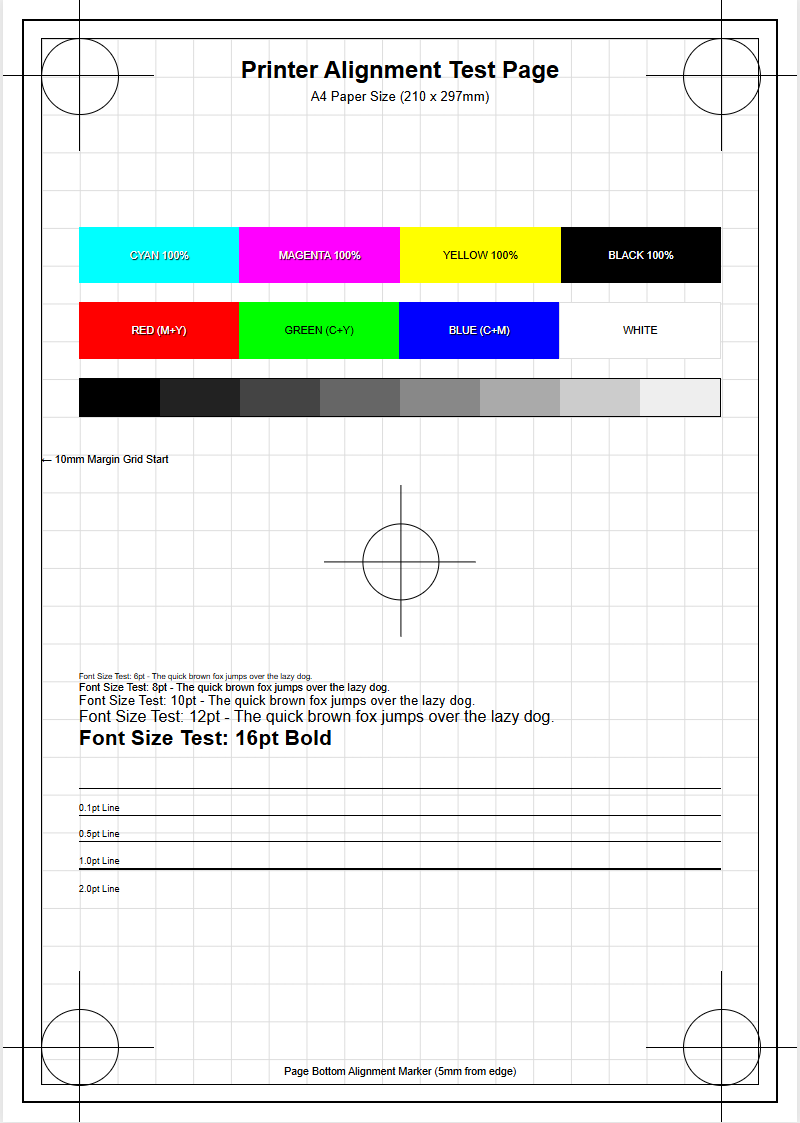
When vertical or horizontal lines on a test page appear jagged or disconnected, a manual printhead alignment is necessary. This process synchronizes the movement of the printhead carriage with the paper feed mechanism to ensure that ink droplets land in the exact spatial coordinates intended. Even a microscopic misalignment can cause text to look blurry or create "moiré" patterns in high-density images. Follow these steps to calibrate the alignment:
- Load high-quality, bright white paper to ensure the test patterns are clearly visible.
- Select the "Print Alignment Page" option from the printer's maintenance menu.
- Examine the printed patterns, which usually consist of numbered boxes with vertical and horizontal lines.
- Identify the pattern in each set that shows the straightest lines with the least amount of visible overlap or gaps.
- Enter the corresponding numbers into the printer's interface to update the firmware's mechanical offset values.
- Print a second test page to verify that the adjustments have successfully resolved the registration errors.
Evaluating Laser Toner Density
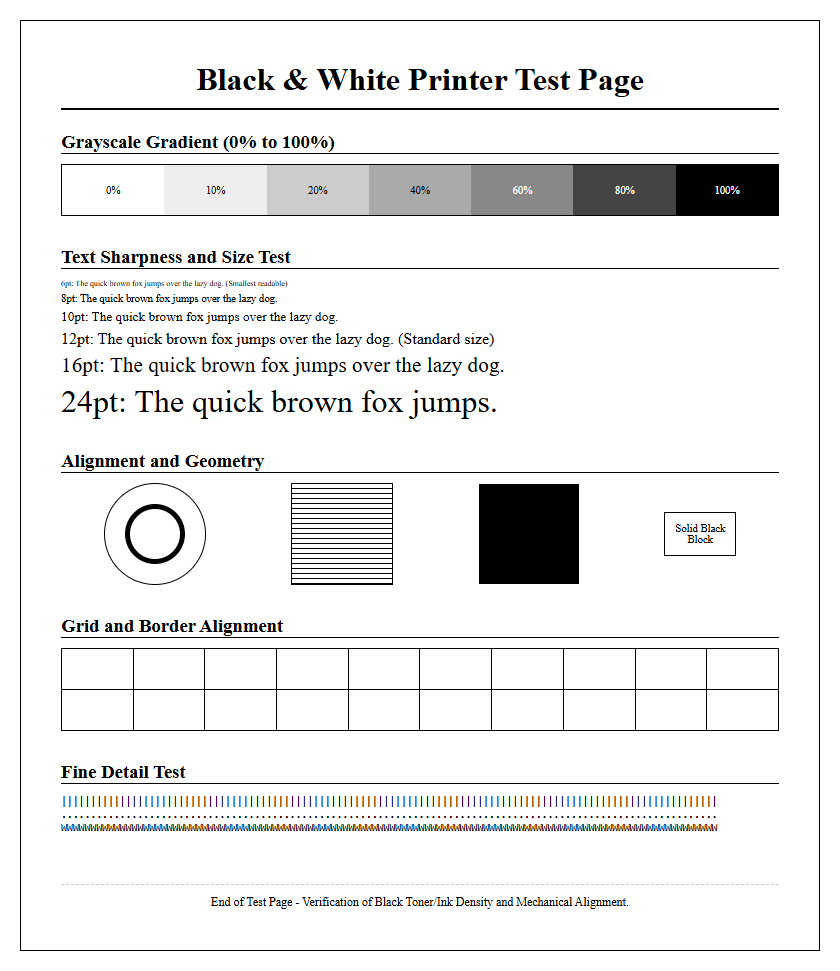
For laser printers, the focus of a calibration printer test page shifts to toner density and solid area coverage. Unlike inkjet printers, laser systems rely on static electricity and heat to fuse plastic resin onto the paper. Evaluating the solid black patches helps determine if the developer unit and the Organic Photo Conductor (OPC) drum are functioning correctly. If the black areas appear washed out or "mottled," it may indicate that the toner level is low or that the fuser temperature is not reaching the threshold required for proper adhesion.
Furthermore, halftoning must be assessed to ensure that fine dots are rendered with precision. A densitometer can be used to measure the optical density of the printed page to ensure it meets the target specifications of the printer's firmware. Issues such as "backgrounding"-where a thin layer of toner appears in non-image areas-often point to a failing charge roller or an imbalance in the high-voltage power supply. Consistent density is paramount for professional documents, as it ensures that text remains legible and images retain their intended contrast ratios.
Optimizing CMYK Color Reproduction
In a professional print workflow, optimizing CMYK (Cyan, Magenta, Yellow, and Key/Black) reproduction is essential for brand consistency. The calibration printer test page allows users to analyze the "subtractive" color mixing process. By examining the overprint patches-where two or more inks overlap-technicians can assess the "trapping" performance. Trapping determines how well one ink adheres to another, which is vital for preventing white gaps or muddy colors at the edges of graphical elements.
Effective CMYK optimization also involves Gray Component Replacement (GCR) and Under Color Removal (UCR). These techniques replace certain proportions of cyan, magenta, and yellow with black ink to stabilize the neutral tones and reduce total ink coverage (TIC). Monitoring the TIC on a test page ensures that the media does not become oversaturated, which can lead to cockling or slow drying times. By fine-tuning these parameters during calibration, you ensure that the printed output exhibits a high dynamic range and deep shadow detail without sacrificing the vibrancy of the highlight areas.
Fixing Vertical Line Distortions
Vertical line distortions are a common frustration found on calibration printer test pages, often manifesting as thin white streaks or dark, repetitive lines running down the length of the paper. In inkjet printers, white vertical lines usually signify a "dead" nozzle or a localized obstruction on the printhead that cannot be cleared by standard cleaning. If the lines are dark, there may be a buildup of waste ink on the star wheels or the exit rollers, causing "pizza wheel" marks on the still-wet surface.
In laser printers, vertical lines are frequently traced back to the scanner glass, the corona wire, or a scratched drum. A single speck of dust on the LED printhead or the scanner's optics can create a continuous line throughout the document. To resolve these distortions, carefully clean the internal optics and check the transfer belt for any physical abrasions. If the distortion persists, the imaging drum or the toner cartridge may have reached the end of its duty cycle and require replacement to restore a clean, artifact-free path for the media.
Maintaining Consistent Professional Output
Achieving consistent professional output requires more than just a one-time calibration; it demands an ongoing commitment to monitoring and maintenance. The environmental conditions of the print room, particularly temperature and humidity, significantly impact how paper absorbs ink and how toner reacts to static charges. Utilizing a calibration printer test page weekly allows you to track these variables and adjust your ICC profiles accordingly. This ensures that a job printed in January will perfectly match a job printed in July.
Additionally, keeping the printer's firmware updated is crucial, as manufacturers frequently release patches that improve color algorithms and mechanical efficiency. Always use high-quality media that matches the settings in your print driver, as "generic" paper settings can negate the benefits of even the most precise calibration. By documenting the results of your test pages over time, you build a performance log that can help predict when parts like printheads or fusers will fail, allowing for scheduled maintenance that avoids costly, unpredicted downtime in your production schedule.

Comments