Measuring toner density and grayscale linearity is essential for achieving professional-grade output on laser printers. By utilizing standardized printer test pages, technicians analyze the optical density of solid fills to ensure maximum coverage and an optimal contrast ratio. Simultaneously, evaluating grayscale linearity involves measuring halftone reproduction across a stepped gradation scale, typically from 0% to 100% black. Using a densitometer or spectrophotometer, you can identify issues like dot gain or non-linear gamma curves that distort midtones. Calibrating these parameters ensures that your Raster Image Processor (RIP) accurately translates digital bit depth into precise physical output, maintaining consistent tonal transitions and fine-detail clarity.
Defining Toner Density Standards
Toner density refers to the measurement of the thickness and coverage of the dry ink particles fused onto the substrate. In the printing industry, this is often quantified using Optical Density (OD) values, specifically Solid Area Density (SAD). A high-quality test page uses a densitometer to measure the "Dmax" value, representing the darkest possible black a printer can produce. These standards ensure that the contrast between the blackest blacks and the white of the paper remains sharp and legible.
- Optical Density: The degree of opacity of the printed layer.
- Dmax Value: The peak saturation point for black toner.
- Target Range: Usually between 1.30 and 1.70 OD for office laser printers.
- Solid Area Density: Consistency across large, filled blocks of color.
Understanding these standards is essential for professional document production. When density falls below the standard threshold, text appears washed out, and barcodes may become unreadable by scanners. Maintaining these metrics ensures that every print job meets industrial benchmarks for clarity and longevity.
Factors Affecting Print Saturation
Several variables influence how effectively toner adheres to the page and how saturated the final image appears. The electrostatic charge of the Organic Photo-Conductor (OPC) drum is the primary driver of toner attraction. If the charge is too weak, the latent image will not attract sufficient toner particles, leading to poor saturation. Additionally, environmental conditions play a significant role in the chemical behavior of the toner.
| Factor | Impact on Saturation |
|---|---|
| Humidity | High moisture causes toner clumping and low density. |
| Fuser Temperature | Incorrect heat prevents proper toner bonding. |
| Transfer Roller Voltage | Determines how much toner moves from drum to paper. |
Beyond hardware, the software driver settings also dictate the "darkness" levels. High-resolution settings often require more precise saturation control to avoid "filling in" fine lines. Regular monitoring of these factors helps prevent common print defects like ghosting or graying backgrounds.
Optimizing Laser Printer Grayscale
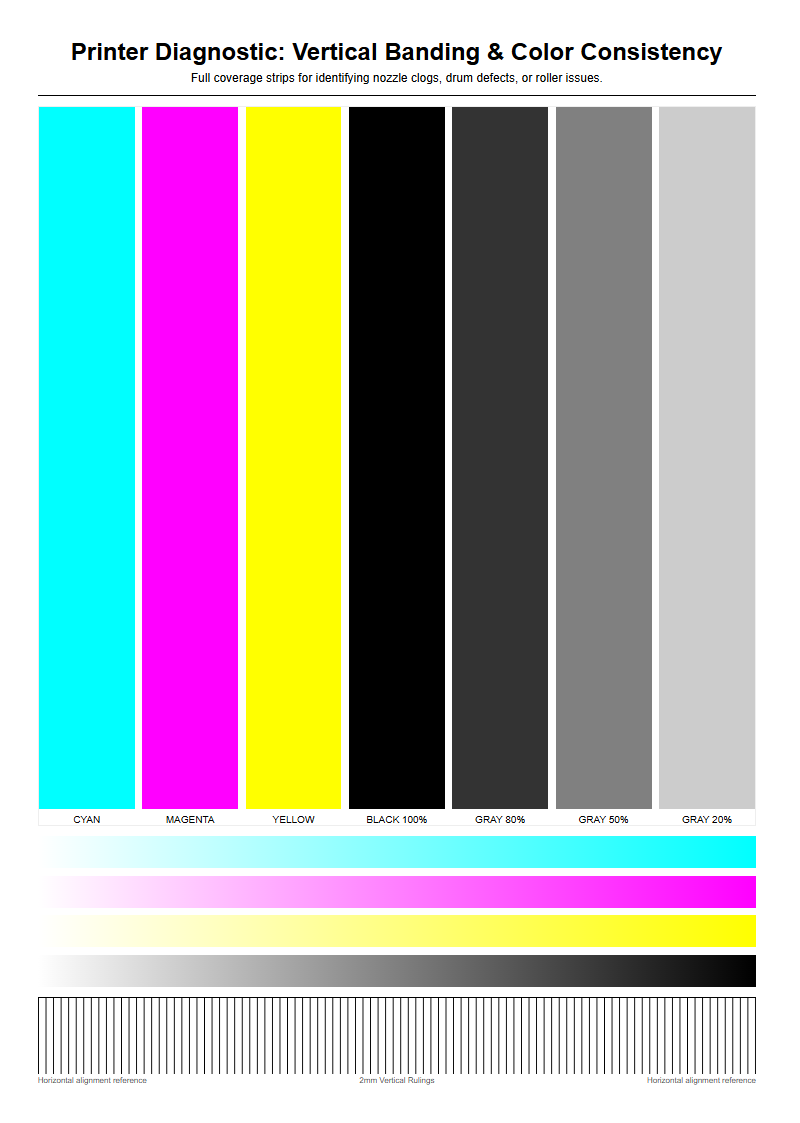
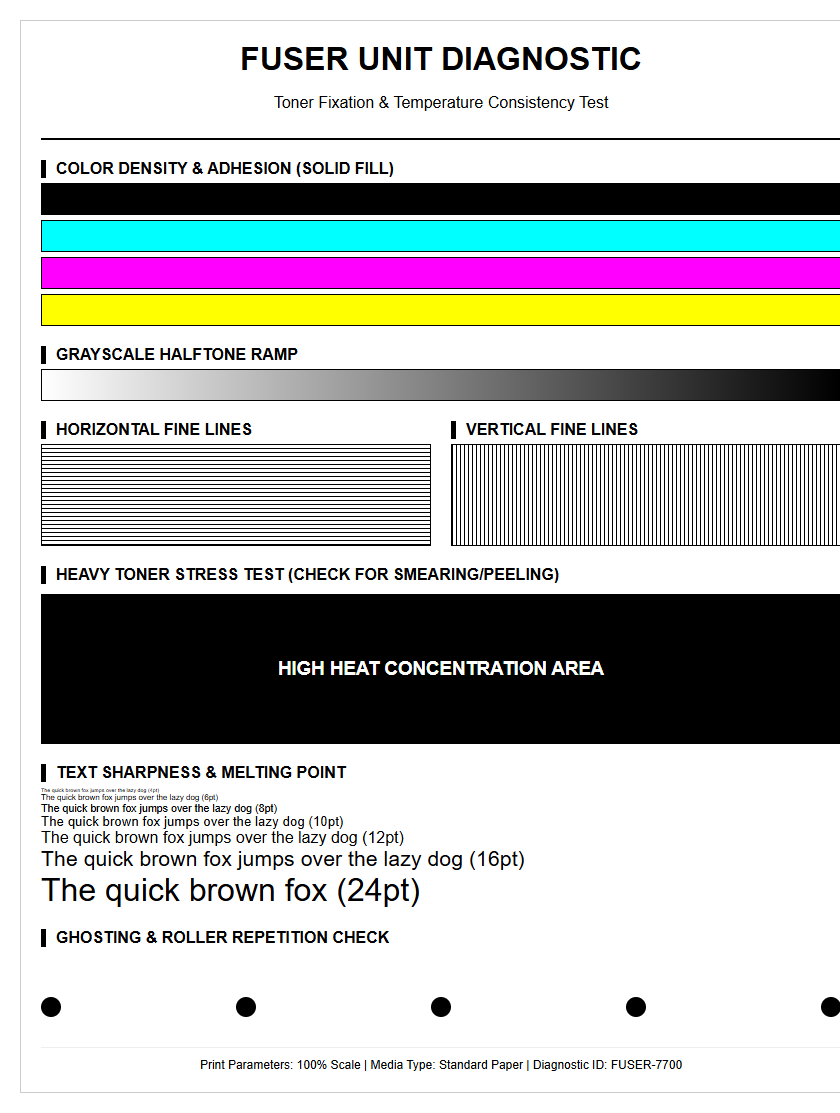
Grayscale optimization is the process of ensuring that shades of gray are rendered accurately through halftoning or dithering patterns. Since laser printers only use black toner, they create gray by varying the frequency and size of dots (Lines Per Inch or LPI). A well-calibrated test page will show a smooth gradient scale from 0% to 100% without visible banding or "stepping" between shades.
- Adjust the Screen Frequency (LPI) to balance detail and smooth transitions.
- Verify the Dot Gain to ensure small dots don't expand and darken the image.
- Run a linearization procedure to align digital input with physical output.
When grayscale is optimized, photographic images and complex charts retain their depth. If the printer's internal lookup tables (LUTs) are misaligned, the mid-tones may appear too dark (crushed blacks) or too light, losing essential detail in the shadows. Proper calibration ensures that the tonal response curve remains linear throughout the printing process.
Calibrating Black Ink Levels
Calibrating black ink levels involves synchronizing the printer's output with standardized color profiles, typically ICC profiles. This process ensures that the requested 100% black in a document actually results in the maximum toner laydown allowed by the hardware. Calibration involves printing a series of test patches and measuring them with a spectrophotometer to adjust the printer's internal voltage and toner flow. Without this step, black text may appear as a dark charcoal gray rather than a true, deep black.
The calibration process also addresses "Rich Black" versus "True Black." While inkjets may mix colors to create a deeper black, laser printers rely heavily on the precise metering of the developer roller. By calibrating these levels, you ensure that the "Total Area Coverage" (TAC) does not exceed the paper's ability to hold the toner, which would otherwise lead to smearing or flaking. Regular calibration is particularly important in environments where multiple printers must produce identical results across different brands or models.
Common Causes of Faded Prints
Faded prints are most frequently caused by a depletion of toner, but technical hardware failures can produce similar results even with a full cartridge. One of the primary culprits is a dirty or aged Laser Scanner Window. If the laser cannot clearly "write" the image onto the drum, the resulting electrostatic charge will be too weak to attract the necessary amount of toner, leading to vertical or horizontal fading across the page.
- Low Toner Concentration: Insufficient toner-to-developer ratio.
- Transfer Roller Wear: Failure to pull toner from the drum to the paper.
- EconoMode Settings: Software settings intentionally reducing density to save toner.
- Contaminated Coronal Wire: Uneven charging of the OPC drum.
Another factor is the age of the toner itself. Over time, toner particles can lose their ability to hold a static charge, a phenomenon known as "low tribo-charge." This results in a weak attraction to the drum, causing the entire page to look pale or washed out. Cleaning the internal optics and checking the transfer belt can often resolve these issues.
Adjusting Hardware Density Settings
Most enterprise-grade laser printers allow users to manually override the default toner density through the hardware control panel or the Advanced Properties tab in the print driver. These settings modify the "Bias Voltage" applied to the developer roller. Increasing this voltage increases the amount of toner that jumps from the developer to the OPC drum, thereby darkening the final output. This is a vital tool for compensating for aging components or low-quality third-party toner.
- Navigate to the "Device Settings" or "Quality" menu on the printer's LCD.
- Locate the "Toner Density" or "Print Darkness" slider.
- Incrementally increase the value (typically on a scale of 1 to 10).
- Print a test page to verify the new Solid Area Density.
Care should be taken not to set the density too high. Excessive toner laydown can cause "toner scatter," where stray particles land in non-image areas, creating a "dirty" look. It can also lead to premature wear of the fuser unit, as more heat is required to melt the thicker layer of plastic resin onto the paper substrate.
Evaluating Cartridge Performance Quality
Evaluating a toner cartridge involves more than just checking its yield; it requires an analysis of its mechanical components. The cartridge is a complex system involving the OPC drum, the wiper blade, and the magnetic roller. A high-quality cartridge maintains a consistent "Doctor Blade" pressure, which regulates the thickness of the toner layer on the developer roller. If this blade is notched or worn, the density will be inconsistent across the page.
| Component | Function | Failure Symptom |
|---|---|---|
| OPC Drum | Holds the electrostatic image. | Repeating spots or streaks. |
| Wiper Blade | Cleans excess toner. | Vertical lines or gray haze. |
| Mag Roller | Transfers toner via magnetism. | Light or patchy print areas. |
When testing a new cartridge, use a "Halftone Pattern" test page. This reveals the cartridge's ability to maintain uniform density without "voids" or "mottling." Evaluating these components ensures that the cartridge will perform reliably until the end of its life cycle, rather than failing prematurely as the toner level drops.
Impact of Paper Texture on Coverage
The physical characteristics of the paper, specifically its smoothness and porosity, significantly affect how toner density is perceived. On the Sheffield scale, smoother papers allow for a more uniform "laydown" of toner. In contrast, highly textured or laid papers have microscopic "valleys." Because toner is a dry powder, it may not reach the bottom of these valleys during the transfer process, resulting in white specks or "mottled" coverage in solid areas.
Surface tension and moisture content also play roles. If the paper is too damp, it acts as a conductor, dissipating the electrostatic charge required to pull toner from the drum. This leads to a significant drop in saturation. To achieve professional density on textured stocks, many printers require a "Heavy Media" setting, which slows down the print speed and increases the fuser temperature to ensure the toner is pressed and melted deeply into the fibers. Understanding the relationship between media type and toner adhesion is critical for high-end graphic applications and marketing materials.
Troubleshooting Uneven Toner Distribution
Uneven toner distribution often manifests as "faded streaks" or "dark bands" running vertically down the page. This is usually not a software issue but a physical obstruction or mechanical failure. One common cause is "toner starvation," where the developer unit is unable to replenish toner quickly enough in specific zones. Another culprit is a dirty Coronal Wire or primary charge roller, which prevents the drum from receiving a uniform charge.
- Check the Doctor Blade: Ensure no debris is blocking the toner flow.
- Inspect the Developer Roller: Look for "rings" or wear patterns on the roller surface.
- Shake the Cartridge: Gently redistribute toner that may have settled on one side.
- Examine the Transfer Belt: Ensure it is free of fingerprints or oils.
To diagnose, print a "Solid Black" test page. If the left side is lighter than the right, the issue is likely a leveled-alignment problem with the developer roller. If the fading is cyclical, the diameter of the drum or roller can be measured to find the source of the repeating defect based on its mathematical period.
Maintaining Consistent Professional Output
Consistency is the hallmark of professional printing. To maintain high toner density over thousands of pages, a strict preventive maintenance schedule is required. This includes regular cleaning of the internal mirrors and lenses, which can accumulate "toner dust" and reduce the intensity of the laser. Most modern printers feature an internal "Auto-Calibration" or "Color Sensing" routine that should be triggered whenever a new cartridge is installed or after significant temperature shifts in the room.
- Perform a "Full Calibration" via the system menu every 5,000 prints.
- Clean the internal paper path using a dedicated lint-free cloth and isopropyl alcohol.
- Monitor environmental humidity to keep it between 40% and 60%.
- Use high-quality, branded consumables to ensure chemical compatibility.
By monitoring the "Consumables Status" report, users can predict when density might begin to drop as the cartridge nears its "End of Life" (EOL). Establishing these habits ensures that the first page of a project looks identical to the last, preserving the brand integrity and professional appearance of all printed documents.

Comments