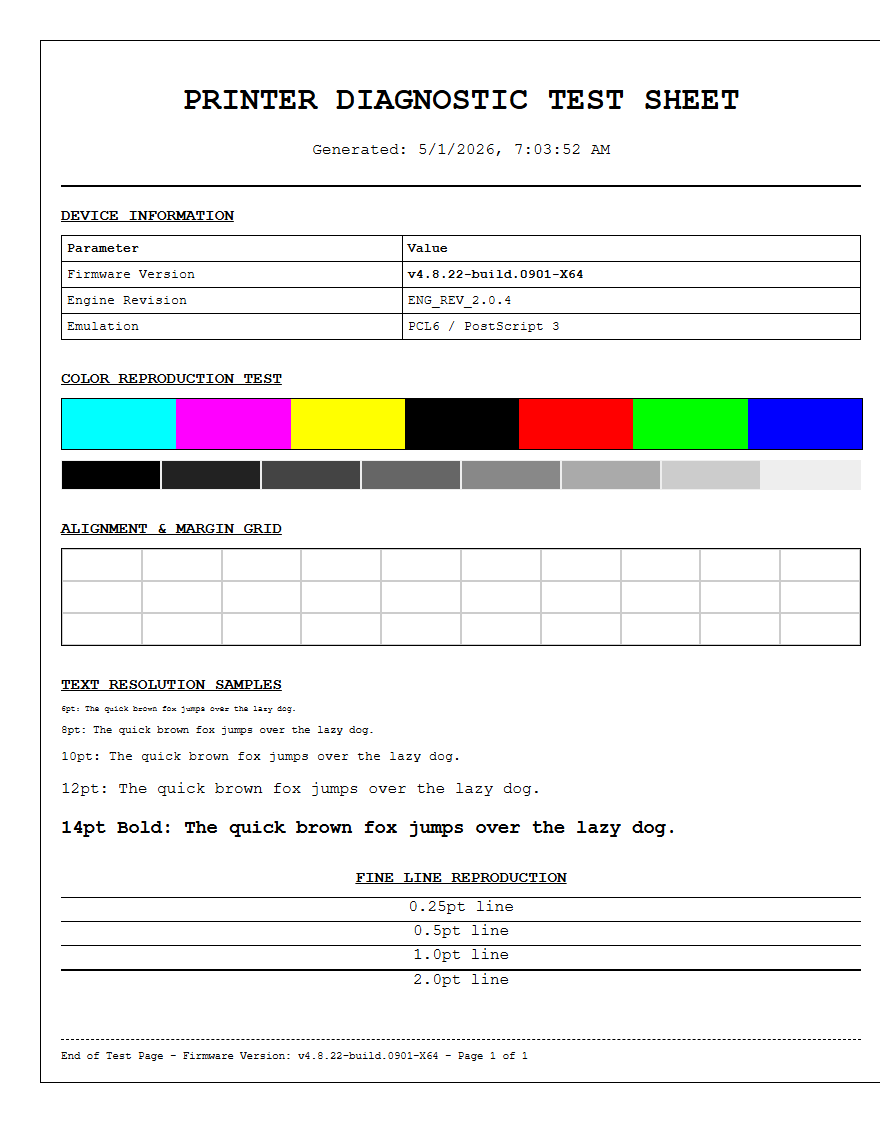
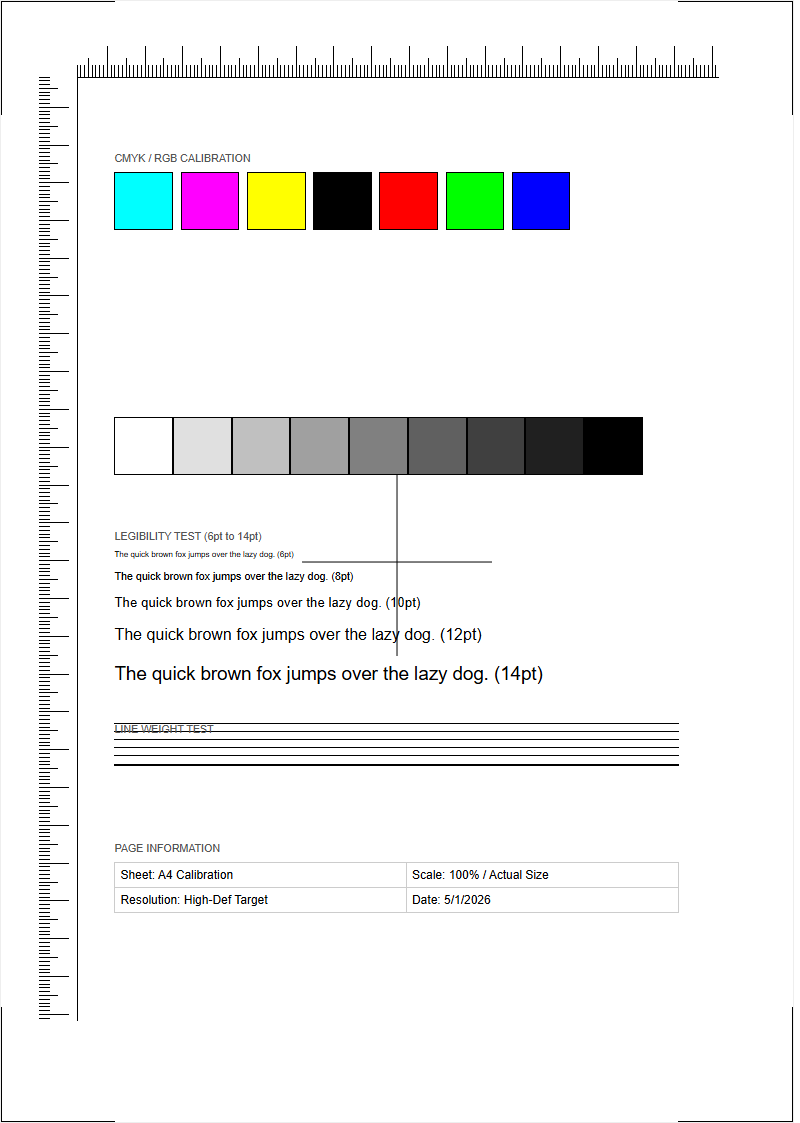
Evaluating the Intermediate Transfer Belt (ITB) integrity is essential for maintaining professional print quality. By generating diagnostic test pages, such as CMYK solid blocks and gradient scales, you can visually identify critical issues like surface degradation, scratches, or tracking errors. If you notice repetitive print artifacts or ghosting, the ITB's cleaning blade or belt surface may be compromised. Additionally, alignment patterns help pinpoint registration errors between color planes, ensuring precise toner transfer. Regularly reviewing these diagnostic reports allows for the early detection of belt wear or mechanical misalignment, preventing downtime and ensuring consistent color accuracy across all your output.
Transfer Belt Role in Laser Printing
In a color laser printer, the transfer belt is a critical intermediate component that ensures the precise delivery of toner to the paper. While the imaging drums create the initial latent images for each color-Cyan, Magenta, Yellow, and Black (CMYK)-it is the transfer belt that collects these individual layers of toner particles. As the belt rotates, each drum deposits its specific color onto the belt's surface in perfect synchronization. This process creates a complete, multi-layered color image before it is ever touched by the substrate.
The belt operates using a sophisticated system of electrostatic charges. High-voltage power supplies create an attraction that pulls the charged toner from the Organic Photo-Conductor (OPC) drums onto the belt. This "intermediate" step is what allows for high-speed, high-resolution color printing without the paper having to pass through four separate drum stations, which would increase the risk of jams and registration errors. Once the composite image is formed on the belt, a secondary transfer roller applies an opposite charge to the back of the paper, pulling the entire image off the belt and onto the page for final fusing.
Signs of Transfer Belt Failure
Identifying a failing transfer belt early can save significant costs in wasted toner and paper. Because the belt is a moving mechanical part subjected to constant friction and electrostatic stress, it eventually degrades. When the surface of the belt becomes scarred or loses its ability to hold a uniform charge, print quality suffers immediately. Users should monitor their printer testing pages for specific visual cues that point toward a belt issue rather than a drum or fuser problem.
- Ghosting: Faint repetitions of previously printed images appearing further down the page.
- Consistent Vertical Lines: Scratches on the belt surface that prevent toner from adhering or being cleaned off properly.
- Background Graying: A light "haze" of toner across the entire page, indicating the belt is holding a residual charge.
- Blank Spots: Areas where the belt surface has become "blind" to toner particles, leaving gaps in the final output.
- Error Codes: Modern printers often trigger "Replace Transfer Kit" or "Transfer Belt Life End" alerts based on internal page counters.
Maintaining Print Quality and Clarity
Optimal print clarity depends on the physical integrity of the transfer belt's surface. This belt is typically made of a high-tech polymer or polyimide material designed to be both flexible and highly conductive. To maintain professional-grade output, the belt must be kept free of microscopic debris and paper dust. Even a small accumulation of dust can interfere with the electrostatic "tack" required to hold toner particles in place, leading to blurred edges or a loss of fine detail in high-resolution graphics.
Regularly running the printer's internal cleaning cycle can help maintain clarity by cycling the cleaning blade against the belt surface. This blade acts as a squeegee, scraping off excess toner into the waste toner box. If the belt becomes contaminated with oils from human fingers or excessive humidity, the toner may "clump" or fail to transfer evenly. Ensuring the printer is stored in a climate-controlled environment prevents the belt material from becoming brittle or overly sticky, both of which negatively impact the sharpness of the final printed characters and images.
Transfer Belt vs Imaging Drum
It is common for users to confuse the transfer belt with the imaging drum, as both are central to the xerographic process. However, they serve distinct roles. The imaging drum (or OPC drum) is responsible for creating the initial image using a laser or LED array to discharge specific areas on its surface. In contrast, the transfer belt acts as a carrier or "staging area" for the toner collected from multiple drums in a color system. While a mono printer might not require a belt, color laser printers rely on it to consolidate the CMYK layers.
| Feature | Imaging Drum (OPC) | Transfer Belt |
|---|---|---|
| Primary Function | Creates latent image via laser. | Collects and carries toner layers. |
| Quantity | One per color (usually 4). | One single large belt. |
| Common Failure | Pinholes or light leaks. | Surface scratches or belt slippage. |
| Output Impact | Affects one specific color. | Affects all colors simultaneously. |
Causes of Color Misalignment
Color misalignment, often referred to as "registration error," occurs when the Cyan, Magenta, Yellow, and Black layers do not stack perfectly on top of one another. This results in a "halo" effect or blurry text where colors bleed out from the edges. The transfer belt is usually the primary culprit in these scenarios. If the belt is not tracking straight or if the drive gears have worn down, the timing of the toner deposition will be slightly off-kilter. Mechanical slippage is a frequent cause, often exacerbated by a belt that has stretched over time due to heat exposure from the nearby fuser unit.
Additionally, the sensors that monitor belt position-known as registration sensors-can become clouded by toner spill. These sensors read calibration marks printed directly onto the belt during the printer's startup sequence. If the sensors cannot see these marks clearly, the printer cannot adjust the timing of the drums to match the belt's speed. To fix this, users often need to perform a "Full Calibration" through the printer menu, which forces the system to realign the color coordinates based on the current physical state of the transfer assembly.
Cleaning Your Printer Transfer Unit
Cleaning a transfer belt is a delicate operation that requires caution, as the surface is incredibly sensitive to light and physical contact. You should only attempt manual cleaning if the internal automatic cleaning blade has failed to resolve visible streaks. Before starting, ensure the printer is turned off and cooled down. Using a clean, dry, lint-free microfiber cloth is the safest approach. Never use harsh chemicals, window cleaners, or abrasive materials, as these will strip the conductive coating from the belt, rendering it useless and requiring a total replacement.
- Open the printer and locate the transfer belt assembly, usually found behind the toner cartridges.
- Gently wipe the surface in one direction; do not use a circular motion.
- Rotate the belt manually using the side gears to access the entire circumference.
- Inspect the cleaning blade (the rubber strip touching the belt) for nicks or built-up toner "crust."
- Vacuum any loose toner from the surrounding cavity using a specialized ESD-safe vacuum.
Avoid touching the belt with your bare hands, as skin oils can create permanent "blind spots" where toner will no longer adhere properly.
Replacing a Worn Transfer Belt
Most transfer belts are rated for a specific duty cycle, often ranging from 50,000 to 150,000 pages depending on the printer model. Once the "Transfer Kit Life" message appears, it is time to source a replacement. Continuing to print on a worn belt risks damaging other components, such as the imaging drums or the fuser rollers, due to excessive toner scatter. Replacing the unit typically involves removing the toner cartridges and the waste toner bottle to gain access to the belt's locking mechanism.
When installing a new belt, it is vital to handle the unit by its frame and avoid touching the black shiny film. Most modern printer firmware requires a "life counter reset" after installation. This tells the printer's logic board that a new belt is present, allowing it to recalibrate the voltage and secondary transfer currents. Genuine OEM (Original Equipment Manufacturer) belts are generally recommended over third-party alternatives, as the specific conductivity and thickness of the belt material are precisely tuned to the printer's high-voltage power supply specifications.
Impact on Color Saturation and Depth
The transfer belt plays a silent but pivotal role in the "density" of a print. Saturation and color depth are achieved by the precise layering of toner particles; if the belt's electrostatic properties have weakened, it will not pull the full amount of toner from the drums. This results in "washed out" colors or gradients that appear grainy and mottled. For professionals printing marketing materials or photographs, a degraded belt can make a vibrant red look like a pale orange or cause deep blacks to appear dark gray.
Depth is also affected by the belt's "smoothness." As the belt ages, its surface can become microscopicly pitted. These pits cause uneven toner distribution, particularly in large areas of solid color. During the secondary transfer phase-where the image moves from the belt to the paper-the belt must release the toner completely. If the belt retains some of the toner due to surface wear, the resulting print will lack the intended punch and contrast. Regular density calibrations can temporarily compensate for this, but eventually, physical degradation of the belt material will limit the achievable color gamut.
Extending Transfer Assembly Lifespan
While the transfer belt is a consumable item, its lifespan can be significantly extended with proper printer habits. One of the most important factors is the type of media used. Rough, textured, or overly thick paper acts like sandpaper against the belt, accelerating the wear on the cleaning blade and the belt surface. Using standard-weight, smooth laser-rated paper reduces this friction. Furthermore, keeping the printer in a low-dust environment prevents abrasive particles from entering the paper path and getting caught under the cleaning blade.
Temperature control is equally important. Excessive heat from the fuser can cause the belt material to lose its elasticity over time. Ensure the printer has adequate ventilation and is not pushed against a wall. Additionally, avoid frequent "short runs" (printing only one page at a time). Every time a printer starts up, the belt performs a rotation cycle; printing in larger batches reduces the total number of rotations the belt makes per page, effectively extending its mechanical life. Finally, always use high-quality toner, as low-grade powders can contain oversized particles that scratch the delicate belt film.
Troubleshooting Streaks and Smudges
When a printer testing page shows vertical streaks or horizontal smudges, you must determine if the fault lies with the transfer belt or the fuser. A simple "stop test" can diagnose this: interrupt the printing process just after the paper passes the belt but before it enters the fuser. If the streak is present on the paper before it is fused, the transfer belt or the imaging drum is the culprit. If the streak is only on the belt itself, the cleaning blade is likely failing to clear the residual toner from the previous cycle.
Smudges that repeat at regular intervals indicate a physical defect on a roller or the belt. You can calculate the source by measuring the distance between the smudges; the circumference of the transfer belt is much larger than that of a drum. A smudge occurring every few inches is likely a drum, while one occurring once every 10 to 15 inches usually points to the transfer belt. If you see "smearing" of colors, it suggests the secondary transfer roller is not applying enough pressure or charge to cleanly pull the toner off the belt, leaving a messy residue behind.


Comments