Achieving professional monochrome output requires a deep dive into printer grayscale performance to ensure neutral density and precise tonal accuracy. By utilizing a spectroreflectometer, technicians can measure Delta E variances across the lightness scale, ensuring a linear response from highlights to shadows. Evaluating gradient transitions is equally critical, as it identifies potential banding within halftone screening or dithering patterns. Adhering to calibration standards like G7 gray balance or ISO specifications ensures consistent results across different media. By optimizing ICC profiles and managing Dmax levels, you maintain shadow detail and highlight retention, resulting in smooth, neutral transitions essential for high-fidelity imaging.
Understanding Grayscale Printing Standards
Grayscale printing is the process of representing an image using various shades of gray, ranging from absolute black to pure white. Unlike true black-and-white printing, which only uses binary ink placement, grayscale relies on sophisticated halftoning and dithering algorithms to simulate continuous tones. Modern printers achieve this by varying the size and frequency of ink droplets or toner particles. In professional environments, the standard often involves translating 8-bit luminosity data into printable patterns that maintain the intended gamma curve.
Understanding these standards requires a grasp of how color spaces like sRGB or Adobe RGB are converted into a single-channel luminance value. When a printer processes a grayscale test page, it interprets 256 levels of gray (0 to 255). High-end devices may utilize dedicated "photo black," "light black," and "light-light black" inks to minimize the "metamerism" effect, where grays appear to shift color under different lighting conditions. Maintaining a neutral balance is critical for technical drawings and professional photography alike.
Importance of Monochrome Test Patterns
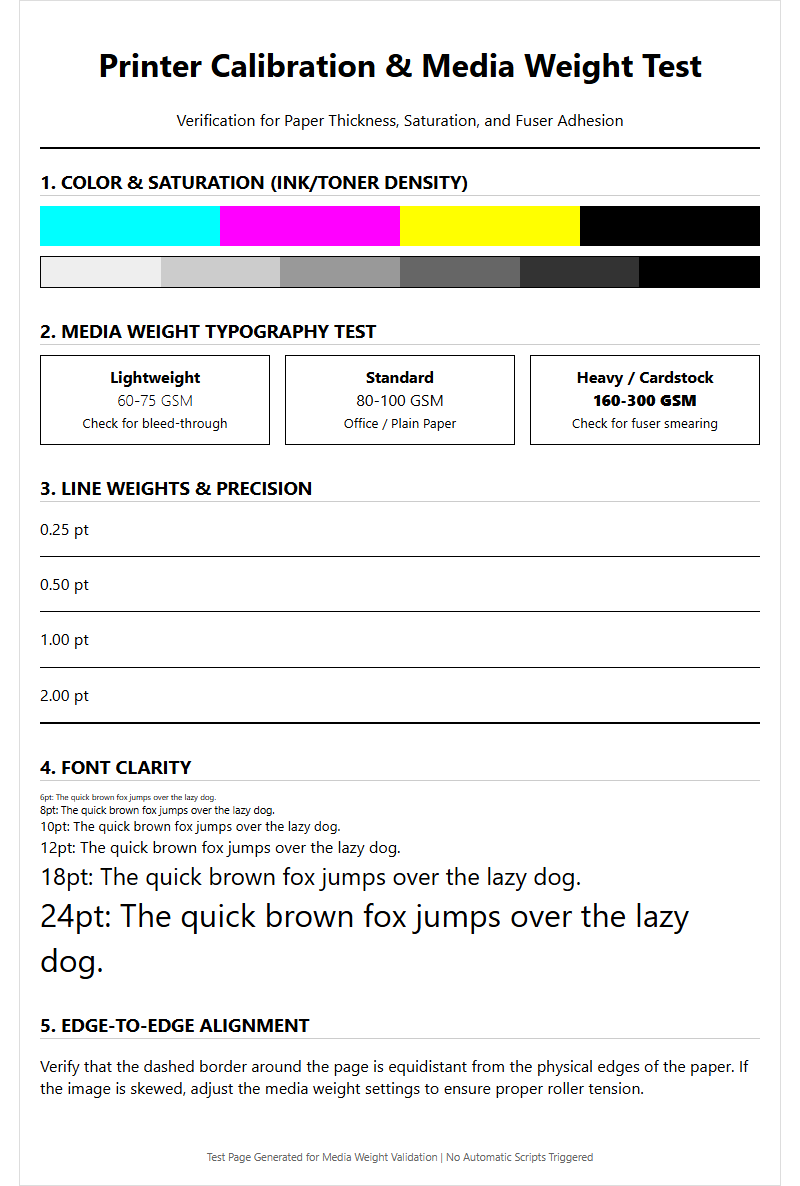
Monochrome test patterns serve as the primary diagnostic tool for assessing a printer's mechanical and software health. These patterns eliminate the complexity of color mixing, allowing technicians to isolate issues related specifically to black ink delivery and precise droplet placement. A standard test pattern typically includes radial gradients, step wedges, and solid fill blocks to challenge the hardware's rendering capabilities.
- Step Wedges: Used to identify "banding" or clipping in specific percentage increments of gray.
- Radial Gradients: Essential for checking the smoothness of transitions and the absence of contouring artifacts.
- Solid Blocks: Helpful for detecting "mottling" or uneven ink density across large surface areas.
- Micro-Text: Evaluates the printer's ability to maintain legibility at high resolutions without ink bleed.
By utilizing these specific patterns, users can determine if a printer's driver is correctly interpreting the "Gray Component Replacement" (GCR) or "Under Color Removal" (UCR) settings, which dictate how much black ink is used versus a composite mix of CMY colors.
Evaluating Black Ink Consistency
Black ink consistency is measured by the optical density, often referred to as Dmax. A high Dmax indicates deep, rich blacks that provide a strong foundation for the rest of the grayscale spectrum. When evaluating a test page, it is vital to look for "bronzing," a phenomenon where the ink sits on top of the media and reflects light unevenly, or "gloss differential," where the black areas have a different sheen than the white paper.
| Metric | Description | Ideal Result |
|---|---|---|
| Dmax Value | Maximum measurable black density. | 2.0 or higher for photo. |
| Uniformity | Variation of density across the page. | Less than 2% deviation. |
| Ink Absorption | Rate at which the substrate accepts ink. | No pooling or "feathering." |
Consistency issues often stem from varying viscosity in liquid ink or irregular particle size in laser toner. Testing across different media types-such as matte, luster, or high-gloss-helps determine if the internal ICC profile is correctly managing the "Total Ink Limit" for the specific paper being used.
Calibrating Neutral Gray Gradients
A neutral gray gradient should appear perfectly colorless, showing no hint of cyan, magenta, or yellow. This is one of the most difficult tasks for an inkjet printer, as many systems create gray by mixing colored inks to achieve finer gradations. Calibration involves adjusting the "Transfer Function" to ensure that a 50% gray input results in a 50% gray output on the physical page. This process, known as linearization, ensures that the transitions from highlights to midtones are perceptually uniform.
To calibrate effectively, users must examine the "neutrality" under standardized D50 lighting. If the grays appear "warm" or "cool," the printer's firmware may need a custom ICC profile or an adjustment to its "Gray Balance" settings. Digital test ramps help visualize where the printer might be "crushing" highlights or shadows, allowing for precise adjustments in the RIP (Raster Image Processor) software to recover lost detail in the extreme ends of the gradient.
Identifying Print Head Nozzle Streaks
Nozzle streaks, often manifesting as horizontal or vertical white lines, are the most common failure in grayscale printing. In a grayscale test, these artifacts are highly visible because the eye is sensitive to breaks in uniform patterns. These streaks indicate "clogged" or "deflected" nozzles. A clogged nozzle leaves a gap, while a deflected nozzle fires ink at an incorrect angle, creating "dark streaks" due to overlapping ink droplets.
- Run a nozzle check pattern to identify which specific ink channel is failing.
- Perform a "Power Clean" if standard cleaning cycles do not resolve the gaps.
- Check the "Encoder Strip" for dust or grease, which can cause systematic alignment errors.
- Inspect the "Capping Station" for dried ink residue that may be preventing proper nozzle sealing.
Regularly printing a grayscale test page helps keep the ink flowing and prevents the sedimentation of pigment particles, which is particularly common in professional-grade black and gray inks used in high-fidelity printers.
Analyzing Shadow Detail and Contrast
The quality of a grayscale print is often judged by its ability to render detail in the "deep shadows"-the regions between 90% and 98% black. If the printer's contrast is set too high or the ink density is poorly managed, these dark tones will merge into a single solid black block, a defect known as "shadow clipping." Conversely, poor contrast results in "muddy" images where the blacks appear as dark grays, lacking the punch necessary for high-impact monochrome graphics.
To analyze this, use a "Zone System" test chart, which divides the grayscale into eleven distinct steps from Zone 0 (black) to Zone X (white). A well-calibrated printer should show a visible distinction between Zone 0 and Zone I. Technical factors such as "Dot Gain"-where the ink spreads on the paper fibers-can significantly impact shadow clarity. Controlling this through proper "Media Type" selection in the printer driver ensures that the micro-details in textures and dark fabrics remain discernible to the naked eye.
Improving Monochrome Text Clarity
Text clarity in grayscale printing is determined by the "addressability" of the print head and the precision of the halftone engine. Even when printing black text, printers often apply a small amount of gray anti-aliasing to smooth the curves of the characters. If the grayscale settings are incorrect, text can appear "fuzzy" or "soft." High-resolution grayscale test pages include "Serif" and "Sans-Serif" fonts at varying point sizes, down to 2pt, to evaluate edge sharpness.
Improving clarity involves disabling "Economy Mode" and ensuring the print resolution is set to its native maximum (e.g., 1200 or 2400 DPI). For laser printers, "Toner Save" features can introduce "graininess" in the gray areas of a font. For inkjets, using "Unidirectional" printing can improve alignment and sharpen text edges, though it reduces overall print speed. Finally, ensuring the "Rendering Intent" is set to "Relative Colorimetric" or "Perceptual" can help maintain the integrity of fine lines in complex monochrome typography.
Troubleshooting Faded Gray Output
Faded output across the grayscale spectrum typically indicates a hardware exhaustion issue or a mismatch in software settings. In laser printers, this is frequently caused by a depleted "Developer Unit" or a failing "Organic Photo Conductor" (OPC) drum that can no longer hold a sufficient electrostatic charge. If the drum cannot attract enough toner, the resulting grays will appear washed out and lack saturation.
For inkjet systems, faded output may suggest that the "Ink Out" sensor has been bypassed or that the air vents in the cartridge are blocked, creating a vacuum that restricts ink flow. Users should check the following:
- Transfer Roller: In laser printers, a dirty roller prevents toner from moving efficiently to the paper.
- Fuser Temperature: If the fuser is too cool, toner won't bond, leading to light, flaky grays.
- Media Weight: Setting the printer to "Heavyweight" or "Cardstock" increases the voltage or ink volume to compensate for thicker surfaces.
Regularly checking these components ensures the grayscale remains bold and the "L* value" in the CIELAB color space remains accurate.
Optimizing Laser Toner Grayscale Performance
Laser printers handle grayscale differently than inkjets, utilizing "Pulse Width Modulation" (PWM) to control how long the laser hits the drum for each pixel. This creates "Screen Cells" of varying sizes. To optimize this, users should access the printer's internal "Half-tone Screen" settings. Options like "Fine" or "Super Fine" increase the "Lines Per Inch" (LPI), which makes the gray dots less visible to the eye, resulting in a smoother appearance.
Environmental factors also play a massive role in laser grayscale quality. High humidity can cause toner to clump, leading to "speckling" in gray fields, while low humidity increases static, causing "toner scatter." Calibrating the "Density Sensor" inside the machine helps the printer self-adjust its internal voltages to maintain consistent gray levels. For the best results, always use "OEM" toner, as third-party powders often have inconsistent melting points and magnetic properties, which can degrade the precision of delicate gray gradients and fine halftone patterns.
Professional Calibration for Neutral Tones
For professionals in graphic design or medical imaging, "visual" calibration is insufficient. Professional-grade grayscale requires the use of a spectrophotometer-a device that measures the light reflected from the page to calculate exact color values. By reading a "target" containing hundreds of gray patches, software can generate a custom "ICC Profile" that corrects for the specific quirks of the printer, ink, and paper combination.
This process addresses "Metameric Failure," ensuring that a neutral gray remains neutral whether viewed under incandescent, LED, or natural sunlight. The G7 calibration methodology is often used to ensure "Gray Balance" and "Tonality" across different printing technologies. By aligning the "Neutral Print Density Curve" (NPDC), professionals can ensure that a grayscale image printed on an inkjet will match a version printed on an offset press or a digital xerographic engine. This level of calibration is essential for maintaining brand integrity and achieving "Exhibition Quality" monochrome prints that stand the test of time.

Comments