Achieving professional print quality requires a deep dive into calibration sheets, the essential diagnostic tools used to synchronize hardware performance with digital intent. This technical guide explores how alignment patterns and color patches facilitate precise printhead positioning and CMYK color fidelity. By evaluating test targets, users can monitor nozzle health, adjust for substrate-specific dot gain, and refine ICC profiles to ensure an expansive yet accurate color gamut. We examine the mechanics of gray balance and registration marks, providing a clear methodology for maintaining chromatic consistency. Understanding these calibration variables ensures that every output meets rigorous standards for resolution, density, and tonal accuracy across various media types.
Essential Printer Calibration Basics
A calibration sheet serves as the fundamental benchmark for ensuring that your hardware communicates effectively with the software drivers. This process synchronizes the movement of the print head carriage with the paper feed mechanism, ensuring that every droplet of ink or particle of toner lands with sub-millimeter precision. When a printer undergoes initial setup or a cartridge replacement, the internal sensors must recalibrate the voltage and timing of the piezoelectric or thermal elements. This ensures the output matches the digital input, preventing common issues like skewed text or overlapping characters.
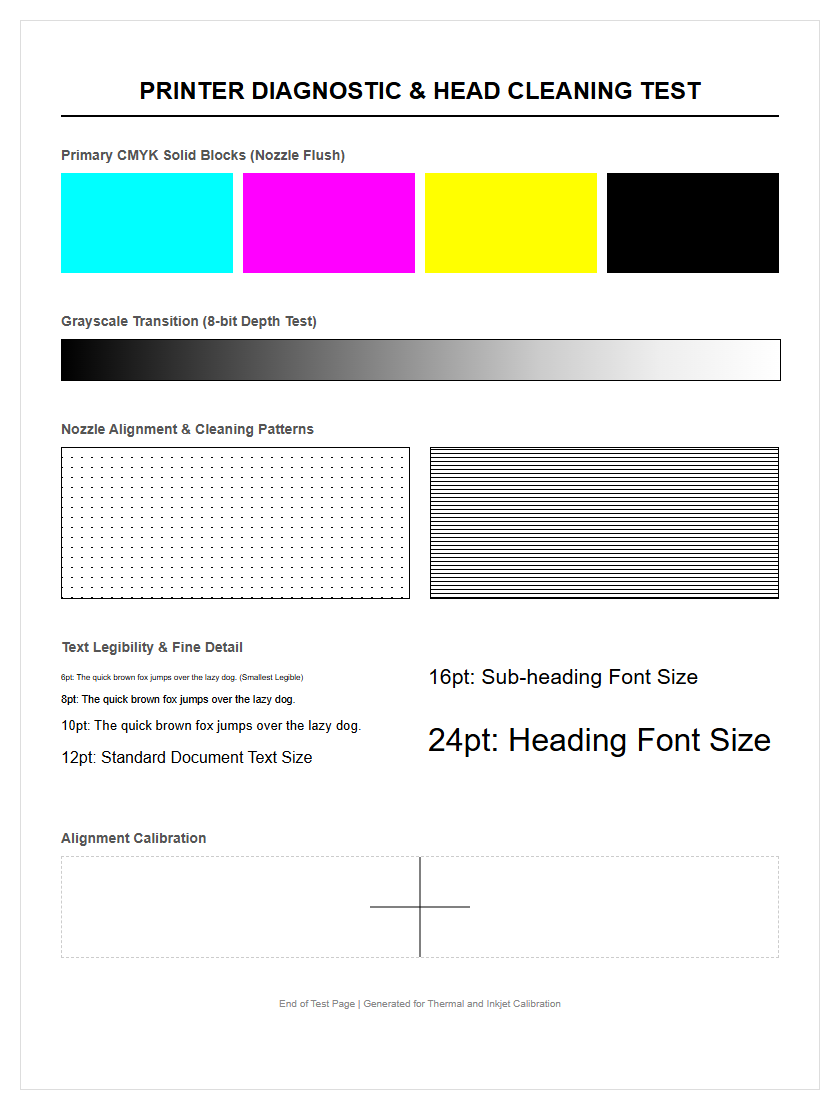
- Nozzle Check: Verifies that all print head nozzles are firing without clogs.
- DPI Synchronization: Matches the dots per inch density to the requested print resolution.
- Paper Path Alignment: Adjusts the rollers to prevent paper skew during high-speed passes.
By analyzing the printed calibration patterns, users can identify if the printer's firmware requires a manual override to correct mechanical offsets. Consistent calibration maintains the integrity of the print architecture, providing a stable foundation for more complex color management tasks.
Improving Color Accuracy and Precision
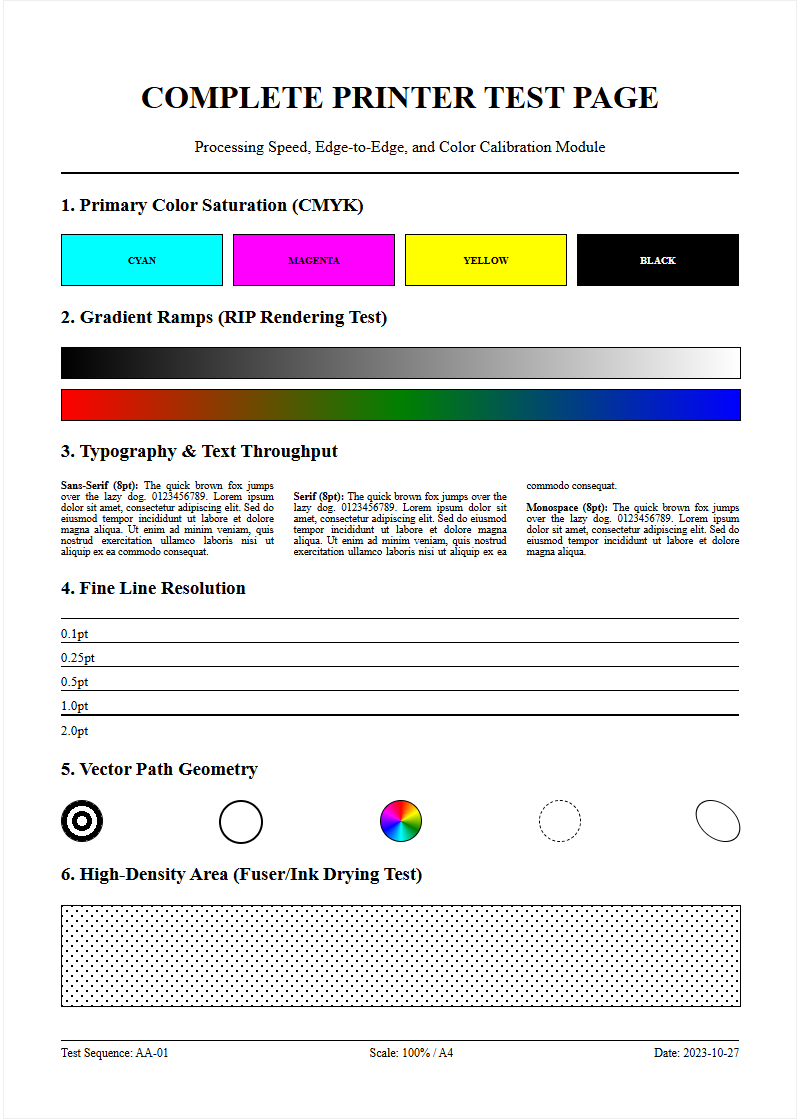
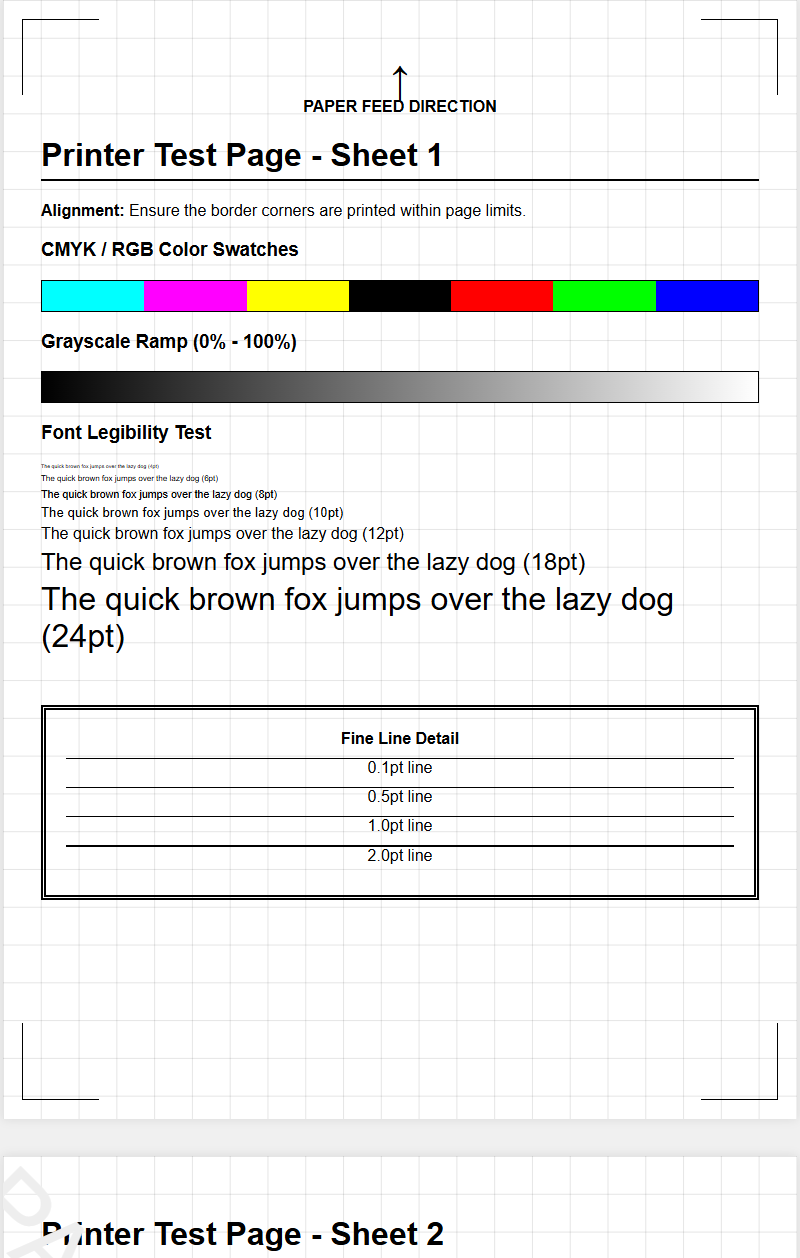
Achieving vibrant and true-to-life colors requires more than just high-quality ink; it necessitates a sophisticated understanding of color gamuts and ICC profiles. The calibration sheet includes specialized color blocks-typically representing CMYK and RGB spectrums-to measure how the printer translates digital color values into physical pigments. If the cyan appears washed out or the magentas are too oversaturated, the printer's internal lookup tables (LUT) may need adjustment. Precision is particularly vital for professional photographers and graphic designers who rely on color fidelity across various lighting conditions.
To enhance precision, follow these technical parameters:
- Run a full-color spectrum test to identify "dead zones" in color reproduction.
- Adjust the saturation levels within the printer driver settings based on the test sheet results.
- Ensure the ink viscosity is optimal by performing a head cleaning cycle if colors appear streaky or dull.
Advanced users often use a spectrophotometer alongside the calibration sheet to create custom profiles, ensuring that the delta-E variance remains minimal for color-critical projects.
Fixing Vertical and Horizontal Streaks
Streaks on a printed page are often symptomatic of hardware obstructions or synchronization errors. Vertical streaks typically indicate a clogged nozzle or a scratched drum in laser printers, while horizontal streaks often point to a "banding" issue caused by inconsistent paper advancement. The calibration sheet is designed with solid fill areas and gradient bars specifically to highlight these defects. By examining the continuity of these lines, you can determine if the fuser assembly is reaching the correct temperature or if the wiper blade in the toner cartridge is failing.
Common causes for streak artifacts include:
- Dried Ink Residue: Accumulation on the print head prevents smooth ink flow.
- Corona Wire Contamination: Dust on the wire in laser printers creates vertical white lines.
- Encoder Strip Grime: Smudges on the timing strip cause the carriage to stutter, leading to horizontal displacement.
Using the diagnostic patterns on the calibration page allows you to pinpoint the exact location of the hardware failure, facilitating targeted cleaning or component replacement.
Resolving Cartridge Alignment Errors
Cartridge alignment is the process of ensuring that the black and color nozzles are perfectly centered relative to each other. Misalignment manifests as blurry text, "ghosting" images, or thin white gaps in solid blocks of color. Most modern calibration sheets print a series of numbered boxes with varying degrees of overlap. The user must select the pattern where the lines are most perfectly centered, allowing the firmware to adjust the firing sequence of the print head. This is especially critical for bidirectional printing, where the head deposits ink while moving in both directions.
| Error Type | Visual Symptom | Calibration Fix |
|---|---|---|
| Vertical Shift | Text appears jagged | Adjust carriage timing |
| Horizontal Gap | White lines in images | Recalibrate feed rollers |
| Color Bleed | Fuzzy edges on logos | Align nozzle offset |
Once the alignment values are entered, the printer recalibrates its internal coordinate system, restoring sharp edges and crisp typography.
Testing Ink and Toner Consistency
Consistency in pigment delivery is essential for maintaining professional-grade output throughout a long print run. A calibration sheet tests this by printing large areas of uniform density, known as "solids." In inkjet systems, this reveals if the ink delivery system is maintaining constant pressure. In laser systems, it checks the integrity of the developer unit and the electrostatic charge on the drum. Variations in density across the page can indicate that the toner is running low or that the ink delivery tubes have trapped air bubbles, leading to premature fading.
- Check for "mottling," where the ink pools unevenly on the surface.
- Verify that the "dither" patterns are uniform without visible graininess.
- Observe the "halftone" blocks to ensure the dots are evenly spaced.
Frequent testing prevents the waste of expensive media by catching consistency issues before they affect the final product. Regular monitoring of these density blocks ensures that the "lightness" and "darkness" settings are balanced according to the manufacturer's specifications.
Interpreting Standard Calibration Patterns
To the untrained eye, a calibration sheet looks like a chaotic array of lines and dots, but each element serves a specific diagnostic purpose. Moiré patterns are used to detect interference between the printer's resolution and the image's frequency. Line scales help measure "dot gain," which is the tendency of ink to spread as it hits the paper fibers. Convergence targets-usually crosshairs-are used to ensure that the multiple color layers overlap precisely to create a single, unified image. Understanding these patterns allows for a rapid "visual audit" of the machine's health.
- Gray Balance Scales: Essential for ensuring neutral grays without a color cast.
- Resolution Wedges: Measures the fine-line detail and sharpness limits.
- Bleed Targets: Determines if ink is spreading too far into adjacent white space.
By reading these patterns, technicians can diagnose if the issue is a software driver mismatch or a physical mechanical failure, such as a worn-out drive belt or a loose carriage screw.
Maintaining High Definition Print Quality
High-definition printing relies on the smallest possible droplet size, measured in picoliters, and the highest possible dots per inch (DPI). To maintain this quality, the calibration sheet includes micro-text and fine-line lattices. If the text at 2-point font becomes illegible, it indicates that the print head's precision has degraded. Maintaining HD quality involves managing the "inter-dot" distance and ensuring the printer's "screening" algorithm is functioning correctly. This is particularly important for high-gloss media where every imperfection is magnified by the reflective surface.
Key HD maintenance factors include:
- Using high-grade pigments that resist "wicking" on the paper surface.
- Updating the printer firmware to utilize the latest dithering algorithms.
- Cleaning the optical sensor that detects paper type and adjusts the head height accordingly.
Consistent use of the calibration page ensures that the machine operates at its peak performance ceiling, delivering gallery-quality results without the need for constant manual intervention or expensive professional servicing.
Optimizing Output for Various Media
Different media types-from 80gsm bond paper to 300gsm heavy cardstock-require unique calibration profiles. A calibration sheet helps optimize the "media handling" settings, such as the fuser temperature for laser printers or the "dry time" for inkjets. For instance, glossy photo paper requires a higher ink density but a slower feed rate to prevent smearing. By running a calibration sheet on a new media type, the printer can detect the "reflectivity" and "porosity" of the surface, adjusting the "vacuum force" or "roller tension" to ensure the paper remains flat during the printing process.
- Coated Media: Requires precise ink limit control to avoid puddling.
- Uncoated Media: Needs adjustments for higher absorption rates.
- Textured Media: Demands a higher head gap to avoid physical contact with the paper.
Optimizing for media ensures that you do not over-saturate thin papers or under-ink thick canvases, resulting in an efficient use of resources and a higher quality finish for every specific job type.
Diagnostic Steps for Hardware Reliability
When print quality fails, the calibration sheet is the first tool used in a hardware diagnostic workflow. It allows you to isolate whether the fault lies in the consumables or the machine's mechanical framework. By analyzing the "step-and-repeat" patterns, you can determine the circumference of the roller causing a recurring mark. This systematic approach reduces downtime and prevents the unnecessary replacement of functional parts. A successful calibration run serves as a "clean bill of health" for the printer's internal computer and mechanical actuators.
| Component | Diagnostic Marker | Action Required |
|---|---|---|
| Feed Rollers | Inconsistent margin size | Clean or replace rubber grips |
| Fuser Unit | Toner smudges easily | Increase heater temperature |
| Print Head | Missing color channels | Deep clean or purge air |
Reliability is built through these small, iterative checks. If the diagnostic patterns are sharp and consistent, the hardware is capable of handling high-volume workloads without risk of catastrophic failure or data loss during the spooling process.
Enhancing Long Term Printer Performance
Long-term performance is a result of proactive maintenance rather than reactive repair. Utilizing the calibration sheet as part of a monthly maintenance schedule prevents the gradual "drift" in color and alignment that occurs over time due to vibration and environmental factors like humidity. Humidity can swell paper fibers and change the way ink adheres, necessitating a seasonal recalibration. Furthermore, keeping a history of these sheets allows you to track the "wear-out" phase of components like the print head or the transfer belt, enabling you to order replacements before the machine actually breaks down.
Recommended Maintenance Checklist:
- Perform a monthly alignment check to compensate for mechanical wear.
- Run a full cleaning cycle after every 500 pages or if the printer sits idle for a week.
- Validate color profiles whenever switching between different brands of ink or toner.
- Check the firmware version to ensure the latest calibration algorithms are active.
By prioritizing these steps, you extend the lifespan of the printer, maximize the value of your investment, and ensure that every page printed is as perfect as the first one off the assembly line.

Comments