Maintaining peak performance in inkjet systems requires a systematic approach to printhead health. By regularly generating a diagnostic test page, operators can analyze the nozzle check pattern to identify misfiring or clogged orifices. These visual reports highlight critical issues like banding or ink starvation before they compromise output quality. When gaps appear, executing a targeted cleaning cycle facilitates the removal of dried residue from the printhead face and internal channels. For persistent blockages, advanced nozzle recovery procedures utilize the maintenance station to re-prime the system. This proactive strategy ensures consistent droplet trajectory and extends the operational lifespan of your hardware.
Identifying Clogged Print Heads
Clogged print heads are usually first noticed through visible artifacts on a standard printer test page. When you run a nozzle check, the output should display a perfect grid or solid blocks of color. If you see broken lines or white gaps, this indicates that microscopic nozzles are obstructed. In piezoelectric systems, even a tiny amount of dried residue can prevent the mechanical pulse from ejecting ink. Conversely, thermal inkjet heads may experience "kogation," where burnt ink accumulates on the heating element. Identifying these issues early prevents the printer from attempting to compensate by pushing more ink through remaining open channels, which can lead to further overheating or mechanical stress. Monitoring for horizontal banding is essential, as this typically points to a specific color channel failing. Early detection through diagnostic patterns ensures you do not waste expensive substrates on poor-quality prints. Regular inspection of the nozzle check pattern is the first line of defense in maintaining high-fidelity output.
Causes of Ink Buildup
Ink buildup is primarily a result of the volatile components in the fluid evaporating over time. Most inkjet inks are solvent-based or aqueous, meaning they rely on a liquid carrier to keep pigments or dyes in suspension. When the printer sits idle, the ink in the nozzles is exposed to air, leading to increased viscosity and eventually solid coagulation. Environmental factors like low humidity or high ambient temperatures accelerate this process. Furthermore, paper dust and airborne particulates can adhere to the moist print head surface, creating a physical barrier. Another technical cause is "overspray," where fine droplets land back on the nozzle plate rather than the paper, slowly forming a crust. Using third-party inks with inconsistent particulate sizes can also cause internal blockages within the manifold or the fine mesh filters. Maintaining a stable environment and using high-quality consumables are critical to preventing these buildup issues before they require intensive recovery procedures.
Automated Cleaning Cycle Process
The automated cleaning cycle is a software-controlled maintenance routine designed to clear minor obstructions without manual intervention. When triggered, the printer moves the print head assembly to the capping station. Here, a small vacuum pump engages, creating negative pressure to pull a fresh charge of ink through the nozzles. This process effectively flushes out air bubbles and dried residue into a waste ink reservoir or maintenance box. Modern firmware often includes different levels of cleaning, ranging from a quick "prime" to a "deep clean" or "power flush." While effective, these cycles consume a significant volume of ink and can eventually fill the waste ink pads to capacity. The printer's logic board monitors these cycles to ensure the piezoelectric or thermal elements are not over-stressed. It is best to perform an automated clean only when a nozzle check confirms a failure, as excessive cleaning can actually introduce air into the lines through cavitation.
Manual Print Head Maintenance Steps
When software cycles fail, manual print head maintenance becomes necessary to restore functionality. This process involves accessing the internal carriage and carefully cleaning the exterior of the nozzle plate to remove stubborn physical blockages. Accuracy and gentleness are required to avoid damaging the delicate electronic components.
- Use lint-free microfiber cloths to avoid introducing new fibers into the assembly.
- Apply a specialized print head cleaning solution or distilled water to the cloth.
- Gently blot the nozzle surface; never scrub, as this can damage the delicate orifice plate.
- Clean the capping station and wiper blade, which often harbor dried ink and debris.
- Inspect the electrical contact points for any ink splatter that might cause communication errors.
Manual intervention requires a steady hand and should be done with the power disconnected to prevent short-circuiting the logic board. By removing the physical crust from the exterior, you allow the internal pressure of the next automated cycle to be far more effective in clearing the internal channels.
Resolving Streaks and Blurry Lines
Streaks and blurry lines are often the result of misdirected ink droplets or partial clogs that alter the spray pattern. This phenomenon, known as "deflection," occurs when dried ink around the nozzle rim forces the ink to exit at an angle rather than straight down. To resolve this, you must distinguish between horizontal banding and vertical blurring. Horizontal streaks usually indicate a total blockage in certain nozzles, while vertical blurring often points to a synchronization issue between the print head and the encoder strip.
| Symptom | Potential Cause | Solution |
|---|---|---|
| Horizontal White Lines | Clogged Nozzles | Run Cleaning Cycle |
| Blurred Text | Head Misalignment | Calibration Utility |
| Color Bleeding | Excessive Buildup | Wiper Blade Clean |
| Ghosting | Encoder Strip Dirt | Clean Encoder Strip |
Performing a bi-directional alignment calibration ensures that the drops from the "left-to-right" and "right-to-left" passes land exactly on top of each other, sharpening the final image output and eliminating ghostly edges.
Testing Print Quality After Cleaning
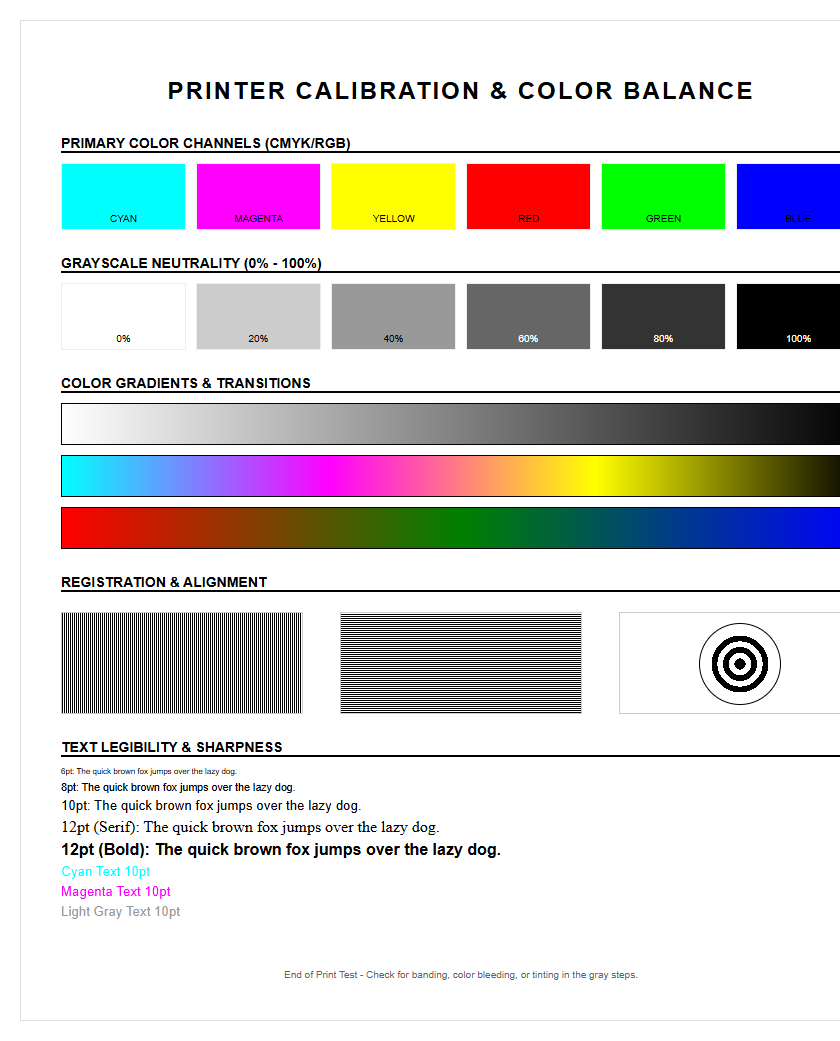
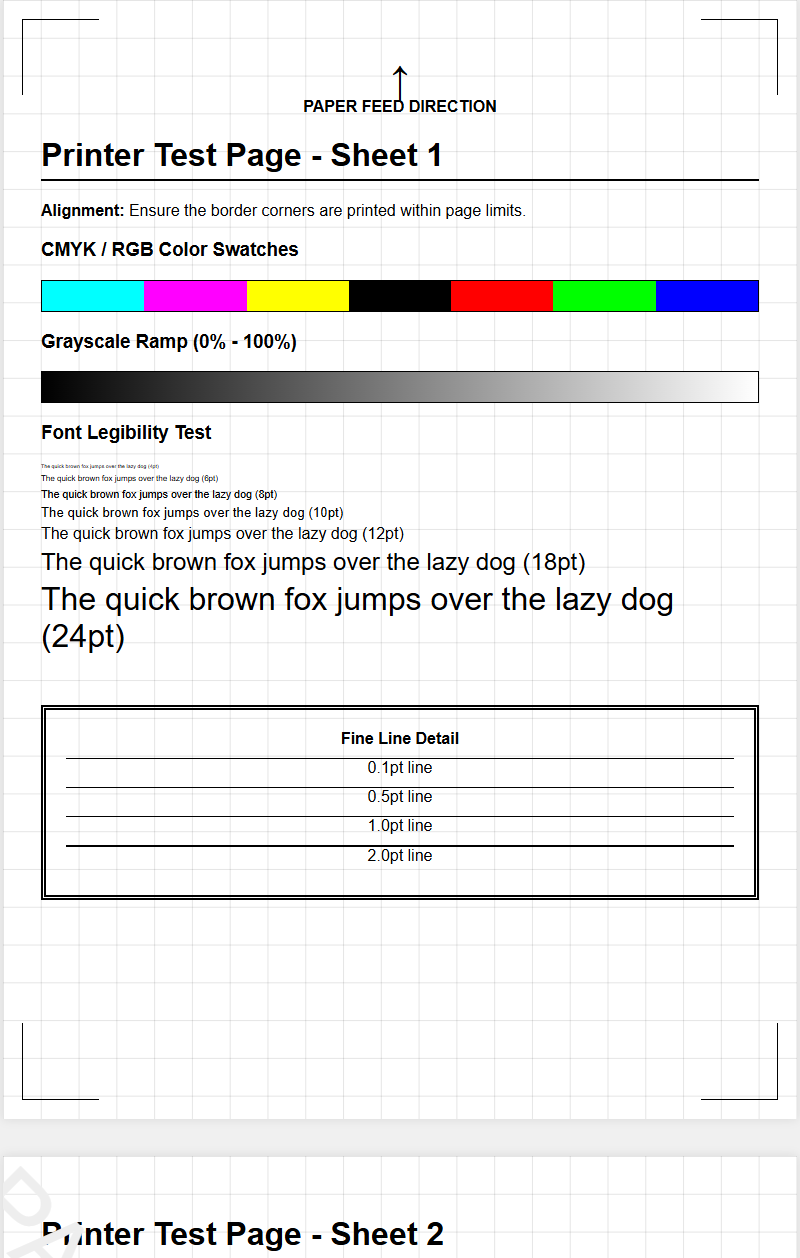
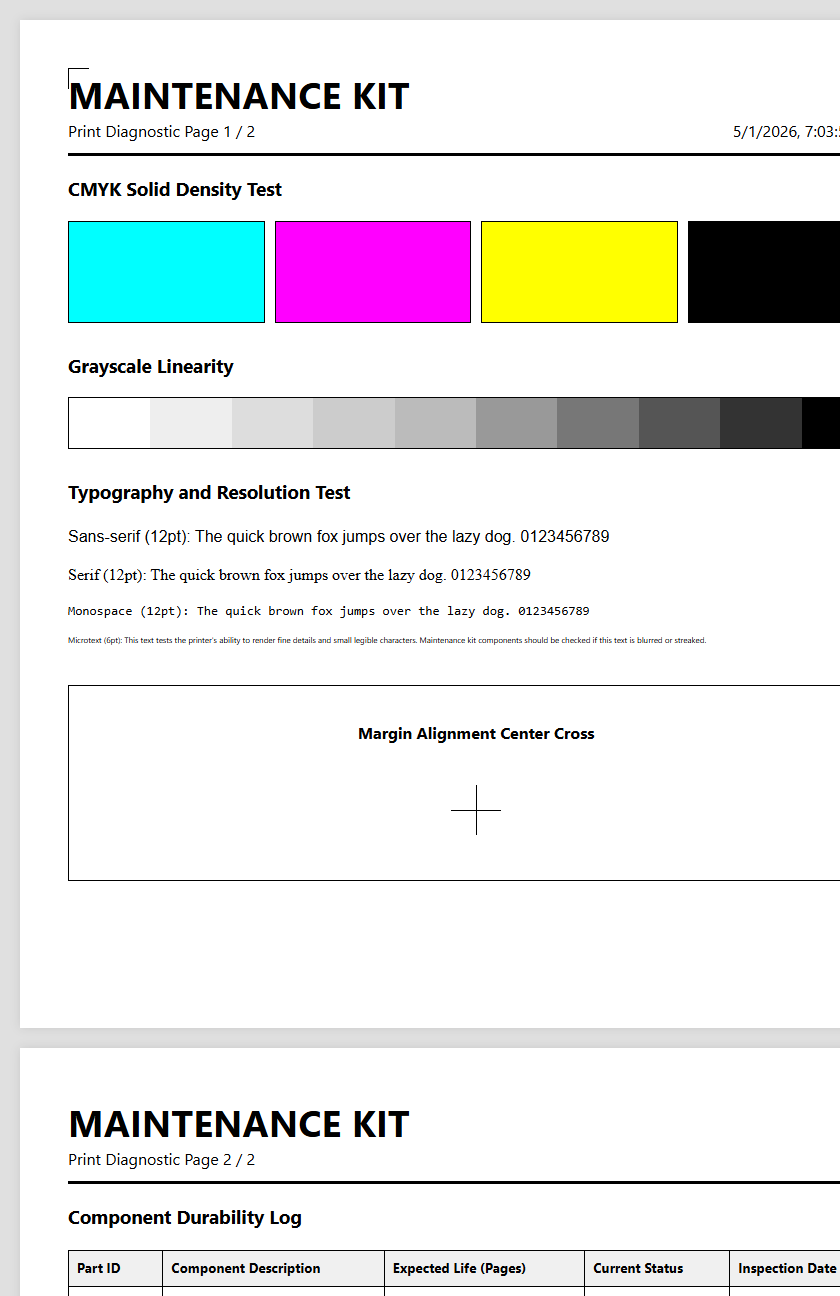
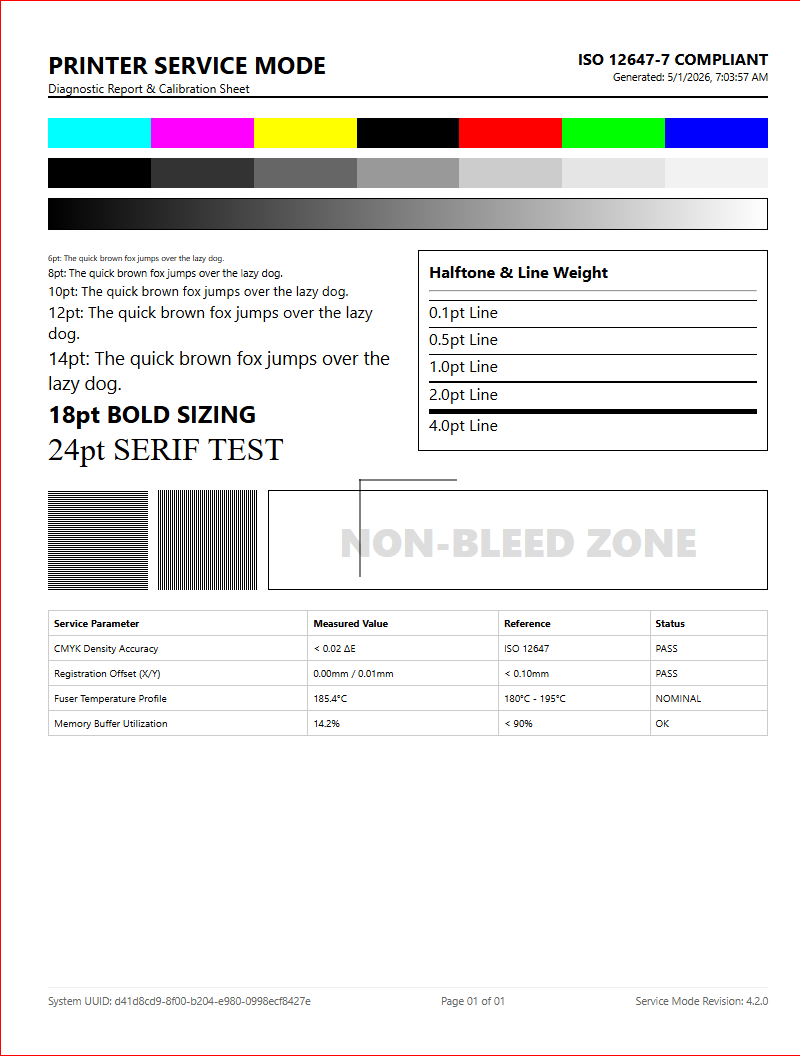
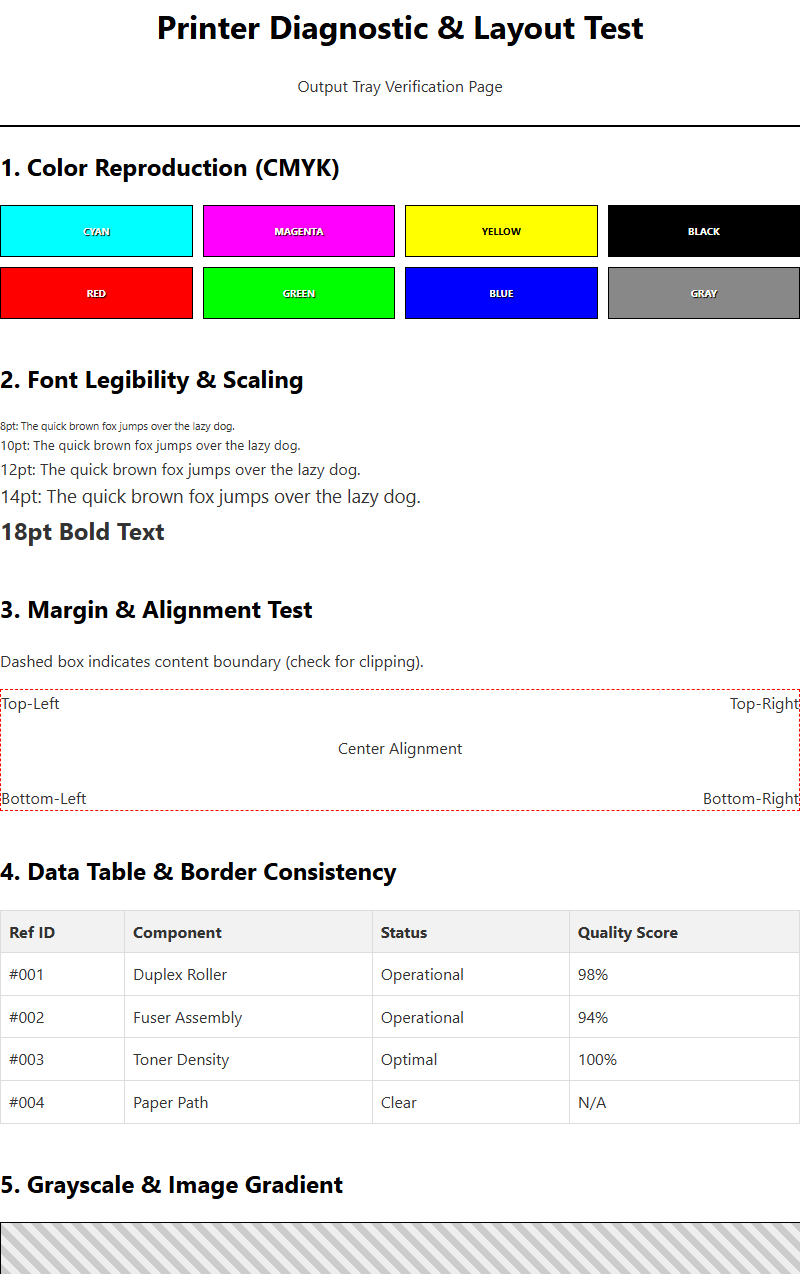
After any maintenance procedure, testing the print quality is vital to verify that the nozzles are firing at full density. A comprehensive test page should include several specific elements to diagnose the state of the print head. Evaluating these outputs under bright, neutral lighting helps identify subtle "stuttering" or "faintness" in specific channels.
- Nozzle Check Grid: Displays each individual nozzle's performance across all colors.
- Solid Color Blocks: Checks for consistency and saturation in Cyan, Magenta, Yellow, and Black.
- Grayscale Gradients: Identifies issues with dither patterns and neutral color balancing.
- Fine Text Samples: Tests the precision and sharpness of the droplet placement.
If the solid blocks show "mottling" or uneven density, it suggests that while the nozzles are not fully clogged, the flow rate is restricted. Repeated testing should show incremental improvement; however, if quality plateaus or worsens after several cycles, it may indicate a failing hardware component or a depleted damper rather than a simple surface blockage.
Prolonging Printer Component Life
Consistent maintenance is the key to prolonging the operational lifespan of critical printer components. The print head is the most expensive part of an inkjet system, and its longevity is directly tied to how well it is kept from drying out. When nozzles remain clear, the printer operates with less mechanical resistance, reducing the strain on the carriage motor and the timing belt. Furthermore, maintaining the capping station-the rubber seal that protects the head when at rest-is essential. If this seal fails, the heads will dry out prematurely regardless of how often you print.
- Keep the printer away from direct sunlight and heat vents to prevent ink thickening.
- Ensure the waste ink path is clear to avoid back-pressure on the head assembly.
- Replace maintenance tanks before they overflow to keep the internal environment clean.
By adhering to a regular check-up schedule, you reduce the need for aggressive "power cleanings." These high-pressure cycles can wear down the delicate piezoelectric crystals or thermal resistors through heat and friction, significantly shortening the duty cycle of the machine.
Dealing with Stubborn Dried Ink
Dealing with stubborn, dried ink requires a more aggressive approach than standard software cycles. When ink has petrified within the manifold or the fine nozzle apertures, simple vacuum pressure is often insufficient. In these cases, "solvent flushing" is the preferred technical solution. This involves using a syringe and a small section of flexible tubing to gently push specialized cleaning fluid directly into the ink intake ports. This fluid contains surfactants designed to break down the polymer bonds of dried pigment. It is critical to apply only minimal pressure; excessive force can rupture the internal seals or the delicate membrane of the print head, rendering it useless. Another technique involves "bottom-up" soaking, where the print head is rested on a lint-free cloth saturated with solvent for several hours. This uses capillary action to pull the solvent into the nozzles, softening the blockage from the outside in. These methods are typically a last resort before total head replacement and should be performed with caution.
Maintenance Impact on Color Accuracy
Maintenance has a profound impact on color accuracy and the overall reproducible gamut of the printer. When a print head is partially obstructed, the volume of ink per droplet (measured in picoliters) may decrease, leading to "washed out" colors or unexpected shifts in hue. For example, if the Cyan nozzles are firing at only 80% efficiency, your greens will appear more yellowish and your purples will look more reddish. This disrupts the ICC profile's ability to translate digital values into accurate physical prints. Consistency is key for professional workflows where color matching is mandatory.
A clean print head ensures that the subtractive color mixing process works as intended, with precise overlaps of CMYK droplets creating the correct secondary and tertiary colors. Regular nozzle checks prevent "metamerism" issues, where colors look correct under one light source but fail under another due to inconsistent ink layering. Monitoring the health of the print head is essentially a prerequisite for any meaningful color management strategy and professional-grade photographic output.
Scheduled Cleaning Best Practices
Implementing best practices for scheduled cleaning can prevent the majority of inkjet failures. The most effective strategy is the "prevention through usage" model, which ensures that ink does not have the opportunity to settle and dry within the narrow delivery channels.
- Run a small color test page at least once a week to keep the ink flowing through the manifold.
- Avoid turning the printer off via a power strip; use the on-board power button so the printer can properly "park" and seal the heads.
- Perform a nozzle check after every ink cartridge replacement to ensure no air was introduced.
- Log your cleaning cycles to track if certain colors are failing more frequently, which could indicate a hardware leak.
Maintaining a stable ambient humidity (between 40% and 60%) significantly reduces the rate of ink evaporation at the nozzle plate. By treating the printer as a precision instrument and performing these low-effort tasks regularly, you minimize the risk of catastrophic clogs and ensure that your diagnostic test pages always return perfect results.

Comments