Analyzing printer test pages is a fundamental step in achieving precise CMYK color balance and maintaining rigorous tonal calibration accuracy. By evaluating specialized diagnostic targets, technicians can identify subtle shifts in neutral gray balance and detect inconsistencies within halftone screening. This systematic review involves measuring primary ink densities and secondary color overprints to ensure a linear output across the entire tonal range. Monitoring dot gain and gradation steps allows for critical adjustments in the RIP software's ICC profiles, ultimately optimizing the color gamut. Utilizing a spectrophotometer to assess Delta E values ensures smooth transitions, effectively minimizing chromatic aberration and guaranteeing predictable, professional-grade print reproduction.
Understanding Color Balance Fundamentals
Color balance is the cornerstone of high-fidelity printing, ensuring that neutral tones remain truly neutral without unwanted chromatic interference. At its core, color balance involves the delicate orchestration of the subtractive color model, where Cyan, Magenta, and Yellow inks combine to create a spectrum of hues. When a printer achieves perfect balance, the mixture of these primary colors results in a "process black" or a clean grayscale gradient, devoid of any specific tint.
Technical factors influencing this balance include:
- Color Gamut: The total range of colors a printer can reproduce within its specific ink set.
- Gray Balance: The specific ratio of CMY required to produce a neutral gray under standard lighting.
- Chromaticity: The quality of a color characterized by its purity and dominant wavelength.
- Subtractive Synthesis: How light reflects off paper after passing through layers of translucent ink.
Understanding these fundamentals allows technicians to identify why a printer might produce "warm" or "cool" prints. By mastering color balance, you ensure that the digital input values align perfectly with the physical output, maintaining the integrity of the original design across various media types.
Importance of CMYK Accuracy
In professional printing, CMYK accuracy is the baseline for predictable results. Unlike digital screens that use light-emitting RGB, printers use light-absorbing inks. Each channel-Cyan, Magenta, Yellow, and Key (Black)-must perform with precise ink density to maintain the intended color profile. If one channel under-performs due to mechanical issues or low ink levels, the entire color secondary and tertiary palette will collapse, leading to inaccurate brand colors and muddy imagery.
| Channel | Primary Role in Balance | Technical Metric |
|---|---|---|
| Cyan | Controls coolness and red suppression | Ink Film Thickness |
| Magenta | Manages warmth and green suppression | Dot Gain (TVI) |
| Yellow | Determines brightness and blue suppression | Solid Ink Density |
| Black | Provides depth and skeletal structure | Dynamic Range |
Maintaining accuracy requires regular monitoring of dither patterns and halftoning techniques. When CMYK channels are synchronized, the printer achieves a high level of color constancy, ensuring that prints look identical across different production runs and environmental conditions.
Identifying Color Tints and Shifts
Color tints and shifts are common deviations where the output exhibits a non-neutral bias. A "tint" typically refers to a global coloration issue, such as a white background appearing slightly pinkish, while a "shift" suggests a transition where colors change unexpectedly across a gradient. These issues often stem from environmental factors or hardware degradation that affects how the printer interprets the ICC profile data.
To identify these shifts, look for the following symptoms on a test page:
- Metamerism: Colors that look correct under one light source but shift dramatically under another.
- Cyan Drift: A blueish tint appearing in shadows, often caused by over-active nozzles.
- Magenta Cast: A reddish or purplish hue in neutral grays, indicating a lack of yellow or cyan compensation.
- Yellowing: A warm shift caused by paper aging or oxidation of the ink vehicle.
Detecting these shifts early prevents wasted consumables. Using a densitometer or spectrophotometer can provide objective data, but a trained eye can often spot these variations in the mid-tone step wedges of a standard printer diagnostic page.
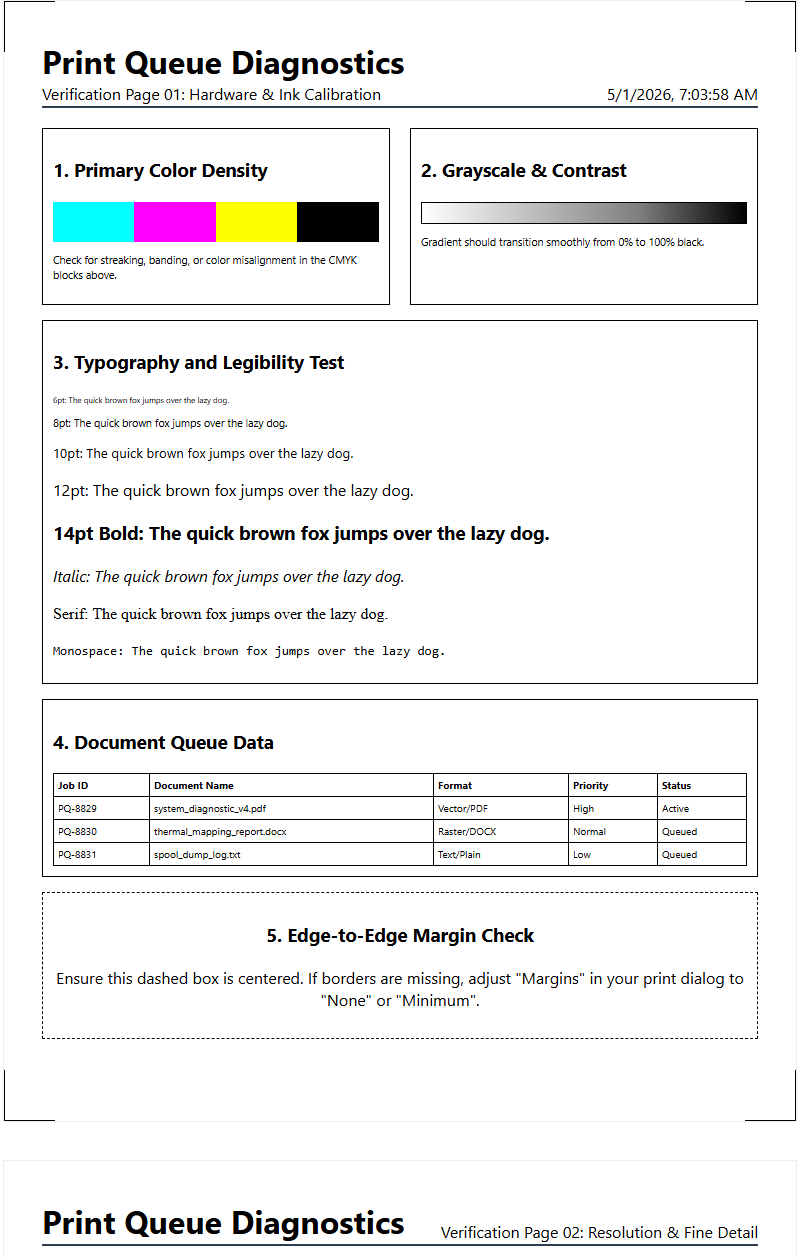
Interpreting Test Pattern Results
A printer test page is a diagnostic roadmap that reveals the internal health of the machine. When analyzing color balance, focus on the "color ramps" and "step wedges." These patterns transition from 0% to 100% ink coverage, allowing you to see where the color balance breaks down. If the transition is not smooth, it indicates a linearization problem or an issue with the printer's internal lookup tables (LUTs).
Follow these steps to interpret the visual data:
- Check the solid fills for "banding," which indicates intermittent ink delivery.
- Examine the radial gradients for "moiré patterns," signaling a conflict in screen angles.
- Inspect the gray scale bars; any hint of color suggests a failing color management system.
- Verify the "trapping" areas where two colors overlap to ensure they create the correct secondary hue.
Successful interpretation leads to targeted maintenance. For instance, if the 50% gray patch looks greenish, you immediately know to investigate the magenta channel's output. These patterns bypass the operating system's color processing, providing a "pure" view of the hardware's current state.
Calibrating Print Head Performance
The print head is the mechanical engine of color balance. Whether using piezoelectric or thermal inkjet technology, the precision of ink droplet firing determines the final color output. Calibration involves aligning the print head's nozzles to ensure that droplets from different channels land exactly where intended. Misalignment, even by a few microns, can cause "color fringing" or a perceived shift in saturation due to improper ink layering.
Key technical aspects of calibration include:
- Nozzle Check: Identifying "nozzle outs" or clogged apertures that cause streaks.
- Bi-directional Alignment: Ensuring the head fires accurately during both left and right passes.
- Voltage Modulation: Adjusting the electrical pulse to control the volume of the ink droplet (picoliters).
- Head Priming: Removing air bubbles from the manifold that cause intermittent firing.
Consistent calibration mitigates "dot gain" issues where ink spreads too far on the substrate. By maintaining the physical health of the print head, you ensure that the software's color instructions are executed with high fidelity, preserving the delicate balance of the CMYK mix.
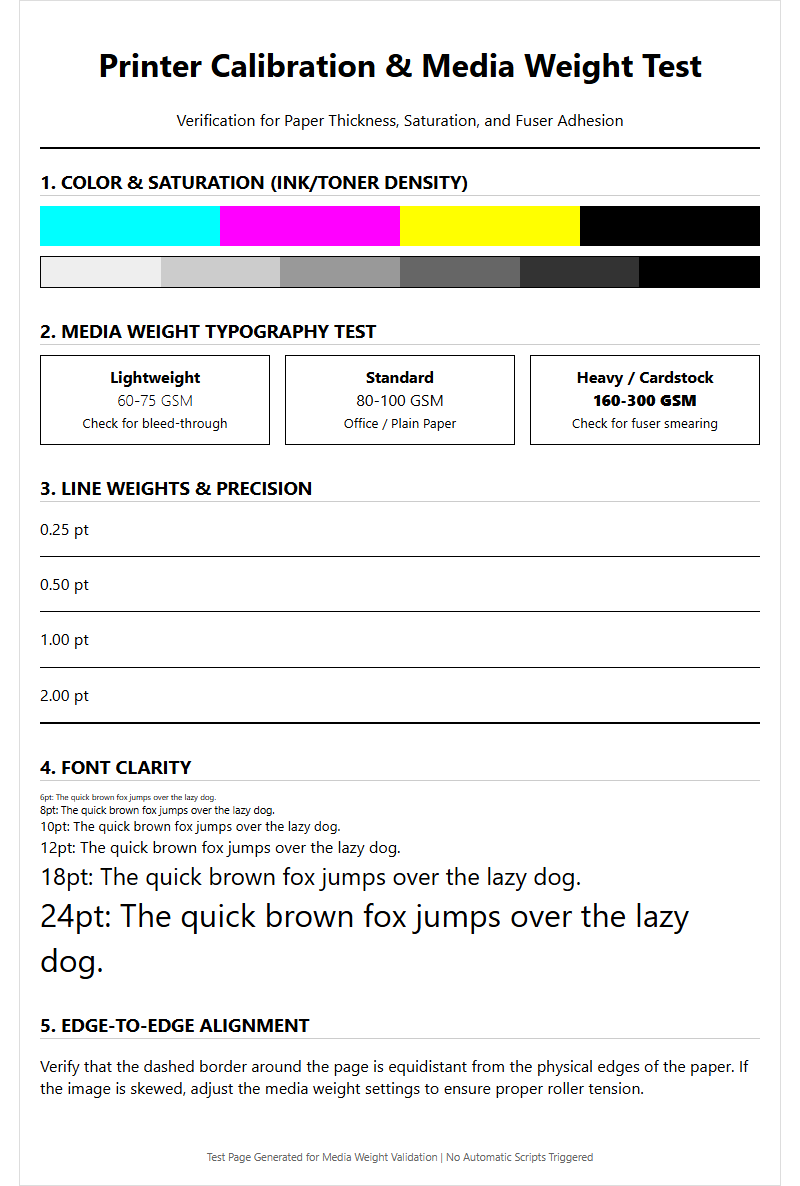
Paper Quality and Color Reproduction
The substrate, or paper, is the fifth variable in color balance. Paper is rarely "pure white"; it has its own brightness, whiteness, and shade. These characteristics act as a base tint that interacts with the translucent inks. Highly absorbent paper can cause "bleeding," where ink spreads and darkens, while coated papers hold the ink on the surface for more vibrant, accurate color reproduction.
| Paper Attribute | Effect on Color Balance | Technical Term |
|---|---|---|
| Opacity | Prevents "show-through" affecting color depth | Opacity Percentage |
| Caliper | Affects head-to-paper distance and drop timing | Microns/Mil |
| Brightness | Defines the maximum reflective highlight | ISO Brightness |
| Surface Energy | Determines ink adhesion and "wetting" | Dyne Level |
When switching paper types, the printer's color balance must be re-evaluated. Using a generic profile on high-gloss photo paper versus matte bond will result in significant color shifts. Always ensure the "media type" setting in the driver matches the physical paper to invoke the correct ink-limit and linearization settings.
Adjusting Driver Color Settings
Software-level control is exercised through the printer driver or a Raster Image Processor (RIP). These tools translate digital RGB values from your computer into the CMYK language of the printer. Adjusting driver settings allows you to fine-tune the color balance without altering the original file. This is crucial when the hardware is functioning correctly, but the output still lacks the desired chromatic accuracy.
Common driver-level adjustments include:
- ICC Profile Selection: Choosing the specific color map for your ink and paper combination.
- Rendering Intents: Deciding how "out-of-gamut" colors are handled (e.g., Perceptual vs. Relative Colorimetric).
- Saturation Sliders: Increasing or decreasing the intensity of specific primary hues.
- Brightness and Contrast: Shifting the black and white points to expand the dynamic range.
A common mistake is "double profiling," where both the application (like Photoshop) and the printer driver try to manage colors simultaneously. This usually results in extreme color shifts and crushed blacks. Proper driver management ensures the signal remains clean from the screen to the nozzle.
Troubleshooting Faded Print Tones
Faded prints often indicate a loss of "chroma" or "ink density," leading to a washed-out appearance. This is usually not a global failure but a specific breakdown in one or more color channels. When a printer cannot reach its maximum density (Dmax), the contrast drops, and the color balance skews toward the remaining functional colors. This can be caused by low ink, air in the lines, or expired consumables that have lost their chemical potency.
Troubleshooting involves investigating these technical areas:
- Ink Starvation: A restriction in the ink delivery system preventing full flow during high-speed printing.
- Substrate Absorption: The paper pulling the pigment too deep into the fibers, dulling the finish.
- Clogged Manifold: Dried ink inside the print head assembly restricting the picoliter volume.
- Driver "Economy" Mode: A software setting that intentionally reduces ink laydown to save costs.
By running a "density test," you can identify which channel is underperforming. If the black is gray and the magenta is pink, the printer lacks the "punch" required for a balanced, professional-grade image.
Maintaining Consistent Color Output
Consistency is the ability to produce the same color balance over days, weeks, or months. Environmental variables like humidity and temperature can significantly impact how ink dries and how paper reacts. For example, high humidity can cause paper to swell, increasing dot gain and making prints appear darker and more saturated than intended. Professional environments use "climate control" to minimize these fluctuations.
To maintain consistency, implement the following practices:
- Regular Linearization: Re-calibrating the printer to account for mechanical wear and tear.
- Batch Tracking: Noting differences between different lots of ink or paper.
- Scheduled Maintenance: Cleaning the capping station and wiper blade to prevent "cross-contamination" of colors.
- Reference Prints: Keeping a "gold standard" test page to compare against new output visually.
Consistency ensures that "Brand Red" today is the same "Brand Red" next month. Without these rigorous checks, gradual "drift" occurs-a slow change in color balance that is difficult to notice until it becomes a significant, costly problem.
Optimizing Visual Clarity and Contrast
The final stage of color balance is optimizing the relationship between light and dark areas, known as contrast. High contrast improves the "perceived sharpness" of an image by creating clear boundaries between colors. However, if the color balance is off, high contrast can exaggerate color shifts, making a slight cyan tint look like a major error. Visual clarity is achieved when the "black point" is deep and neutral, and the "white point" is clean.
Optimizing clarity involves these technical steps:
- Adjusting the "Gamma" settings to ensure mid-tones are not too dark or blown out.
- Using "Unsharp Masking" in the RIP to enhance edge definition without adding noise.
- Refining the "Black Generation" (GCR/UCR) to replace CMY with K, which stabilizes grays and sharpens detail.
- Ensuring "Dot Centricity" so that halftones are perfectly shaped, reducing visual graininess.
When contrast and color balance work in harmony, the print achieves a "three-dimensional" quality. The colors pop, the shadows contain detail, and the highlights are crisp, providing the professional finish expected from high-end output devices.

Comments