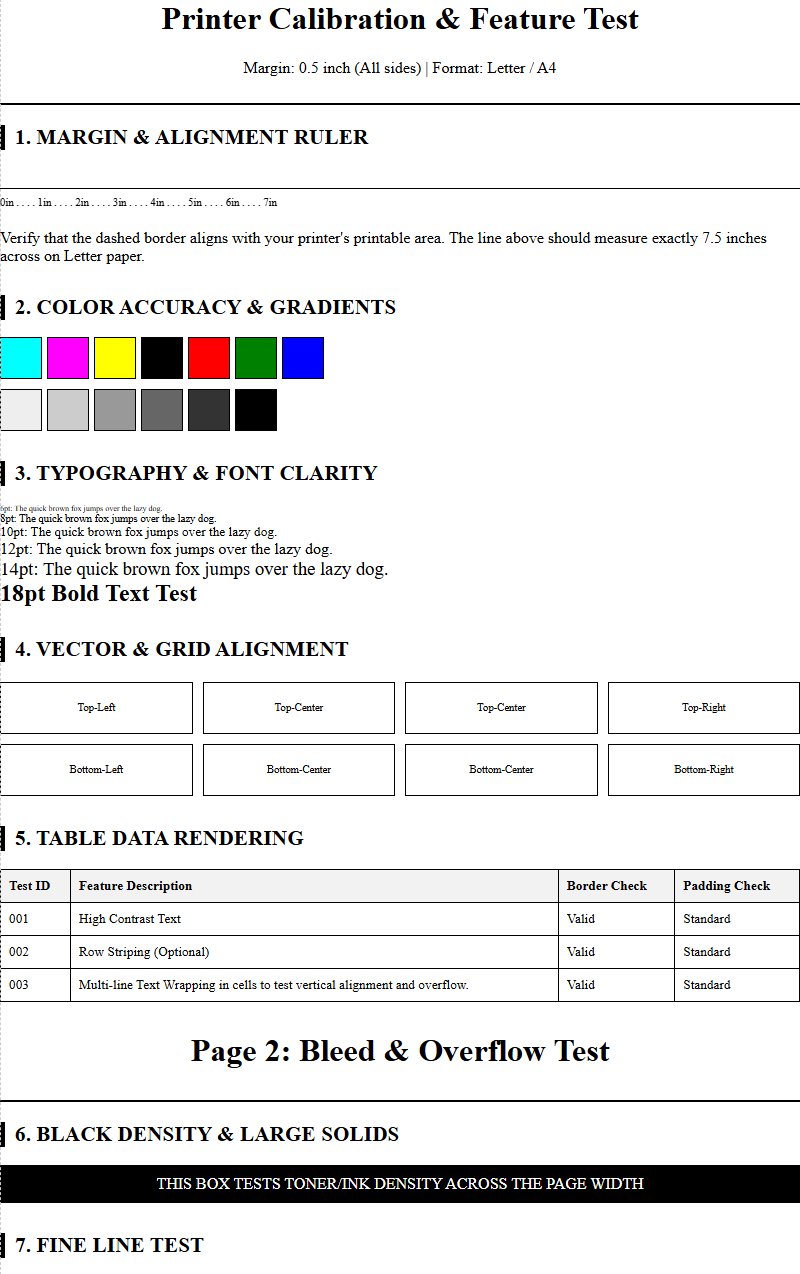
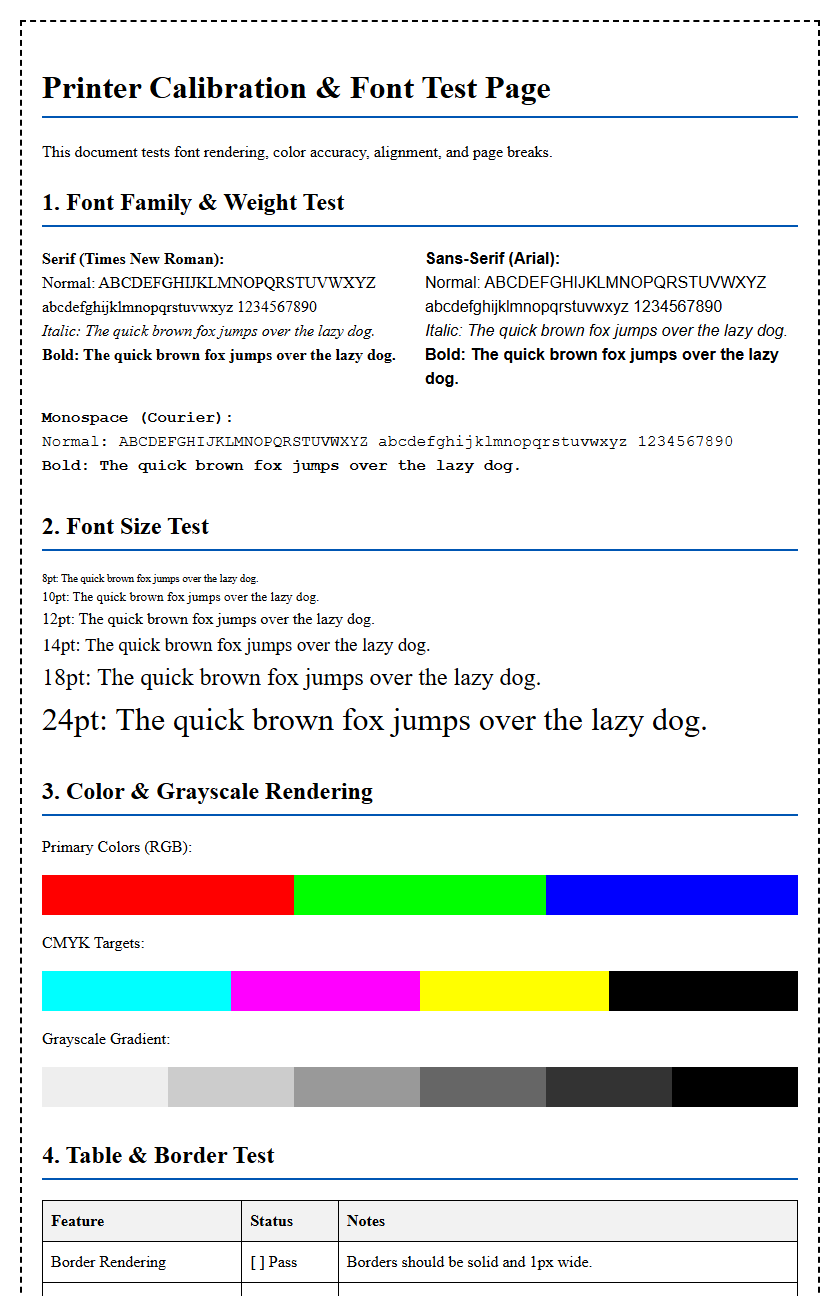
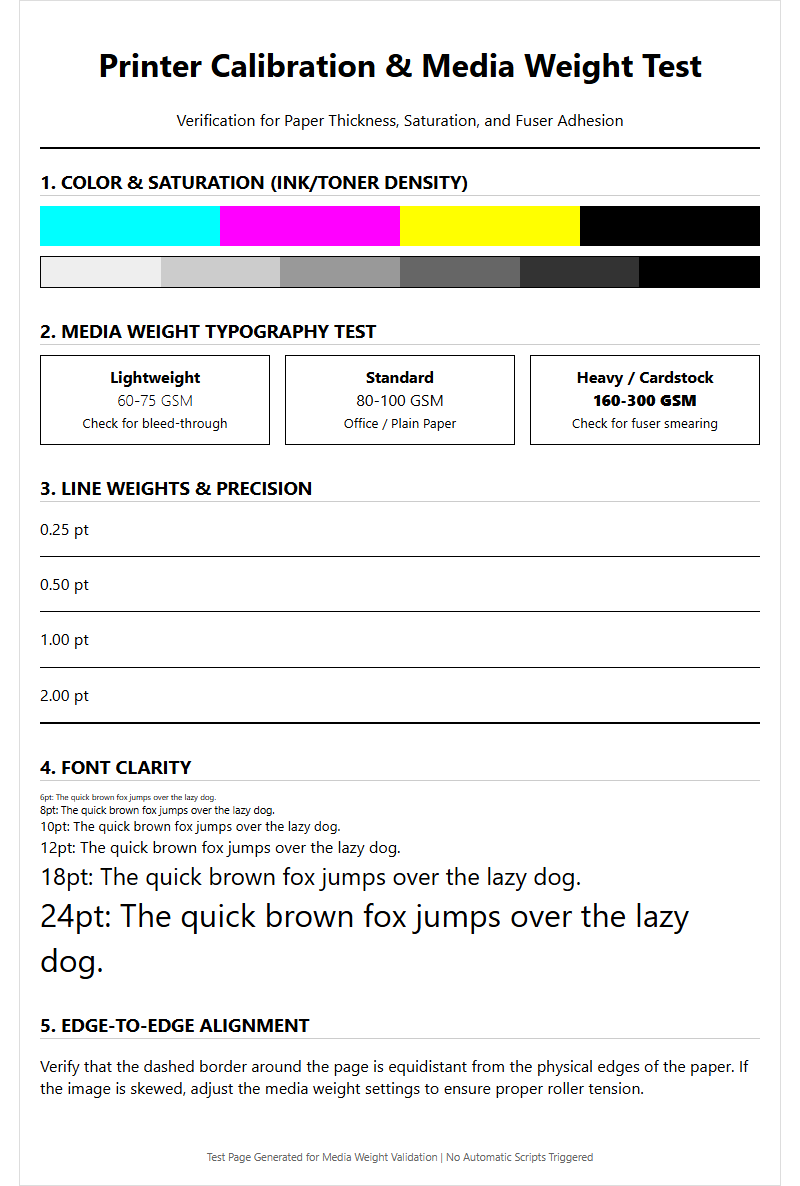
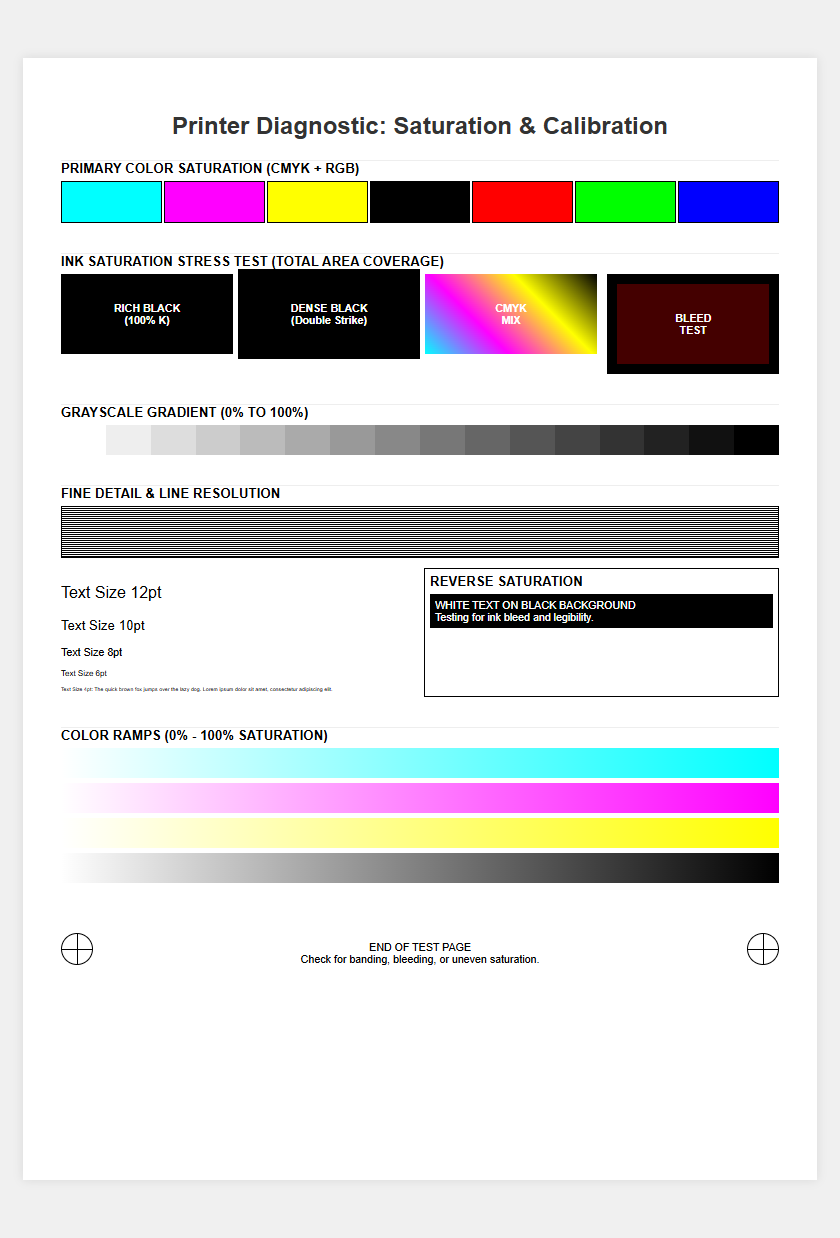
Assessing fuser unit integrity is critical for maintaining professional print quality and device longevity. By generating diagnostic printer test pages, you can effectively evaluate toner adhesion and identify underlying hardware issues. These reports allow technicians to inspect for uniform heat distribution across the heating element and consistent contact from the pressure roller. If the unit fails to reach the optimal curing temperature, symptoms like smudging or ghosting appear, indicating a breakdown in the toner bonding process. Analyzing halftone patterns and solid fill blocks helps pinpoint thermistor inaccuracies or fuser film wear, ensuring your hardware operates within its specified duty cycle parameters while preventing costly output defects.
Understanding Fuser Unit Functions
The fuser unit serves as the terminal stage in the laser printing process, acting as the critical hardware component responsible for making the printed image permanent. While the drum unit and developer handle the placement of toner particles onto the media via electrostatic charges, the fuser provides the physical finishing required for durability. Without a functioning fuser, the toner remains a dry, volatile powder on the surface of the paper that can be easily brushed away by hand.
Modern fuser assemblies are complex modules consisting of several sub-components working in synchrony. The core function is to generate intense thermal energy and apply calibrated mechanical pressure. This combination ensures that the thermoplastic resin within the toner reaches its glass transition temperature. Key elements within the unit include:
- Heating Roller: Often a hollow cylinder containing a halogen lamp or ceramic heating element.
- Pressure Roller: A high-durability rubberized roller that presses the paper against the heat source.
- Thermistor: A sensor that monitors surface temperature to prevent overheating.
- Separation Claws: Small fingers that prevent the paper from wrapping around the hot rollers.
How the Fuser Bonds Toner to Paper
The bonding process is a delicate balance of thermodynamics and mechanical force. As a printer testing page travels through the fuser assembly, it passes through the "nip," which is the narrow contact point between the upper heating roller and the lower pressure roller. At this specific junction, the toner is subjected to temperatures typically ranging between 350°F and 425°F (175°C to 220°C).
The sequence of the bonding process follows a precise operational flow to ensure high-quality output:
- Initial Contact: The paper enters the fuser with loose toner held only by static electricity.
- Phase Transition: The heating roller melts the plastic resin binders found in modern toner formulations.
- Compression: The pressure roller forces the liquefied toner deep into the microscopic fibers of the paper substrate.
- Cooling and Solidification: As the paper exits the fuser, the toner rapidly cools, creating a permanent, smudge-resistant bond.
If the speed of the paper through the fuser is inconsistent with the temperature, the bond will fail, leading to poor adhesion or paper scorching.
Common Signs of Fuser Assembly Failure
Identifying fuser failure early can prevent secondary damage to other internal printer components. When a fuser begins to reach the end of its duty cycle, the most prominent symptom is "unfused toner." If you can wipe the text off a test page with your finger, the fuser is no longer reaching the required temperature or applying sufficient pressure. Another common indicator is "ghosting," where a faint duplicate of the image appears further down the page because the roller is not being cleaned properly or the Teflon coating is worn.
Watch for these specific mechanical and visual warnings:
- Frequent Paper Jams: Particularly jams occurring specifically at the exit or rear of the machine.
- Loud Grinding Noises: Often caused by worn plastic gears or failing bearings within the fuser frame.
- Visible Surface Damage: Physical scratches or "rings" on the orange or black fuser rollers.
- Wrinkled Output: Paper that emerges with creases, indicating uneven pressure across the rollers.
Consistent "Service Call" errors on the display panel often point toward a hard failure of the heating lamp or the thermal fuse.
Resolving Smudged Text and Image Streaks
Smudging and streaking are frequently misinterpreted as toner cartridge issues, but they are often rooted in the fuser unit's inability to maintain a clean surface. Vertical streaks usually indicate that debris, such as dried toner or paper dust, has accumulated on the fuser's scraper blades or picker fingers. This debris scratches the delicate Teflon or silicone coating of the heating roller, leaving a permanent mark that transfers to every page.
To diagnose and resolve these artifacts, follow these troubleshooting steps:
- Print a Half-Cycle Test: Stop the printer before the paper reaches the fuser. If the image is clear before the fuser, the fuser is the culprit.
- Check the Cleaning Roller: Some high-end fusers use a felt cleaning web; ensure it is not exhausted.
- Inspect for Build-up: Look for "toner buildup" on the pressure roller, which can cause repetitive smudges.
- Verify Paper Weight: Ensure the printer settings match the paper thickness, as "Heavy" paper requires higher fuser temperatures.
If streaks persist after cleaning, the roller surface is likely compromised, requiring a full assembly replacement.
Fuser Temperature and Heat Control Issues
Precision heat management is vital for both print quality and fire safety. The printer's logic board relies on a thermistor-a temperature-sensitive resistor-to provide real-time feedback. If the temperature exceeds a safe threshold, a thermal cutout (thermostat) will physically break the circuit to prevent the unit from melting or catching fire. Conversely, if the unit stays too cool, the printer will display a "Low Heat" error and refuse to print.
The following table outlines common heat-related components and their failure symptoms:
| Component | Primary Function | Failure Symptom |
|---|---|---|
| Halogen Lamp | Generates radiant heat | No heat, cold fuser error |
| Thermistor | Temperature monitoring | Inconsistent heat, "Overheat" codes |
| Thermal Fuse | Emergency circuit break | Complete unit power failure |
| Control Board | Power regulation (Triac) | Flickering lights or fuser surges |
Temperature fluctuations can also lead to "fuser tacky" issues, where the paper sticks to the roller and causes accordion-style jams.
Maintenance Tips for Extending Fuser Life
While fuser units are considered consumables with a specific page-yield rating, their lifespan can be extended through proper usage habits. The most significant factor in fuser wear is the accumulation of residual toner and paper fibers. Using high-quality, low-lint paper reduces the abrasive material passing through the rollers, thereby preserving the non-stick coating. Furthermore, avoiding "over-running" the printer beyond its monthly duty cycle prevents excessive heat soak, which can degrade internal bearings and plastic gears.
Implement these maintenance practices to maximize longevity:
- Use Proper Media: Never use adhesive labels or transparencies not specifically rated for high-heat laser printers.
- Allow Cooling Cycles: During high-volume jobs, pause the machine occasionally to prevent thermal stress.
- Clean External Trays: Keeping the paper path clean prevents grit from entering the fuser.
- Update Firmware: Manufacturers often release updates to optimize fuser warm-up times and temperature curves.
By monitoring the "Fuser Life Remaining" percentage in the printer's configuration menu, you can plan for replacement before a total failure occurs during a critical job.
Comparing Fuser Units and Drum Units
In the hierarchy of printer components, fuser units and drum units are often confused, yet they perform diametrically opposed functions. The drum unit is an imaging component that utilizes light and static electricity to create a latent image. In contrast, the fuser unit is a finishing component that uses heat and physical force. Understanding these differences is essential for accurate troubleshooting when reading a printer test page.
| Feature | Drum Unit (OPC) | Fuser Unit |
|---|---|---|
| Primary Input | Laser/LED light | Thermal Energy |
| Primary Output | Toner transfer | Toner bonding |
| Failure Result | Blurs, gray background | Smudging, paper jams |
| Sensitivity | Light sensitive | Heat sensitive |
A simple rule of thumb: if the image is flawed but stuck firmly to the paper, the issue is likely the drum or developer. If the image looks perfect but smears or rubs off when touched, the fuser unit is malfunctioning.
Diagnostic Steps for Fuser Error Codes
Modern laser printers use standardized error codes, often referred to as "SC" (Service Codes) or "Fatal Errors," to identify fuser malfunctions. Codes like "50.x" in HP printers or "SC542" in Ricoh devices specifically point to temperature or warm-up issues. When these codes appear, the printer will typically lock out all functions to prevent damage. The diagnostic process must be methodical to determine if the failure is the fuser itself or the power supply board.
Standard diagnostic steps include:
- Power Cycle: Turn the printer off, unplug it for 60 seconds, and restart to clear transient logic errors.
- Resistance Check: Use a multimeter to check the continuity of the heating lamp and thermal fuse.
- Thermistor Inspection: Ensure the thermistor is making physical contact with the roller and is not covered in crusty toner.
- Hard Reset: Some printers require a specific "Service Mode" command to reset fuser error codes after a repair.
If the error returns immediately after a reset, it indicates a hardware failure that requires component replacement.
Safe Handling and Cleaning of Fuser Rollers
Handling a fuser unit requires caution due to both the extreme operating temperatures and the fragile nature of the roller surfaces. Before attempting any inspection or cleaning, the printer must be powered down for at least 30 minutes to allow the rollers to reach a safe handling temperature. Never use sharp metal objects, such as screwdrivers or knives, to scrape off stuck paper or toner, as even a microscopic scratch on the Teflon coating will result in permanent print defects.
For safe cleaning, adhere to these guidelines:
- Use Proper Solvents: Only use 99% Isopropyl alcohol; avoid water or harsh household cleaners.
- Lint-Free Materials: Use microfiber cloths or specialized "fuser wipes" to prevent leaving fibers behind.
- Manual Rotation: Carefully rotate the gears by hand to expose the full surface of the rollers.
- Avoid Skin Contact: Oil from your fingers can create "hot spots" on the heating roller, leading to premature failure.
Proper cleaning can often resolve minor smudging issues and extend the time between expensive part replacements.
Guidelines for Fuser Component Replacement
When the fuser unit finally reaches its end of life, usually signified by a "Replace Fuser" message or recurring print defects, replacement is necessary. In many desktop printers, the fuser is a Customer Replaceable Unit (CRU), meaning it can be swapped out without specialized tools. However, in larger enterprise multi-function printers, the fuser may be integrated into the main chassis, requiring a technician to perform the installation and calibrate the settings.
Follow these guidelines for a successful replacement:
- Verify Compatibility: Ensure the replacement unit matches the exact voltage (110v vs. 220v) and model of your printer.
- Install the Full Assembly: It is usually more cost-effective to replace the entire assembly rather than individual rollers.
- Reset the Maintenance Counter: Most printers do not automatically detect a new fuser; you must manually reset the life counter in the system menu.
- Run Calibration: Perform a printer test page and a color calibration to ensure the new fuser is heating correctly for the specific toner density.
Always dispose of the old fuser through an e-waste recycling program, as it contains various metals and plastics.

Comments