Mastering your hardware requires a comprehensive Zebra Printer Test Page Guide to ensure consistent, high-quality output. By generating a ZPL configuration label, you can audit critical internal parameters such as darkness settings, print speed, and network protocols. Precision media calibration is vital for synchronizing transmissive or reflective sensors with your specific label gap or black mark. Additionally, conducting regular thermal printhead diagnostics helps identify failing heating elements or debris buildup that causes streaks. Understanding these diagnostic procedures allows you to maintain optimal tension and heat distribution, ensuring your direct thermal or thermal transfer printer delivers scannable, professional-grade barcodes every time.
Zebra Printer Calibration Essentials
Zebra printer calibration is the fundamental process of aligning the internal sensors with the physical characteristics of the media being used. When a printer fails to recognize the start of a new label, it often results in "Media Out" errors or skipped labels. To initiate a standard auto-calibration, users typically hold the Feed button until the status light flashes twice. This triggers the printer to measure the label length and the gap or black mark intensity. Proper calibration ensures that the transmissive or reflective sensors are tuned to the specific opacity of the liner and the density of the facestock.
- Gap/Notch Sensing: Used for standard die-cut labels where the sensor detects the change in light through the liner.
- Black Mark Sensing: Utilized for continuous media with printed identifiers on the reverse side.
- Continuous Media: Requires disabling the sensors via ZPL commands since there are no physical breaks.
If the printer is not calibrated correctly, the print head may engage over the gap, causing ribbon melt or damage to the platen roller. Effective calibration is the first step in troubleshooting any Zebra output discrepancy.
Browser Based Label Testing
Modern Zebra printers equipped with ZebraNet print servers offer a robust web interface for remote diagnostics and testing. By entering the printer's static IP address into a standard web browser, administrators can access the ZebraNet Bridge or the internal WebView utility. This interface allows for direct communication without the need for a proprietary driver. Users can navigate to the "Directory Listing" or "Print Test Page" links to fire off internal diagnostic scripts. This is particularly useful for verifying that the network card is processing packets correctly before troubleshooting the local workstation's spooler.
| Feature | Function |
|---|---|
| View Configuration | Displays current ZPL settings and IP parameters. |
| Direct ZPL Input | Allows raw code entry for real-time label rendering. |
| Status Monitor | Shows real-time alerts like "Head Open" or "Ribbon Out." |
Additionally, the Zebra Browser Print SDK enables web applications to communicate directly with USB or Network connected devices, facilitating seamless cloud-to-print workflows and rapid testing of dynamic data fields.
ZPL Scripting for Test Outputs
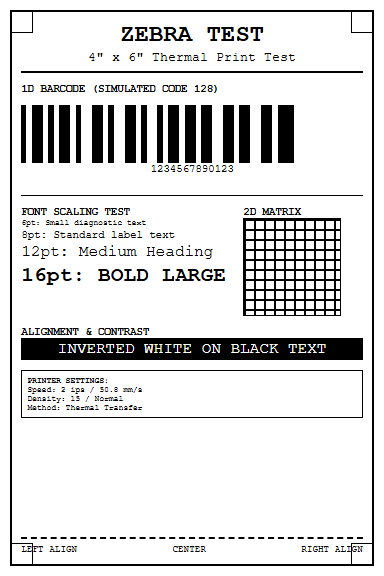
Zebra Programming Language (ZPL) is the backbone of label generation, and mastering its syntax is essential for creating precise test outputs. A standard ZPL test script begins with the ^XA (Start Format) command and ends with ^XZ (End Format). For diagnostic purposes, scripts often include a combination of alphanumeric strings, barcodes, and graphic boxes to test the printer's rendering capabilities. Using the ^FB (Field Block) command allows for testing text alignment, while ^B3 or ^BC commands generate Code 39 or Code 128 barcodes to verify scanning readability.
- Define the label home position using the ^LH command to ensure the origin point is correct.
- Utilize the ^GB (Graphic Box) command to print a border around the label edge, identifying any clipping issues.
- Insert a ^PON (Print Orientation Normal) command to test the rotation logic of the firmware.
Testing with raw ZPL bypasses the Windows Driver's graphical rendering, allowing technicians to determine if a print issue is hardware-related or a software interpretation error within the driver's Dithering settings.
Thermal Print Head Diagnostics
The thermal print head is the most critical and fragile component of a Zebra printer. It consists of a line of tiny heating elements (dots) that transfer heat to the ribbon or direct thermal paper. When an element fails, it creates a vertical white line across every label, often referred to as a "blown pixel." Running a Print Head Test Page is the primary method for diagnosing these failures. This test usually prints a solid black block or a series of thin vertical lines. If any white gaps appear within the solid black areas, the print head likely requires replacement or cleaning with 99% Isopropyl alcohol.
Maintenance involves checking the "Head Resistance" value in the printer configuration. This value, measured in ohms, is factory-set and ensures the correct voltage is applied to the elements. High-density printing at excessive darkness settings can accelerate wear. Monitoring the "Head Test" results regularly helps prevent the shipment of unreadable barcodes, which can lead to costly vendor chargebacks in logistics environments.
Network Connectivity Verification
Confirming that a Zebra printer is correctly talking to the network is vital for enterprise deployments. The most reliable way to verify connectivity is by printing a Network Configuration Label. This is achieved by holding the Cancel and Feed buttons simultaneously during power-up or through the printer's front panel menu. This label provides the MAC Address, IP Address, Gateway, and Subnet Mask. If the IP address shows 0.0.0.0 or a 169.254.x.x address, the printer has failed to obtain a DHCP lease.
- Ping Test: Use the command prompt to ping the printer's IP to check for packet loss.
- Telnet/Port 9100: Verify that the raw print port is open for receiving data.
- SNMP Monitoring: Use ZebraNet Bridge to track the printer's heartbeat across the VLAN.
Network latency can also cause "stuttering" during print jobs. Checking the "Timeout" settings on the printer's internal web page ensures that the connection isn't dropped prematurely during large batch transfers of high-resolution graphic labels.
Label Alignment Precision
Alignment precision ensures that the printed data falls exactly within the boundaries of the label, avoiding "over-printing" onto the liner or the next label. This is controlled by three primary settings: Top-of-Form, Tear-Off position, and Left Position. The Top-of-Form setting determines the vertical starting point of the print relative to the sensor's detection of the gap. If the print is drifting vertically, it indicates a sensor calibration issue or an incorrect Media Type setting in the driver. The Left Position shift is used to move the entire image horizontally to compensate for mechanical variances in the media guides.
Technicians use a "Calibration Test" label to measure these offsets. For example, a Tear-Off adjustment of +10 dots will push the label further out of the printer after finishing, making it easier for the operator to remove. Precise alignment is especially critical for small "jewelry style" labels or high-density component labels where the margin for error is less than 1mm. Failure to maintain alignment can lead to adhesive buildup on the platen roller, eventually causing jams.
Zebra Print Intensity Optimization
Print intensity, often called "Darkness," is the amount of heat applied to the print head elements. Optimizing this setting is a balance between print clarity and hardware longevity. If the darkness is too low, barcodes will appear grey and fail to scan due to low contrast. If it is too high, the ink can bleed, or the ribbon can melt and snap. The "Darkness" setting in ZPL is controlled by the ~SD command, ranging from 0 to 30. A proper test involves printing a "Darkness Range" template, where several labels are printed at incremental heat levels.
| Setting | Visual Result | Technical Impact |
|---|---|---|
| Low (0-10) | Faint, speckled text | High scan failure rate |
| Optimal (15-22) | Crisp edges, solid black | Balanced head life |
| High (25-30) | Blurred edges, ribbon burn | Shortened head life |
Always adjust the darkness in small increments. It is also important to match the ribbon type (Wax, Wax/Resin, or Resin) with the media type, as resin-based ribbons require significantly higher heat to transfer correctly than wax ribbons.
Hardware Status Report Generation
A hardware status report, commonly known as the "Configuration Label," is a comprehensive snapshot of the printer's current internal state. This report lists essential data such as the firmware version, total inches printed (odometer), and installed hardware options like cutters or peelers. To generate this on most Zebra desktop models, press and hold the Feed button until the green status light flashes once. On industrial models, this is found under the "Tools" menu. This report is the "ID card" of the printer and is required for most technical support inquiries.
The report includes the "Sensor Profile," which is a graphical representation of how the sensors view the labels and gaps. Analyzing this profile allows technicians to see if the sensor is dirty or if the label liner is too opaque for the current sensitivity settings. Additionally, the report displays the "Communication Settings," showing the baud rate for serial connections and the handshake protocols. Keeping physical copies of these reports for every printer in a fleet helps in maintaining a baseline for performance audits.
Media Sensor Calibration Techniques
When automatic calibration fails, manual media sensor calibration becomes necessary. This is a common requirement for specialized media, such as clear labels with black marks or very thick tag stock. Manual calibration involves a step-by-step process where the printer measures the specific "light" and "dark" values of the media and the liner. On industrial printers (like the ZT series), the LCD screen guides the user to "Load Backing" (liner only) and then "Load Media" (label and liner). This allows the printer to set a precise threshold for detecting the gap.
- Transmissive Sensor: Position this for center-gap labels.
- Reflective Sensor: Move this to align with black marks located on the edge or center.
- Sensor Sensitivity: Adjust via ZPL if the media has high internal reflectivity.
Correct sensor placement is as important as the software calibration. If a moveable sensor is nudged out of place, the printer will fail to detect the top-of-form, resulting in a "Media Out" error despite the printer being fully loaded. Checking the sensor's physical alignment should always precede software adjustments.
Thermal Label Quality Assessment
Assessing the final output quality involves more than just a visual check; it requires an understanding of barcode anatomy and thermal transfer chemistry. A high-quality Zebra test page should exhibit sharp, well-defined edges on all fonts and barcode bars. "Voids" (white spots) in the print indicate either a dirty print head or poor-quality ribbon. Conversely, "Smudging" suggests that the print speed is too high for the chosen darkness setting, not allowing the ink enough time to settle and cool.
To perform a professional assessment, use the following criteria:
- ANSI Grade: Use a barcode verifier to ensure the output meets Grade C or better.
- Edge Definition: Check for "bleeding" where the black ink expands into white spaces.
- Adhesion: For thermal transfer, perform a "scratch test" to ensure the ink doesn't flake off.
Regularly printing a "Full-Width Bar Pattern" helps in detecting intermittent motor issues. If the bars appear wavy, it may indicate a worn-out drive belt or a slipping platen roller. Maintaining high quality ensures the labels remain readable throughout the entire supply chain journey.


Comments