Executing a Dell printer test page is a fundamental diagnostic procedure for validating hardware integrity and driver synchronization. This internal utility provides a comprehensive overview of your device's operational status, detailing critical metadata such as firmware versions, network IP addresses, and current toner or ink levels. By examining the physical output, you can effectively troubleshoot mechanical issues like clogged nozzles or fuser malfunctions while ensuring the print spooler communicates correctly with the installed driver. Whether you are calibrating a laser or inkjet model, these reports facilitate precise print quality assessments, helping you identify artifacts or alignment errors for optimized performance.
Dell Printer Test Page Essentials
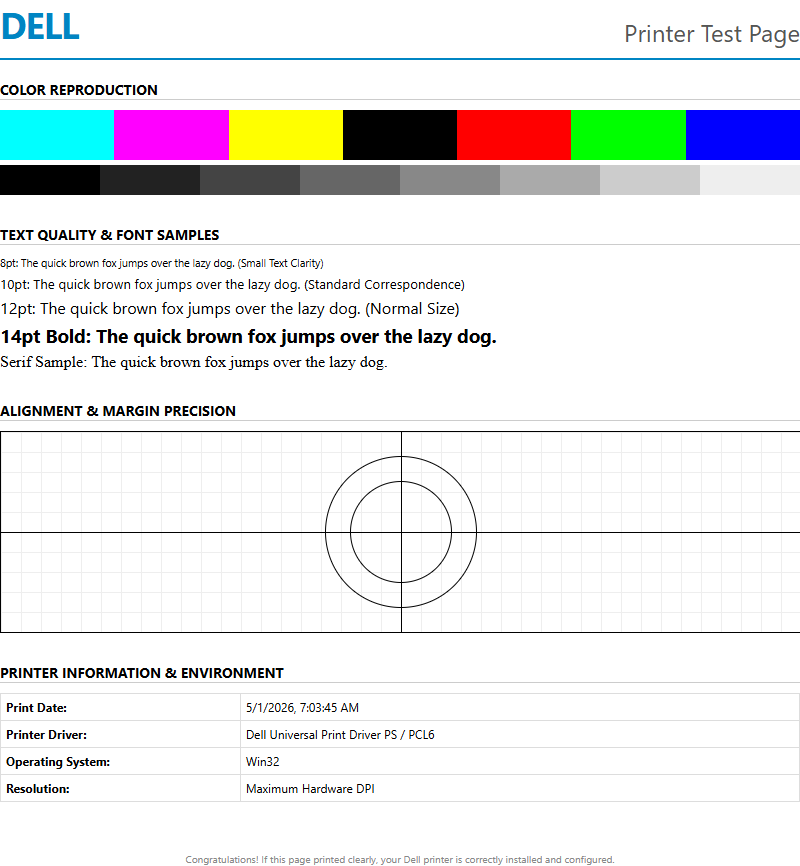
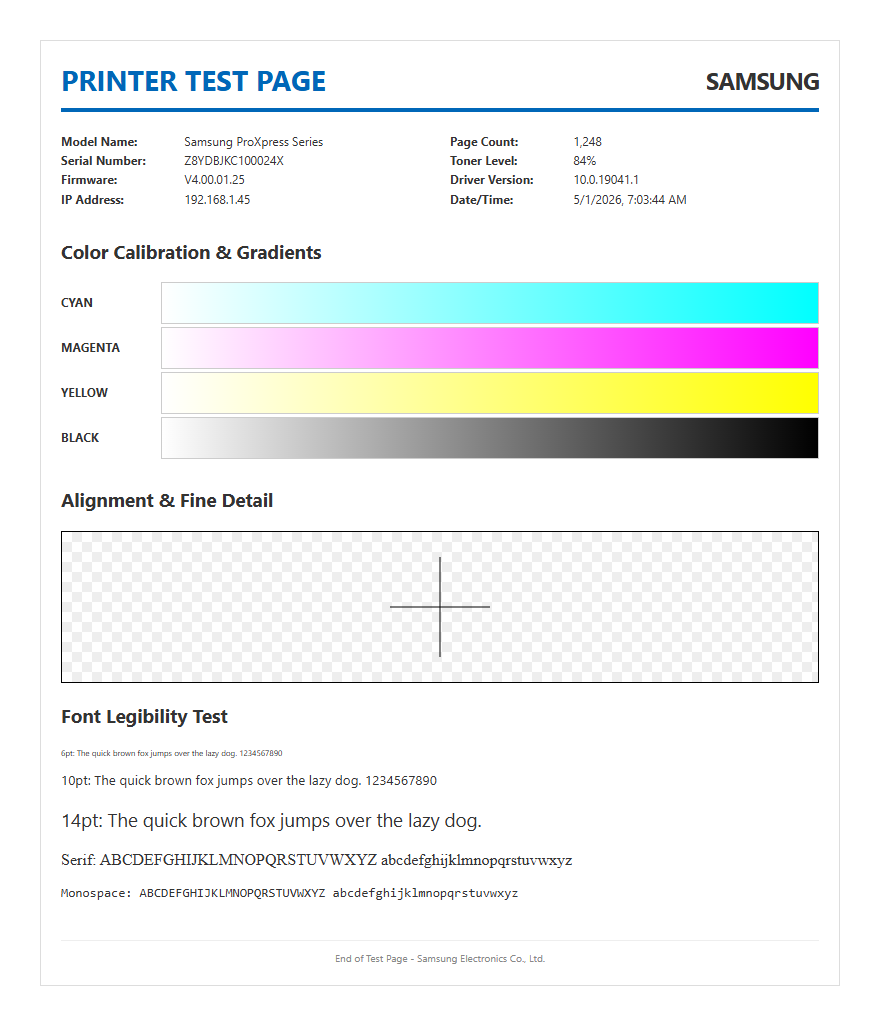
A Dell printer test page serves as a critical diagnostic baseline for assessing the health of your imaging hardware. This document provides a snapshot of the internal configuration, including the specific firmware version, network settings, and total page count. By analyzing this printout, users can verify if the printer's controller board is communicating correctly with the mechanical assembly. It often displays the Service Tag and Express Service Code, which are essential for Dell technical support interactions.
- Firmware Version: Ensures the device is running the latest microcode for stability.
- Page Counter: Tracks the total clicks for maintenance interval scheduling.
- Connectivity Status: Confirms active IP addresses and MAC hardware identifiers.
- Emulation Settings: Shows whether the printer is utilizing PCL6 or PostScript drivers.
Generating this page confirms that the basic data transmission from the onboard buffer to the laser or inkjet engine is functional. It is the first step in differentiating between a hardware malfunction and a software driver conflict within the Windows or macOS environment.
Web Based Printing Procedures
Modern Dell printers utilize an Integrated Dell Remote Access Controller (iDRAC) or a standard Embedded Web Server (EWS) to facilitate remote diagnostics. To access this, you must input the printer's static IP address into a standard web browser. This interface allows administrators to trigger a test page without being physically present at the device. This is particularly useful for managing fleet printers across a local area network (LAN).
- Open a web browser and enter the printer's IPv4 address in the URL bar.
- Navigate to the "Reports" or "Diagnostics" tab within the EWS menu.
- Select "Print Configuration Page" or "Print Quality Page."
- Confirm the request to send the job to the print queue.
Utilizing the web-based interface ensures that the network protocols, such as SNMP and HTTP/HTTPS, are correctly configured. If the web page loads but the test print fails, the issue likely resides in the print engine or the physical paper path rather than the network interface card (NIC).
Color Accuracy Evaluation
Color accuracy is vital for Dell laser and inkjet models to ensure professional-grade output. The test page includes specific CMYK (Cyan, Magenta, Yellow, and Black) color blocks that help identify issues with color shifting or saturation. These blocks are printed at various dither patterns to test the printer's ability to render gradients and halftones accurately. Technicians use these samples to compare the output against standard ICC profiles.
| Color Block | Primary Checkpoint | Potential Issue |
|---|---|---|
| Cyan/Magenta | Gradient Smoothness | Clogged nozzles or low toner |
| Yellow | Visibility/Consistency | Contamination in developer unit |
| Black (K) | Optical Density | Fuser temperature or drum wear |
By evaluating the vibrancy and registration of these color bands, you can determine if the printer requires a color calibration cycle. If the colors overlap or show white gaps, the registration sensors may need cleaning to recalibrate the alignment of the transfer belt.
Print Quality Troubleshooting
When a Dell printer test page reveals artifacts such as streaks, spotting, or ghosting, it indicates a physical component failure. Horizontal lines often suggest a defect in the imaging drum or the fuser rollers, while vertical streaks typically point to a contaminated corona wire or a scratch on the transfer belt. The test page acts as a map, allowing users to measure the distance between repeating defects to pinpoint the specific roller causing the error.
- Ghosting: Occurs when the fuser fails to bond toner properly to the media.
- Fading: Suggests an uneven distribution of toner or an aging developer unit.
- Speckling: Often caused by waste toner overflow or a dirty primary charge roller.
- Skewing: Indicates an issue with the paper feed rollers or registration assembly.
Systematically checking these visual cues helps in deciding whether to replace a high-yield cartridge or invest in a maintenance kit. Consistent print quality monitoring prevents long-term damage to the internal optical components of the Dell imaging system.
Dell Hardware Self Test
The hardware self-test is an internal routine that bypasses the computer's operating system and print spooler. This is initiated directly from the Dell printer's operator panel. For models without a screen, this usually involves a specific sequence of holding the "Continue" or "Cancel" buttons. This process tests the Power-On Self-Test (POST) logic and the internal memory (RAM) integrity of the printer hardware.
- Power off the printer and ensure the paper tray is loaded.
- Press and hold the "Go" or "Menu" button while powering on.
- Release when the status LEDs begin to cycle or the LCD displays "Diagnostics Mode."
- Select the "Print Test" option from the sub-menu.
Executing a hardware-level test isolates the printer from external variables like faulty USB cables or corrupted print drivers. If the self-test prints perfectly but documents from the PC do not, the troubleshooting focus shifts entirely toward the software configuration and port settings.
Interpreting Calibration Results
Calibration results on a Dell test page are often represented by thin crosshair lines and numeric scales. These marks are used to verify the alignment of the print head or the laser scanner unit (LSU). Proper registration ensures that the four colors align perfectly to create sharp images and text. If the test page shows "Color Misregistration," the printer's internal sensors have failed to adjust the timing of the toner application.
- Horizontal Alignment: Ensures text rows are perfectly level across the page.
- Vertical Alignment: Prevents "stair-stepping" in vertical lines and margins.
- Bi-Directional Calibration: Critical for inkjets to ensure drops land accurately during both carriage passes.
Users should look for the section where lines appear straightest and input those corresponding values into the printer's maintenance menu. This fine-tuning process optimizes the micro-stepping motors and ensures that the mechanical output matches the digital input with high precision, maintaining professional document standards.
Alignment and Cleaning Steps
If the Dell printer test page shows irregular ink distribution or blurry text, the alignment and cleaning utility should be engaged. For inkjet models, this involves a "Nozzle Check" which identifies specific blocked jets in the print head. Laser printers may require a "Drum Cleaning" or "Refresh" cycle to remove excess toner buildup from the imaging components. These steps are essential for maintaining the longevity of the consumables.
- Initiate the "Clean Print Head" cycle via the Dell Printer Home software.
- Perform a "Deep Clean" only if the standard cycle fails to resolve the gaps.
- Run the "Align Print Head" utility to print a new alignment pattern.
- Scan the alignment page if the printer is an All-in-One model to automate the correction.
Repeated cleaning cycles consume a significant amount of ink or toner, so it is recommended to only run them when the test page clearly indicates a deficiency. Maintaining a clean internal environment prevents the accumulation of paper dust, which can lead to premature hardware degradation.
Ink and Toner Density Check
Density checks on a Dell test page measure the "darkness" or "richness" of the printed output. This is measured in levels of gray or solid blocks of color. Lower density than expected can indicate that the printer is in "Draft" or "Toner Save" mode, which reduces the voltage applied to the developer roller. A density chart helps in determining if the life of the cartridge is truly exhausted or if the internal optics are simply dusty.
| Density Level | Visual Characteristic | Recommended Action |
|---|---|---|
| 100% Solid | Deep, uniform coverage | No action required |
| 75% Shaded | Minor dithering visible | Monitor for fading |
| 50% Gray | Clear pattern visible | Check "EconoMode" settings |
By comparing the printed density against the on-screen preview, users can calibrate the "Darkness" setting in the Dell print driver. This ensures that barcodes are readable and text is crisp enough for OCR (Optical Character Recognition) software to process accurately.
Resolving Common Printing Errors
Common Dell printing errors identified through test pages often involve the "Load Paper" or "Paper Jam" alerts, even when the tray is full. The test page can help identify if the sensor flags are stuck or if the pickup rollers are slick and need replacement. Additionally, communication errors such as "Spooler Overload" are common when high-resolution test pages fail to print. These are often resolved by clearing the Windows Print Spooler directory.
- Error 001-XXX: Typically indicates a fuser or motor startup failure.
- Error 077-XXX: Points to a paper path or registration sensor obstruction.
- Error 004-XXX: Suggests an issue with the HVPS (High Voltage Power Supply).
When the test page yields an error code, it provides a specific starting point for repairs. For instance, a "Communication Error" on the test page suggests the printer's buffer is not clearing, requiring a hard reset of both the printer and the host computer to re-establish the handshake protocol.
Optimizing Dell Printer Output
To achieve the best results from a Dell printer, users should customize the settings based on the feedback from the test page. This includes adjusting the DPI (Dots Per Inch) settings within the print preferences. High-resolution photos require a higher bit-depth and specialized rendering intents, whereas standard text documents benefit from "Black Optimization" settings. Selecting the correct media type, such as "Heavyweight" or "Coated," adjusts the fuser speed and temperature to prevent smudging.
- Access "Devices and Printers" in the Control Panel.
- Right-click your Dell model and select "Printing Preferences."
- Adjust "Image Quality" to "High Resolution" or "600x600 dpi."
- Set "Media Type" to match the actual paper loaded in the tray.
Optimization also involves keeping the Dell Open Print Driver updated to ensure compatibility with new application features. By periodically printing a test page and adjusting these parameters, users can maximize the efficiency of their toner usage while maintaining the highest possible aesthetic standards for their printed materials.


Comments