Mastering your device starts with this OKI Printer Test Page Guide, designed to help you verify hardware health and output precision. By generating Configuration Reports, you can instantly audit network settings, firmware versions, and consumables status, including remaining toner and drum life. For professionals requiring color accuracy, performing CMYK Calibration is essential to align LED printheads and correct registration shifts. Additionally, initiating Diagnostic Self-Test Procedures allows for a deep-layer analysis of the engine controller and fuser assembly. These integrated utilities ensure your OKI machine maintains peak performance, effectively troubleshooting print quality defects through standardized internal benchmarks.
OKI Printer Performance Evaluation
Conducting a comprehensive performance evaluation on OKI devices requires a deep dive into the machine's internal processing speed and mechanical throughput. Unlike standard inkjet systems, OKI utilizes Digital LED technology, which allows for a flat paper path and high-speed data interpretation. When initiating a test page, the printer must first warm up the fuser unit to the precise operating temperature required for toner adhesion. This evaluation period monitors the "Time to First Print" and the sustained pages-per-minute (PPM) rate under various graphical loads.
During this phase, it is essential to observe the RAM utilization, especially when processing complex PostScript files. Technical indicators to monitor include:
- Engine warm-up time from a cold start versus sleep mode.
- Processor responsiveness when handling multi-layered vector graphics.
- Mechanical noise levels during the pickup and registration cycles.
- Cooling fan efficiency after high-volume print runs.
By analyzing these metrics, administrators can determine if the hardware is operating within its rated duty cycle or if the internal controller requires a firmware update to optimize data handling and print queue management.
Color Accuracy Check for OKI Devices
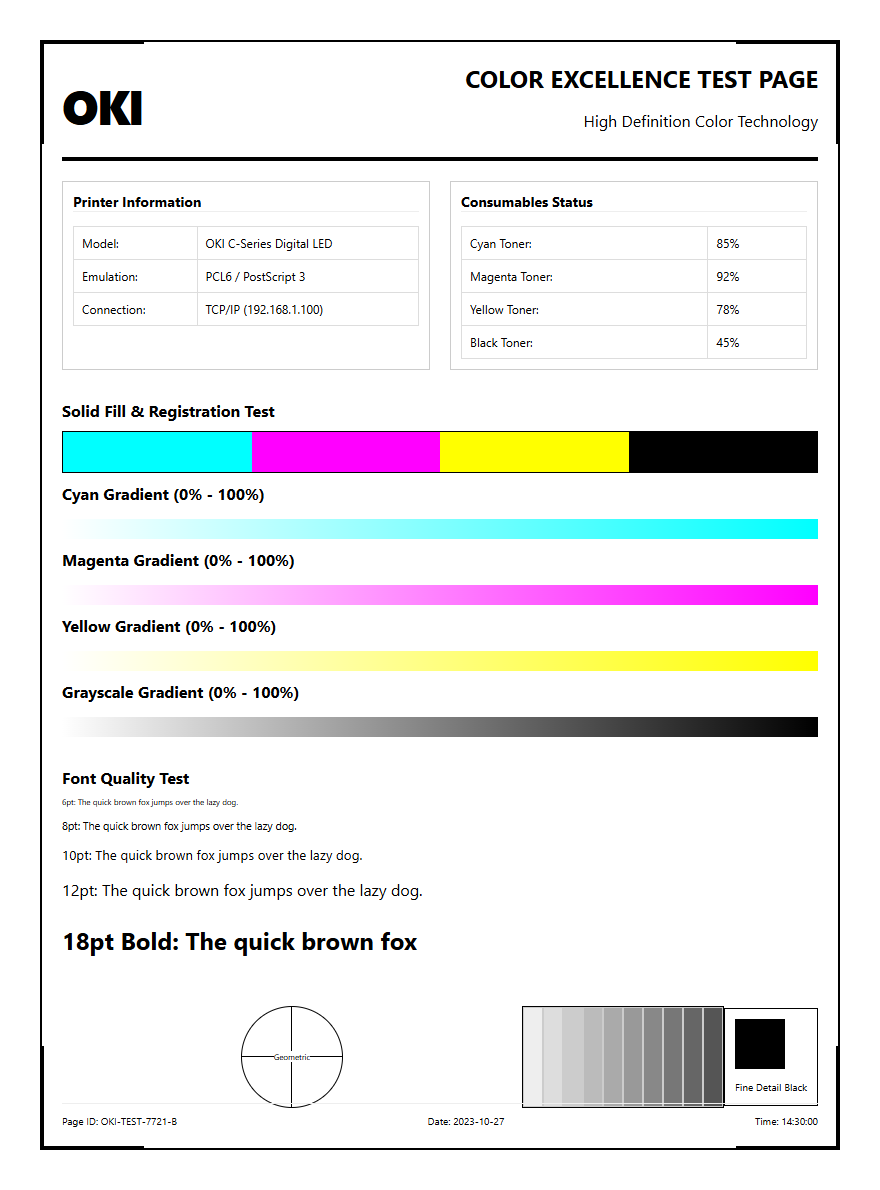
Achieving color precision on an OKI printer involves validating the interaction between the LED heads and the organic photoconductor (OPC) drums. OKI's ProQ Multi-level technology varies the intensity of the light to create different shades, which requires frequent calibration to ensure the output matches the intended ICC profile. A color accuracy test page focuses on the consistency of the CMYK color gamut, checking for shifts in hue or saturation across the entire printable area.
To verify professional-grade output, technicians should inspect the following elements on a calibration sheet:
| Feature | Quality Indicator |
|---|---|
| Gradient Ramps | Smooth transitions without visible banding or stepping. |
| Spot Colors | Direct match to Pantone color charts or specified HEX values. |
| Neutral Grays | Balanced CMY composition without a magenta or cyan tint. |
| Solid Fills | High density and uniformity across the page width. |
If the colors appear washed out, it may indicate a need to adjust the density settings within the printer driver or check the life percentage of the individual image drums.
Diagnosing OKI Print Quality Issues
When print quality degrades, a systematic diagnostic approach is necessary to isolate whether the fault lies within the consumables or the hardware components. A diagnostic test page is the primary tool for identifying artifacts such as ghosting, streaking, or repetitive defects. Because OKI printers use a tandem technology where all four colors are applied in a single pass, a defect in one drum can affect the overall image quality of every subsequent print.
Common issues identified through test patterns include:
- Vertical White Lines: Usually caused by dust on the LED heads blocking light from reaching the drum.
- Repetitive Spots: Indicative of a physical scratch or mark on the drum surface or fuser roller.
- Blurred Text: Often a result of incorrect media weight settings or improper fuser temperature.
- Background Hazing: Suggests an issue with the static charge on the transfer belt or high humidity affecting the toner.
By measuring the distance between repeating marks, technicians can use a "Defect Ruler" to pinpoint exactly which component-be it the fuser, belt, or drum-is the source of the failure.
CMYK Calibration Page for OKI
The CMYK calibration page is an essential document for maintaining the color integrity of OKI LED printers. This page prints a series of color blocks and registration marks that allow the internal sensors to align the four primary toner colors. Because OKI printers utilize a single-pass architecture, precise timing is required to ensure that Cyan, Magenta, Yellow, and Black are perfectly superimposed. Any misalignment results in "color haloing" or fuzzy edges around text and images.
To perform a manual calibration, follow these technical steps:
- Access the printer's "Admin Setup" menu via the control panel or web interface.
- Navigate to the "Print Quality" submenu and select "Color Calibration."
- Print the calibration pattern and inspect the horizontal and vertical alignment lines.
- Adjust the "Registration Offset" values if the lines do not converge at the zero point.
- Restart the printer to commit the new bias voltage settings to the NVRAM.
This process ensures that the printer's High Definition Color technology functions at its peak, providing sharp detail and accurate color reproduction for professional documents.
OKI Laser Printer Maintenance Guide
Proper maintenance of an OKI LED printer extends the life of its consumables and ensures consistent output. Unlike traditional laser printers that use rotating mirrors, OKI devices utilize stationary LED arrays that require periodic cleaning to prevent light blockage. Maintenance involves more than just swapping toner cartridges; it requires monitoring the duty cycle of the fuser unit, the transfer belt, and the four separate image drums. Each component has a specific lifespan, typically ranging from 20,000 to 60,000 pages.
Key maintenance tasks include:
- Wiping the LED heads with a lint-free cloth to remove toner dust and paper lint.
- Checking the waste toner box to prevent overflow and internal contamination.
- Inspecting the paper pickup rollers for wear or glazing, which causes frequent jams.
- Verifying the fuser unit's surface for any built-up toner residue that might cause smudging.
Regularly printing a "Supplies Status Page" allows users to track the remaining life of these components, enabling proactive replacement before the print quality suffers or the hardware enters an error state.
Interpreting OKI Test Patterns
Interpreting the complex patterns found on an OKI test page requires an understanding of how LED technology renders images. Test patterns often feature fine radial lines (Siemens stars), halftone screens, and solid density blocks. These patterns are designed to stress the printer's resolution capabilities, typically 1200 x 1200 dpi or ProQ2400. If the radial lines appear to bleed together, it indicates a resolution or toner melting issue, possibly linked to the fuser's pressure settings.
Halftone screens are particularly useful for detecting "banding," which appears as horizontal or vertical lines of inconsistent density. In OKI printers, vertical banding is often caused by a dirty LED array, while horizontal banding usually suggests an electrical fluctuation in the drum's charging roller. By examining the solid black and color blocks, a technician can also identify "voids," which are areas where toner failed to transfer. This often points to a worn transfer belt or depleted developer unit. Understanding these visual cues allows for rapid troubleshooting without the need for expensive trial-and-error part replacement.
Optimizing OKI Print Output
To maximize the output quality of an OKI printer, users must synchronize the software driver settings with the physical media loaded in the trays. OKI printers are renowned for their ability to handle heavy media, including banners and cardstock up to 360gsm. However, failing to set the correct "Media Weight" in the print preferences can lead to poor toner fusion or paper jams. Optimizing output also involves selecting the correct PDL (Page Description Language), such as PCL6 for standard office documents or PostScript 3 for high-end graphics.
For the best results, consider the following optimization checklist:
- Set the "Print Quality" mode to 'High Quality' to activate 1200 dpi resolution.
- Enable "Toner Save Mode" only for internal drafts to preserve the developer's life.
- Adjust the "Color Matching" profile to 'Vivid' for presentations or 'Relative Colorimetric' for photos.
- Use the multi-purpose tray for specialized media to ensure a straight-through paper path.
These adjustments ensure that the printer hardware is perfectly tuned to the specific job, resulting in professional-grade clarity and color depth.
OKI Hardware Status Verification
Verifying the hardware status of an OKI device is the first step in any troubleshooting routine. This is achieved by printing the "Usage Menu" or "Device Settings" page directly from the hardware's interface. This report provides a detailed breakdown of the total page counts, including a distinction between color and mono prints, as well as the status of the network interface and internal sensors. It is a snapshot of the machine's health, revealing any hidden errors recorded in the system log.
| Hardware Component | Status Metric |
|---|---|
| Network Controller | IP Address, Gateway, and Link Speed (10/100/1000). |
| Firmware Version | Current revision of the boot code and emulation software. |
| Tray Sensors | Detection of paper size and remaining paper levels. |
| Environmental Sensor | Internal temperature and humidity levels affecting toner. |
Regularly checking this status ensures that the printer is communicating correctly with the network and that no environmental factors are causing the toner to clump or the LED heads to misfire.
Resolving OKI Faint Printing
Faint printing on OKI LED devices is often a symptom of insufficient toner delivery or an electrical charge issue. Because OKI uses a dry electrophotographic process, the transfer of toner from the drum to the paper relies on precise static voltages. If the "Toner Low" warning is ignored, the developer unit may become starved, leading to uneven or faded text. Furthermore, if the printer is kept in a high-humidity environment, the toner's ability to hold a charge decreases, resulting in a lighter output than expected.
To resolve faint printing, follow this diagnostic sequence:
- Check the toner levels and replace any cartridge below 10% capacity.
- Inspect the LED window; if it is obscured by dust, the light cannot properly "write" the image onto the drum.
- Run the "Cleaning Cycle" to remove any debris from the transfer belt.
- Verify that the "Media Type" matches the paper being used; thick paper requires more heat and higher voltage.
If these steps fail, the issue likely resides in the high-voltage power supply board or the transfer roller, which may require professional service to restore full density.
Professional OKI Print Alignment
In a professional printing environment, registration and alignment are critical, particularly for duplex (double-sided) jobs where the front and back must line up perfectly. OKI printers feature sophisticated alignment controls that can be adjusted via the "Print Position" menu. This allows users to shift the image in increments of 0.25mm across the X and Y axes. Professional alignment ensures that trim marks on marketing materials are accurate and that text does not drift toward the page margins.
When performing alignment, technicians should print a "Grid Pattern" to check for skewing. Skewing occurs when the paper is not pulled evenly through the registration rollers, often caused by uneven pressure or worn pickup tires. By adjusting the "Leading Edge" and "Side Margin" settings in the system's maintenance mode, the output can be centered precisely. This level of calibration is what differentiates standard office printing from high-end commercial production, ensuring that every page meets strict professional standards for layout and finishing.

Comments