Executing a Xerox printer test page is a vital diagnostic procedure for ensuring professional-grade output and long-term hardware reliability. This systematic report allows users to evaluate CMYK calibration accuracy, ensuring color fidelity across cyan, magenta, yellow, and black channels. By examining the test patterns, you can detect deviations in print head alignment or mechanical registration issues that lead to blurred margins. Additionally, the sheet provides a clear visual of toner density levels, helping identify potential wear in the drum unit or fuser assembly. These targeted diagnostics simplify troubleshooting for color banding or ghosting, maintaining optimal gradient transitions and sharp vector precision.
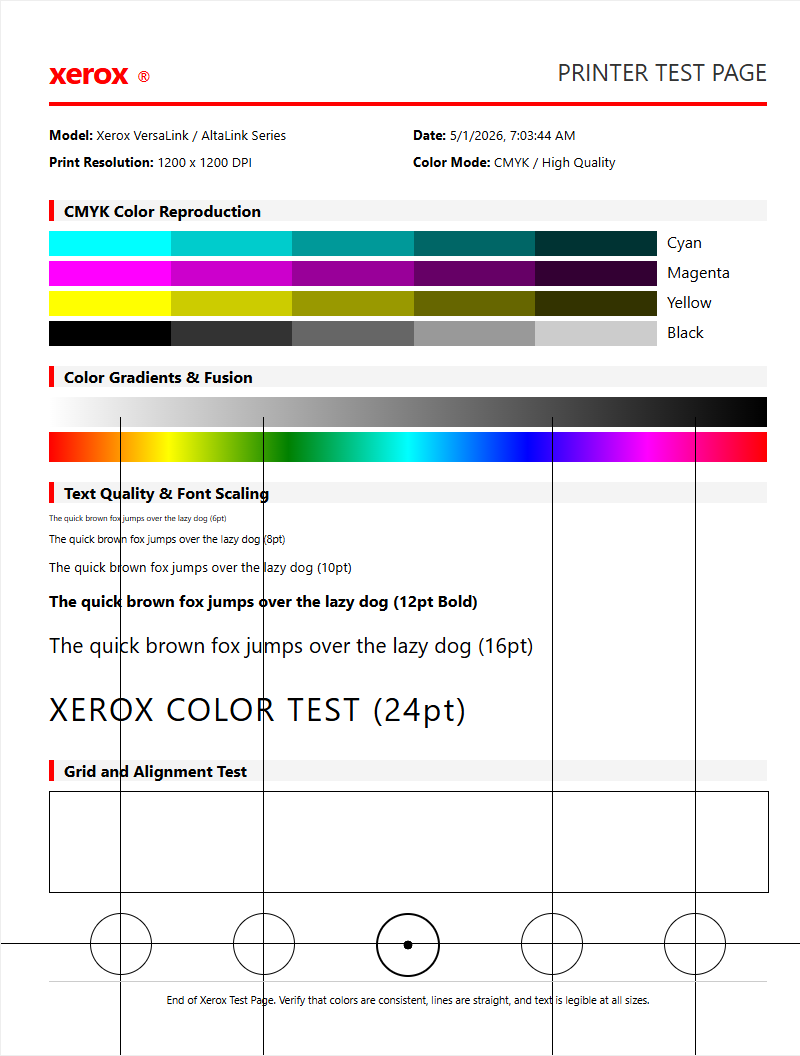
Xerox Print Quality Diagnostic
The Xerox Print Quality Diagnostic (PQD) is a critical utility for assessing the health of the xerographic system. When generating this report, the printer produces a series of solid color bands and gradients across the Cyan, Magenta, Yellow, and Black (CMYK) spectrum. These pages are designed to isolate issues within the imaging units or the Intermediate Transfer Belt (ITB). Technicians analyze these sheets to identify density fluctuations or color dropouts that indicate a failing developer housing or a depleted drum cartridge. By examining the uniformity of the toner laydown, you can pinpoint whether the issue is a hardware malfunction or a software-driven color profile error.
- Identify CMYK density inconsistencies across the page.
- Check for "ghosting" artifacts caused by the fuser assembly.
- Evaluate the integrity of the primary charge roller.
- Verify that the laser scanner unit is projecting a clean image.
Advanced Xerox models allow users to print these diagnostic pages directly from the "Troubleshooting" menu. Analyzing the halftone patterns helps in determining if the printer requires a cleaning cycle or a complete consumable replacement to restore professional-grade output clarity.
Windows Device Calibration Steps
Calibrating a Xerox device within a Windows environment involves synchronizing the GDI or PostScript driver with the physical output capabilities of the hardware. This process ensures that the digital representation on the monitor accurately translates to the printed page. To begin, users must access the "Printer Properties" via the Control Panel and navigate to the "Color Management" tab. From here, specific ICC profiles can be assigned to the Xerox device to manage gamut mapping and rendering intents. This is particularly important for office environments utilizing PCL6 drivers where color accuracy is paramount for branding.
- Open the "Devices and Printers" menu and right-click your Xerox model.
- Select "Printing Preferences" followed by the "Image Options" tab.
- Enable "Xerox Black Optimizer" or "Color Correction" settings.
- Run the "Calibration" tool to print a series of alignment targets.
- Scan the printed target if your Xerox MFP supports automated closed-loop calibration.
By executing these steps, Windows users can mitigate common driver-level discrepancies such as oversaturation or incorrect brightness levels, ensuring the print engine operates at peak efficiency.
macOS Xerox Connection Verification
In the macOS ecosystem, verifying the connection to a Xerox printer requires an understanding of the CUPS (Common Unix Printing System) architecture and the Bonjour discovery protocol. When a test page is initiated from a Mac, it confirms that the PPD (PostScript Printer Description) file is correctly communicating with the Xerox controller. This is vital for ensuring that finishing options, such as hole punching or stapling, are recognized by the operating system. Users should monitor the print queue for "Filter Failed" errors, which often suggest a mismatch between the macOS version and the installed Xerox driver.
- Verify IPP (Internet Printing Protocol) connectivity over the local network.
- Ensure the Xerox print driver version matches the macOS Ventura or Sonoma build.
- Test AirPrint functionality for mobile-to-printer verification.
- Check the "Options & Supplies" menu for real-time bi-directional communication.
A successful test page from macOS confirms that the raster image processor (RIP) on the Xerox machine is correctly interpreting the PDF or PostScript data sent from the Apple device, eliminating potential network bottleneck concerns.
Hardware Menu Test Page Instructions
Accessing the test page directly from the Xerox hardware menu is the most reliable way to bypass external network or driver variables. This "internal" test page, often referred to as the Configuration Report or Information Page, is generated by the printer's onboard controller. To initiate this, navigate the touch-screen interface to the "Device" or "Machine Status" app. Selecting "Information Pages" will reveal a list of printable reports, including the System Configuration and the Font List. These pages contain vital technical data such as the current firmware version, IP address, and total impression counts.
- Press the "Home" button on the Xerox control panel.
- Select "Device" and then choose "About."
- Scroll down to "Information Pages" and tap the menu.
- Select "Configuration Report" and press "Print."
- Review the output for network settings and hardware error codes.
If the hardware menu fails to produce a page, it indicates a mechanical fault or a "System Fault" code that must be cleared before the printer can resume any operations.
Interpreting Color Alignment Results
Color alignment, or registration, is the process of ensuring that the four primary toner colors overlap perfectly to create a sharp image. If the registration is off, the Xerox output will appear blurry or show "color halos" around text. The alignment test page prints a series of crosshairs or grid patterns that must be inspected for precision. In high-end Xerox VersaLink or AltaLink series, this alignment is often managed by the "Auto Alignment" feature, which uses internal sensors to adjust the timing of the laser pulses for each color station.
| Symptom | Probable Cause | Required Action |
|---|---|---|
| Color Overlap | Registration Offset | Run Auto Alignment |
| Blurred Text | Timing Error | Clean Registration Sensor |
| Vertical Shift | Belt Slippage | Inspect Transfer Belt |
Interpreting these results requires looking at the "0" mark on the alignment grid. If the lines do not intersect at the zero point, manual numerical adjustments must be entered into the service menu to calibrate the lead edge and side edge registration.
Troubleshooting Faded Xerox Output
Faded print output on a Xerox machine typically stems from a breakdown in the xerographic transfer process. This occurs when the toner density is insufficient to cover the media properly. Technical factors include a low toner level, a worn-out developer unit, or an aging fuser that is not reaching the correct temperature to bond toner to the paper. Humidity also plays a significant role; if the paper has absorbed moisture, it can resist the electrical charge required for toner transfer. Troubleshooting begins with checking the "Supply Status" to ensure that the drum and toner cartridges have remaining life.
- Disable "Draft Mode" or "Toner Saver" in the print driver.
- Check the "Lightness" slider in the Xerox Image Quality menu.
- Perform a "Developer Refresh" cycle from the Tools menu.
- Inspect the transfer roller for signs of wear or contamination.
If the fading is localized to one side of the page, it often points to a dirty Raster Output Scanner (ROS) window or an unevenly distributed developer, requiring a hardware cleaning or cartridge replacement.
Resolving Print Streak Issues
Streaks on Xerox documents are usually categorized as either "voids" (missing color) or "lines" (excess color). Vertical streaks often indicate that there is debris on the corotron wire or a scratch on the drum surface. Horizontal streaks that repeat at specific intervals are typically caused by a defect in a roller, such as the fuser or the heat roller. To resolve these, users should first utilize the built-in "Clean Developer" or "Clean Drum" utility. For multi-function devices, it is also essential to clean the scanner glass and the constant velocity transport (CVT) glass to rule out streaks caused during the scanning process.
- Clean the ROS (Raster Output Scanner) windows with the provided tool.
- Check the IBT (Intermediate Transfer Belt) for physical tears.
- Ensure the waste toner bottle is not full or overflowing.
- Inspect the wiper blade inside the drum cartridge for failure.
Persistent streaks that appear in the same location regardless of the document indicate a permanent physical defect on a consumable component, necessitating a swap of the affected imaging unit.
Verifying Toner Coverage Levels
Toner coverage is a metric used to determine the efficiency of print jobs and the longevity of consumables. Xerox devices provide detailed "Billing Meters" and "Usage Profiles" that break down the percentage of coverage for each color. A standard test page usually consumes about 5% coverage per color. If a printer is depleting toner faster than expected, it may be due to high-density graphic printing or a misconfigured "Saturation" setting in the driver. Verifying these levels helps in calculating the Total Cost of Ownership (TCO) and planning for supply replenishment.
| Component | Standard Yield | Current Status |
|---|---|---|
| Black Toner | 30,000 pages | Check Meter 1 |
| Color Toner | 15,000 pages | Check Meter 2 |
| Drum Unit | 60,000 pages | Monitor Health |
Advanced Xerox ConnectKey apps can export this data into a CSV format, allowing fleet managers to analyze usage patterns. High coverage levels on test pages may indicate that the "Image Enhancement" settings are forced to a maximum, which increases toner consumption unnecessarily.
Xerox Nozzle Check Procedures
While most Xerox machines are laser-based, specific models like the ColorQube series or high-speed production presses utilize solid ink or inkjet-style heads that require nozzle checks. For these devices, a nozzle check page prints a grid of fine lines for every individual jet. A missing line in the grid signifies a clogged or "de-primed" nozzle. The procedure involves heating the printhead and purging a small amount of ink to clear the blockage. This is a vital maintenance step for ensuring that solid colors remain vibrant and free of "banding" artifacts that can ruin professional graphics.
- Navigate to the "Maintenance" menu on the printer display.
- Select "Eliminate Light Stripes" or "Nozzle Check."
- Print the test pattern and identify missing segments.
- Run a "Cleaning Cycle" if the pattern is incomplete.
- Repeat the test to confirm all nozzles are firing correctly.
Regular nozzle checks prevent the ink from drying within the printhead assembly, which can lead to expensive hardware repairs if left unaddressed in solid-ink environments.
Optimizing Professional Print Performance
To achieve the highest fidelity from a Xerox printer, optimization must occur at both the hardware and software levels. This involves selecting the correct media type-such as "Heavyweight Glossy"-which adjusts the fuser speed and temperature to ensure proper toner adhesion. Furthermore, utilizing the "Ultra Fine" 1200 x 2400 dpi setting on compatible Xerox AltaLink models will produce sharper text and smoother halftones. Professionals should also utilize the "PANTONE Color Calibrator" if they are working with color-critical documents, ensuring that the Xerox digital output matches international color standards.
- Match the "Paper Programming" on the tray to the "Driver Settings."
- Use "PostScript" drivers for complex vector graphics.
- Enable "High Resolution" mode for marketing collateral.
- Set "Halftone Screens" to "Stochastic" for photo-quality prints.
By fine-tuning these technical parameters, users can maximize the output quality of their Xerox device, turning a standard office printer into a capable production machine for high-quality brochures and presentations.

Comments