A printer test page serves as a vital diagnostic tool for maintaining professional output quality and hardware longevity. By initiating a nozzle integrity check, you can identify microscopic clogs within the print head that cause unsightly banding or streaks. Evaluating the CMYK color bars ensures precise ink delivery across the cyan, magenta, yellow, and black spectrums, which is critical for accurate color calibration. Furthermore, analyzing grayscale ramps and halftone patterns helps verify dithering consistency and registration alignment. This systematic review of ICC profile compatibility and tonal range ensures your device maintains peak performance and color fidelity for every print job.
Printer Calibration Essentials
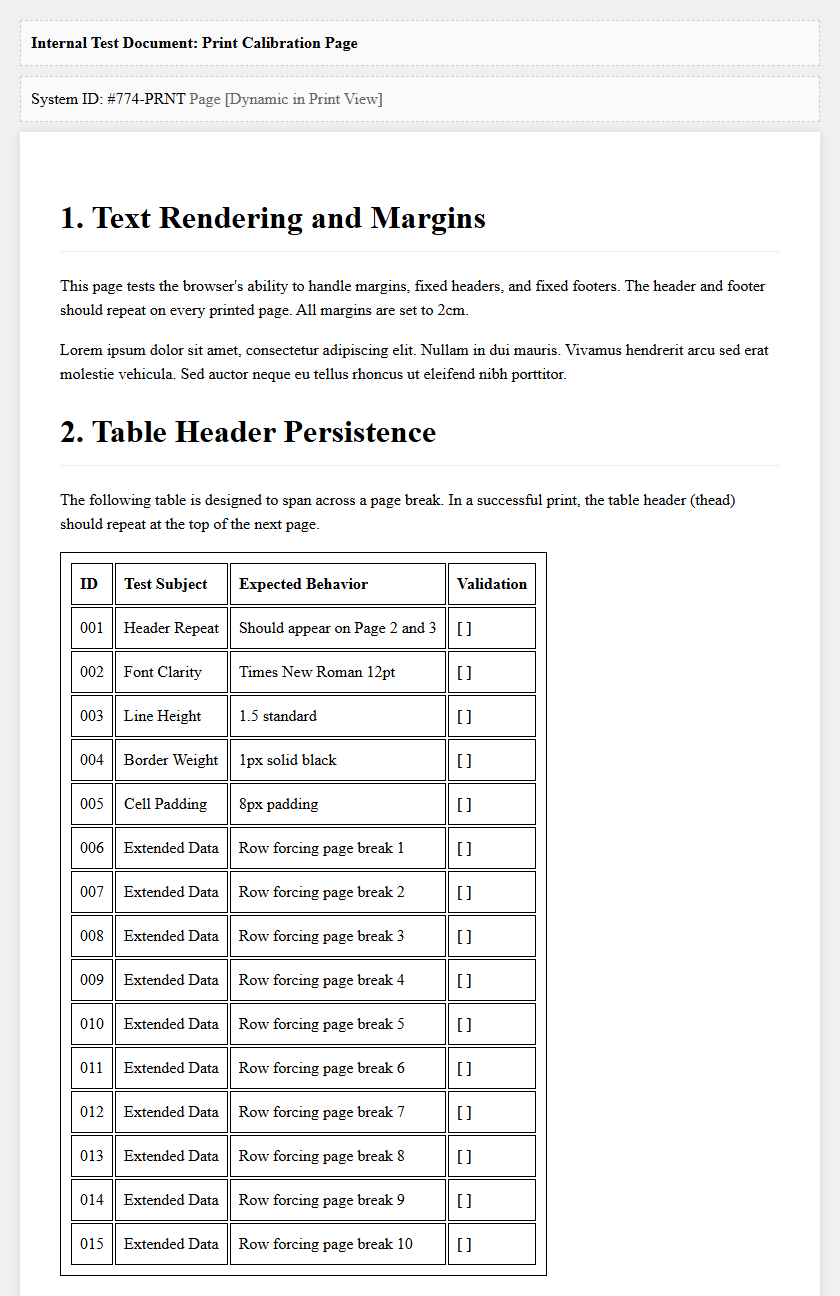
Printer calibration is the foundational process of synchronizing the hardware's output with the digital input to ensure visual fidelity. When printing a test page, the calibration patterns allow users to verify the mechanical alignment of the print head assembly. This involves adjusting the vertical and horizontal convergence to prevent overlapping or staggered lines. Proper calibration addresses the "registration" of colors, ensuring that Cyan, Magenta, Yellow, and Black (CMYK) layers overlap perfectly to create a sharp image without "fringing" or blurred edges.
- Print Head Alignment: Synchronizes the bidirectional movement of the carriage.
- Media Feed Adjustment: Corrects the rate at which the paper advances to prevent horizontal white lines.
- Voltage Optimization: Adjusts the thermal or piezoelectric firing intensity for consistent droplet volume.
To achieve professional results, users should run a calibration cycle whenever a new ink cartridge is installed or if the printer has been moved. These essential adjustments ensure that the Dots Per Inch (DPI) density remains uniform across the entire printable area, maintaining the structural integrity of high-resolution graphics and fine typography.
Understanding Color Accuracy Patterns
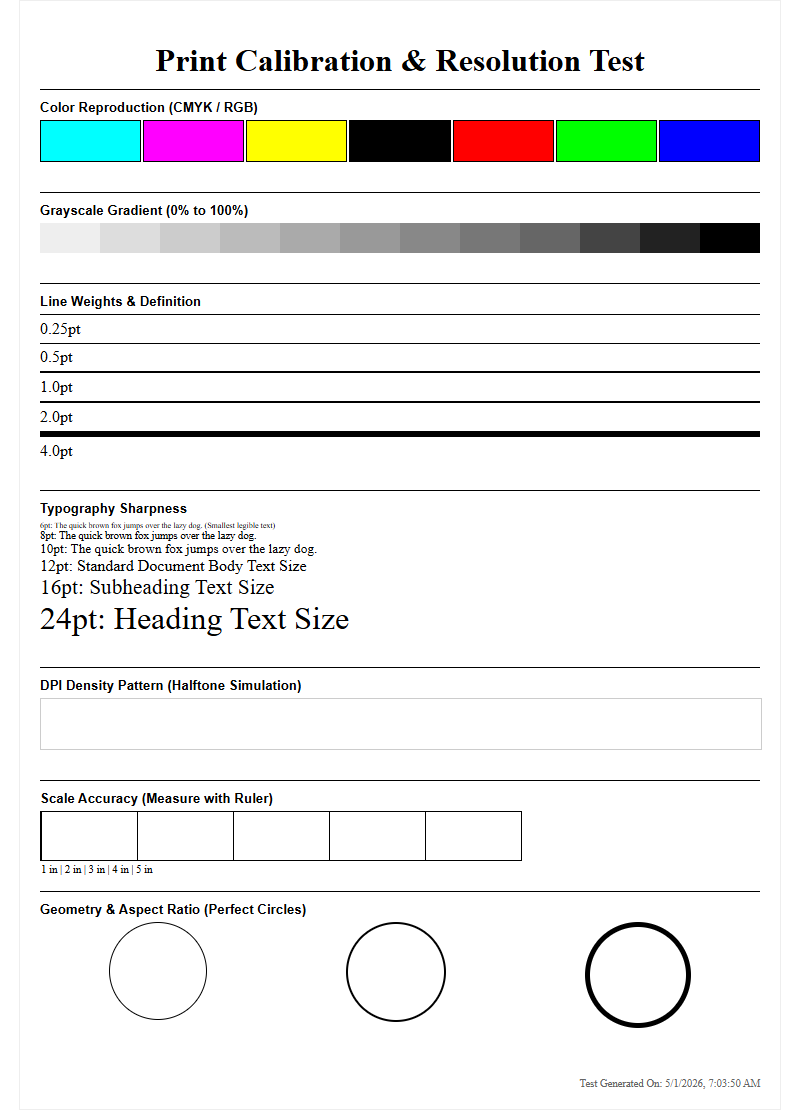
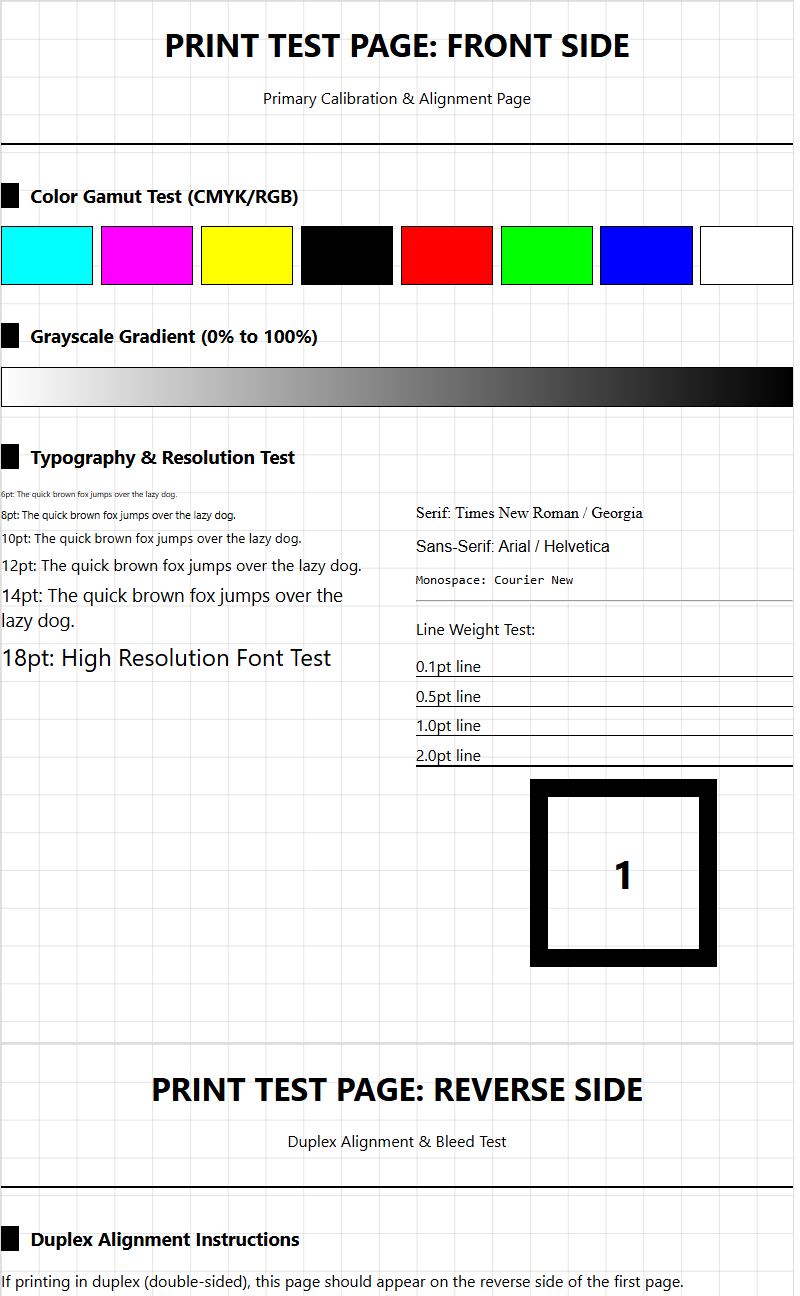
Color accuracy patterns on a test page are designed to evaluate the printer's color gamut-the entire range of colors it can successfully reproduce. These patterns often feature gradient ramps and solid blocks that transition from 0% to 100% saturation. By analyzing these sections, you can determine if the ICC (International Color Consortium) profile is correctly translating RGB digital screen colors into the physical CMYK subtractive color model. Discrepancies often indicate a need for profile recalibration or a check of the rendering intent settings in the print driver.
| Pattern Type | Technical Purpose |
|---|---|
| Gradient Ramps | Tests smooth transitions and identifies "banding" in mid-tones. |
| Color Bars | Verifies the purity and density of primary and secondary inks. |
| Skin Tone Blocks | Evaluates the printer's ability to handle subtle, non-saturated hues. |
Understanding these patterns helps in identifying "color cast," where a specific hue-like yellow or blue-dominates the output inappropriately. High-quality test pages use standardized color values to ensure that what you see on the paper matches the industry-standard chromaticity charts, ensuring professional-grade replication of digital assets.
Troubleshooting Common Print Quality Issues
A comprehensive test page serves as a primary diagnostic tool for identifying common print quality issues that hinder professional output. The most frequent problems involve mechanical or chemical inconsistencies within the delivery system. By examining the output for specific visual artifacts, users can pinpoint whether the issue lies in the software configuration, the physical print head, or the media itself. Systematic observation is key to resolving these discrepancies efficiently without wasting expensive consumables.
- Ghosting: Occurs when a faint image is repeated, often due to a faulty drum or fuser assembly in laser printers.
- Banding: Horizontal or vertical lines caused by clogged nozzles or uneven paper feed synchronization.
- Moire Patterns: Interference patterns resulting from incorrect halftoning or resolution scaling errors.
- Bleeding: Excessive ink saturation where colors run into each other, often due to incorrect paper type settings.
Addressing these issues requires a step-by-step approach. For instance, if banding is observed, a nozzle check is the logical next step. If ghosting appears, the focus shifts to the electro-photographic components. Utilizing the test page as a roadmap minimizes downtime and maintains the longevity of the hardware components.
CMYK Ink Level Verification
The CMYK ink level verification section of a test page provides a visual representation of the remaining toner or ink volume. Unlike digital estimates provided by software, which rely on page-count algorithms and chip data, the physical test blocks show the actual density of the ink being deposited. This is critical for identifying "faded" cartridges that may still report a "low" status but are failing to produce the required optical density for professional documents.
- Cyan (C): Evaluated for brightness and saturation in the blue-green spectrum.
- Magenta (M): Checked for intensity; vital for accurate red and purple reproduction.
- Yellow (Y): Often the hardest to see, but essential for brightness and warmth.
- Key/Black (K): The primary component for text sharpness and deep shadow contrast.
When any of these blocks appear streaky or significantly lighter than the reference standard, it indicates that the cartridge is near depletion or that the air vents are blocked. Regular verification prevents the "dry firing" of print heads, which can lead to permanent hardware damage due to overheating in thermal inkjet systems.
Black and White Grayscale Precision
Grayscale precision is the ultimate test of a printer's ability to manage neutral tones without introducing a "color cast." A perfect grayscale transition should look purely gray, moving from absolute white to the deepest black (Dmax). Many printers struggle with this because they often mix CMYK inks to create "composite black." If the balance is off, the grays may appear slightly pink or greenish. High-end printers utilize "photo black" and "gray" inks to achieve superior neutral balance and finer dither patterns.
- Neutrality: Ensures that no single color dominates the gray ramps.
- Shadow Detail: Tests the printer's ability to distinguish between very dark shades of gray.
- Highlight Retention: Ensures that light grays do not disappear into the white of the paper.
Analyzing the grayscale section of a test page helps in setting the correct "halftoning" parameters. This is especially important for monochrome photography and technical schematics where line precision and shading depth are required. If the grayscale appears stepped rather than smooth, it suggests an issue with the printer's bit-depth processing or a low-quality driver setting.
Nozzle Check and Head Cleaning Guide
The nozzle check is perhaps the most vital component of an inkjet test page. It consists of a grid of tiny lines, each corresponding to an individual nozzle on the print head. A perfect nozzle check shows a continuous, unbroken pattern. If there are gaps in the grid, it indicates that specific nozzles are clogged with dried ink or obstructed by microscopic debris. This "nozzle deflection" or "dropout" is the leading cause of poor print quality in inkjet technology.
- Run Nozzle Check: Print the test pattern to identify which color channel is failing.
- Initiate Soft Cleaning: Use the printer's software to force a small amount of ink through the nozzles.
- Perform Deep Cleaning: If gaps persist, a more aggressive purge cycle may be necessary.
- Evaluate Results: Re-print the test page to confirm all nozzles are firing correctly.
Frequent head cleanings consume a significant amount of ink, so they should only be performed when the test page confirms a blockage. Maintaining a regular printing schedule-at least once a week-helps prevent ink from drying in the apertures, ensuring the piezoelectric or thermal elements remain primed for optimal performance.
Optimal Printer Performance Maintenance
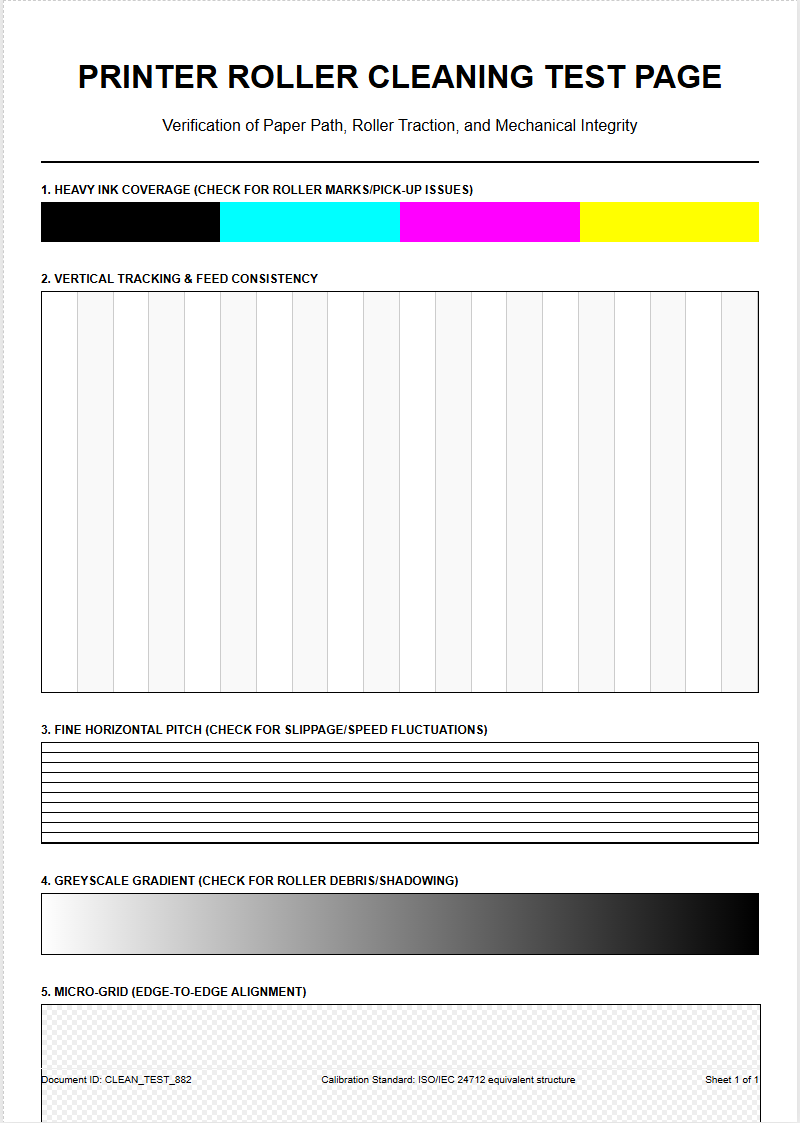
Maintaining optimal printer performance goes beyond fixing errors; it involves proactive management of the entire printing ecosystem. A test page serves as a "health report" for the mechanical components. Beyond ink levels, it reveals the condition of the paper path and the rollers. If the test page shows small, repeating spots at regular intervals, it likely indicates a "pit" or debris on the fuser roller or drum. Consistent monitoring allows for the early detection of wear and tear on these critical hardware components.
- Firmware Updates: Ensure the printer's internal logic is optimized for the latest driver protocols.
- Roller Maintenance: Cleaning the pick-up rollers prevents paper jams and "skewing" of the test patterns.
- Waste Ink Management: Monitoring the saturation of the waste ink pads in inkjet models to avoid overflow.
Environmental factors also play a role in performance. High humidity can cause paper "cockling," while low humidity can increase static electricity, leading to "overspray" on the test page. By reviewing the test page under standardized lighting, you can ensure the printer is operating within its specified mechanical tolerances and environmental parameters.
Identifying Streaks and Fading
Streaks and fading are telltale signs of systemic failures within the ink or toner delivery path. Streaks typically manifest as vertical lines running the length of the page. In laser printers, this often points to a scratched "Photoreceptor Drum" or a dirty "Corona Wire." In inkjet printers, streaks are usually caused by a "dirty" print head that has accumulated fibers or dried ink. Fading, on the other hand, suggests a depletion of the transfer medium or an issue with the "Fuser" not reaching the correct temperature to bond the toner to the fibers.
| Symptom | Probable Cause | Component to Inspect |
|---|---|---|
| Vertical White Streaks | Blocked Nozzle or Low Toner | Print Head or Toner Cartridge |
| Horizontal Banding | Paper Feed Misalignment | Stepper Motor / Rollers |
| Uniform Fading | Economy Mode / Low Density | Driver Settings / Transfer Belt |
To differentiate between hardware and software issues, print the test page directly from the printer's control panel rather than the computer. If the streaks persist on the internal test page, the problem is strictly hardware-related, requiring manual cleaning or component replacement.
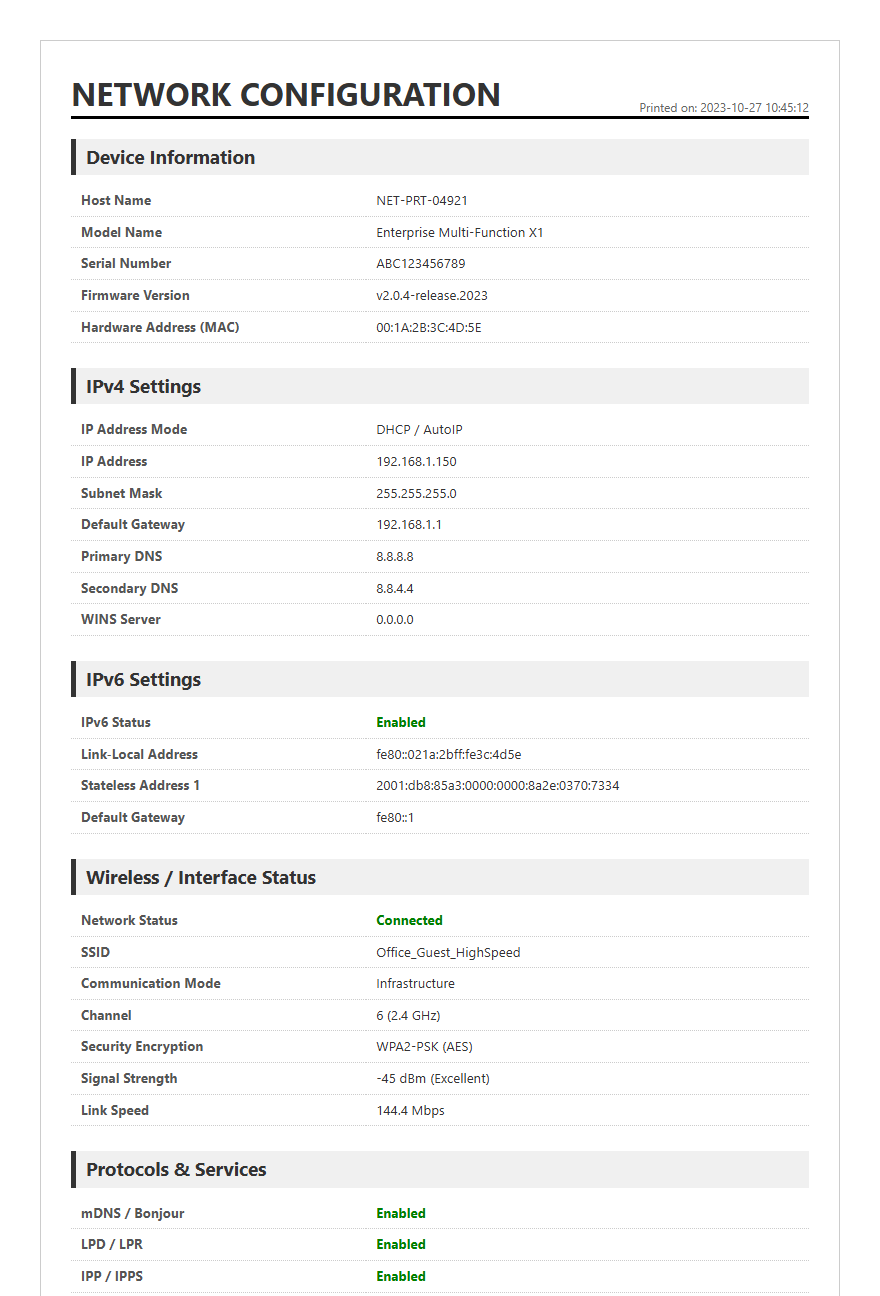
Hardware Connectivity Verification
Before a single drop of ink hits the paper, the hardware connectivity must be verified. The test page header usually contains technical data regarding the connection type and protocol. This section confirms that the "handshake" between the host computer and the printer is successful. Whether using a USB 3.0 wired connection, Gigabit Ethernet, or Wi-Fi Direct, the test page displays the active IP address, MAC address, and signal strength. This information is indispensable for troubleshooting network-related delays or "Print Spooler" errors.
- Interface Check: Confirms if the printer is communicating via the correct port (LPT, USB, or TCP/IP).
- Driver Compatibility: Lists the version of the PCL (Printer Control Language) or PostScript driver being used.
- Buffer Status: Indicates if the printer's internal memory is clearing correctly after each job.
If the test page fails to print despite a "Ready" status on the LCD, it suggests a breakdown in the communication layer. Reviewing the connectivity data on a successfully printed page can help identify if a "Static IP" conflict is causing the printer to go offline intermittently during larger print queues.
Interpreting Diagnostic Print Results
Interpreting the diagnostic results on a test page requires a keen eye for detail and an understanding of printer "geometry." Beyond the colors, diagnostic pages often include fine text in various font sizes, usually down to 2-point type. This tests the "edge definition" and the printer's ability to render complex vector paths without "aliasing." If the text appears fuzzy or "bolded" incorrectly, it may indicate that the "Bi-Directional" print setting is out of sync, causing the carriage to fire at the wrong coordinates during its return pass.
- Font Rendering: Checks the clarity of "Serif" and "Sans-Serif" characters at high DPI.
- Margin Accuracy: Verifies that the "Printable Area" is centered and that the "Hard Margins" are respected.
- Solid Fill Uniformity: Ensures large areas of color are printed without "mottling" or uneven texture.
By cross-referencing the physical output with the digital master, you can determine the "Dimensional Accuracy" of the printer. This is particularly crucial for CAD drawings and professional layouts where a 10cm line on the screen must measure exactly 10cm on the paper. Use these diagnostic insights to fine-tune your software's scaling and output resolution settings.

Comments