To achieve professional-grade output, analyzing print resolution requires a deep dive into technical standards like DPI (Dots Per Inch) and addressable resolution. When evaluating printer test pages, you must examine detail fidelity through spatial frequency and the clarity of line pairs per millimeter. This process involves assessing halftone screening patterns and monitoring dot gain, which can impact image sharpness and tonal transitions. By scrutinizing bit depth and color gamut performance, you ensure that the hardware accurately reproduces microfine details without unwanted artifacts. Understanding these metrics allows for precise calibration, ensuring your equipment meets industry benchmarks for high-fidelity reproduction and consistent output quality.
Understanding Dots Per Inch
Dots Per Inch, or DPI, serves as the fundamental metric for quantifying the spatial printing resolution of a device. It describes the number of individual drops of ink or toner particles a printer can place within a linear inch. While higher DPI values generally suggest a finer level of detail, the relationship between digital input and physical output is governed by the printer's ability to manage droplet size and placement accuracy. In a printer testing page, DPI benchmarks allow users to determine if the hardware is operating at its maximum rated capacity or if there is a bottleneck in the data transmission.
- Input Resolution: The PPI (Pixels Per Inch) of the source file.
- Output Resolution: The physical DPI capability of the print engine.
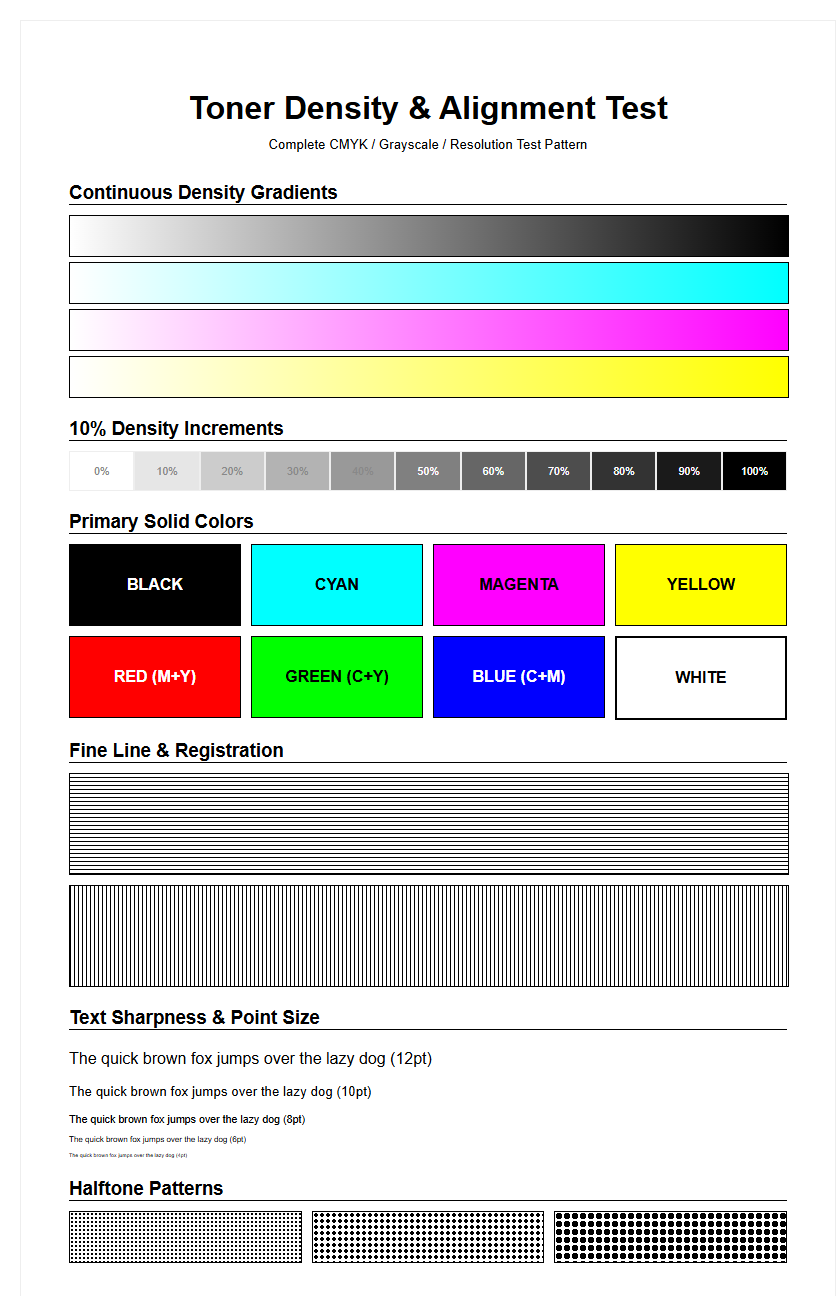
- Halftoning: The process of simulating continuous tones through varied dot density.
- Addressable Resolution: The highest density at which the printhead can physically deposit media.
When evaluating DPI, it is essential to distinguish between "native" and "interpolated" resolution. Native resolution refers to the actual mechanical limits of the printhead nozzles or laser optics, whereas interpolation uses software algorithms to fill gaps between dots. Testing pages often include micro-text to push these limits, revealing whether the printer can maintain legibility at ultra-high densities.
Evaluating Print Clarity and Detail
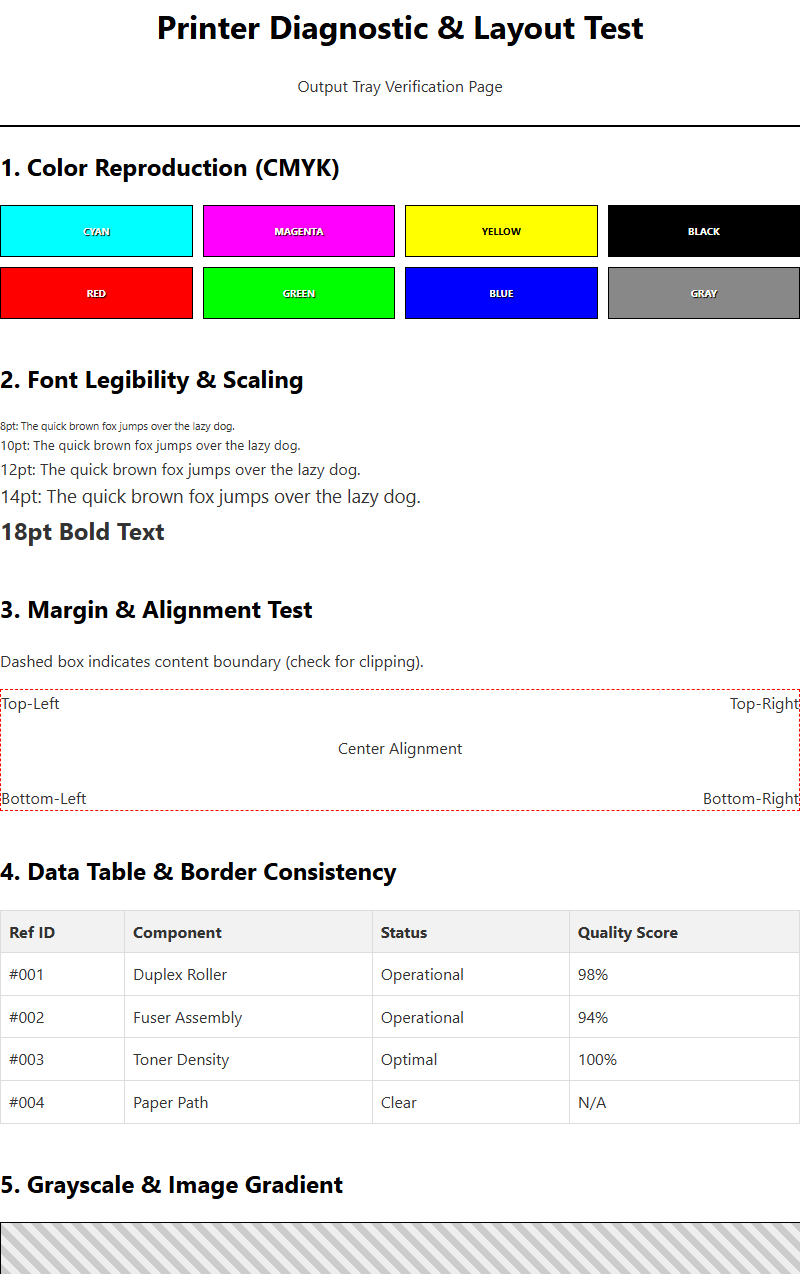
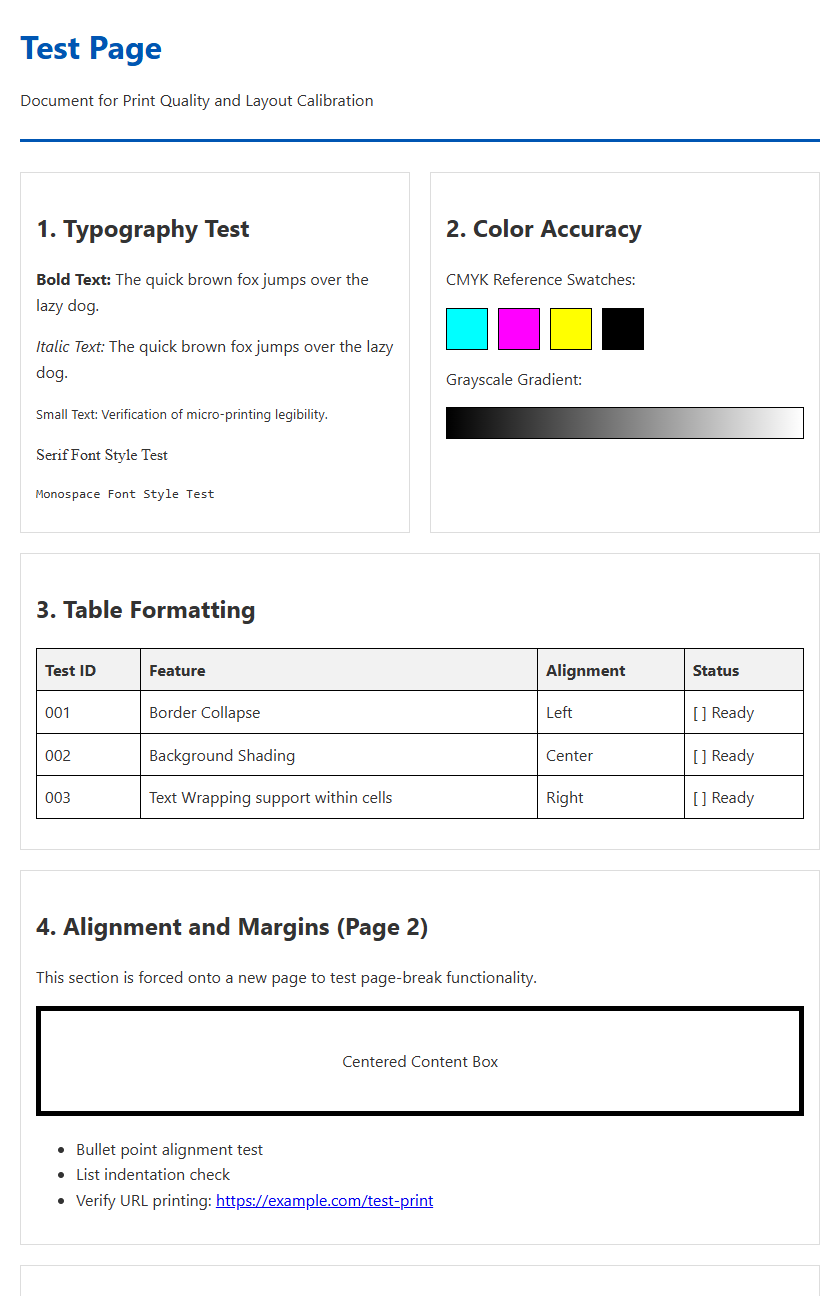
Clarity in a printout is not solely dependent on high DPI; it also involves edge definition and the absence of artifacts like aliasing or "jaggies." When examining a test page, look for the sharpness of curved lines and diagonal strokes. High-quality output should show smooth transitions without visible stepping patterns. This precision is vital for professional documents where fine serifs on fonts must remain crisp even at 4-point or 6-point sizes.
- Edge Acutance: The perceived sharpness of the boundaries between different colors or tones.
- Dot Gain: The tendency of ink to spread upon contact with the substrate, potentially blurring fine details.
- Tonal Range: The ability to reproduce nuances in highlights and shadows without losing detail to "clipping."
To evaluate these factors, test pages utilize specialized targets such as concentric circles and converging lines. If the lines blur together prematurely, the printer may be struggling with mechanical vibration or ink saturation issues. Clarity is also influenced by the dithering pattern used; stochastic screening often provides a more photographic appearance compared to traditional ordered dithering, which can sometimes produce visible patterns at lower resolutions.
Comparing Inkjet and Laser Resolution
Inkjet and laser printers utilize vastly different technologies to achieve high-resolution results. Inkjet printers rely on microscopic nozzles to eject liquid ink, often varying the droplet volume (measured in picoliters) to enhance detail. Laser printers, conversely, use an electrophotographic process where a laser beam "draws" an electrostatic image on a drum, which then attracts dry toner. These differences significantly impact how resolution is rendered on the page.
| Feature | Inkjet Technology | Laser Technology |
|---|---|---|
| Primary Unit | Liquid Droplets (picoliters) | Dry Toner Particles |
| Dot Shape | Variable and fluid | Highly precise and uniform |
| Color Blending | Subtractive physical mixing | Overlaid patterns (halftoning) |
| Substrate Interaction | Absorption into fibers | Thermal fusion to surface |
While an inkjet may boast a higher nominal DPI, a laser printer often produces sharper text due to the lack of "wicking," where ink spreads along paper fibers. On a test page, this is visible in the "hollow text" test, where laser printers typically maintain cleaner interior voids in small characters than standard inkjets.
Analyzing Resolution Test Patterns
Test patterns are engineered to expose the specific weaknesses of a printer's imaging system. One common pattern is the "Siemens Star," which consists of radial lines converging at a center point. As the lines approach the center, the distance between them shrinks, forcing the printer to handle extreme spatial frequencies. Another essential tool is the line pair grid, which measures the number of distinct line pairs per millimeter (lp/mm) the device can render before they merge into a solid gray mass.
- Radial Grids: Used to detect directional resolution bias in the printhead movement.
- Frequency Bursts: Parallel lines of increasing density to check for moiré patterns.
- Negative Space Targets: White lines on a black background to test for toner scatter or ink bleed.
When analyzing these patterns, observers should look for "ghosting" or "banding," which indicates a lack of synchronization between the paper feed mechanism and the print carriage. Effective resolution is confirmed when the lines remain distinct and high-contrast right up to the theoretical limit of the printer's hardware specifications, showing no signs of smearing or erratic dot placement.
Impact of DPI on Document Quality
The practical application of high DPI is most evident in the reproduction of complex graphics and photographic imagery. Higher resolution allows for a finer halftone screen, which reduces the visibility of individual dots to the naked eye. This creates the illusion of continuous tone, essential for high-quality marketing materials and photography. In text-heavy documents, high DPI ensures that the descenders and ascenders of characters are rendered with mathematical precision, reducing eye strain for the reader.
- Text Smoothness: Higher DPI eliminates the jagged edges on curved characters like 'o' and 's'.
- Gradient Transitions: Increased resolution prevents "banding" in color fades and shadows.
- Graphic Precision: Thin lines in technical drawings or architectural blueprints remain visible and accurate.
On a printer test page, the impact of DPI is often demonstrated through a series of gray scales. A printer with superior resolution and dithering logic will display a smooth transition from 0% black to 100% black without visible steps. If the DPI is insufficient for the requested task, the image will appear "pixelated" or grainy, failing to capture the subtle textures present in the digital original.
Optimizing Output for Sharpness
Achieving the sharpest possible output requires more than just selecting the highest DPI setting in the print dialog. Users must synchronize the software instructions with the physical capabilities of the printer and the characteristics of the media. For instance, selecting "Best Quality" often slows down the printhead to allow for more precise dot placement and multi-pass printing, which significantly enhances visual definition. Furthermore, the choice of dithering-the method used to arrange dots-can dramatically affect the perceived sharpness of an image.
- Driver Settings: Ensure the "Media Type" matches the actual paper to calibrate ink volume.
- Unsharp Masking: Digital sharpening can counteract the softening effect of dot gain.
- Bi-directional Alignment: Calibrate the printhead to ensure dots align perfectly on every pass.
On a test page, optimization is often verified using a "microlining" section. If the optimization is successful, even the thinnest lines will appear solid and unbroken. If the settings are mismatched, such as using high-gloss settings on plain paper, the resolution will suffer as the ink oversaturates the fibers, leading to a loss of detail and a "muddy" appearance in high-density areas.
Hardware Limits and Print Precision
Every printer has physical constraints that define its maximum resolution. In inkjet systems, the size of the nozzle opening determines the minimum picoliter drop size, which in turn dictates the smallest possible dot. In laser systems, the precision of the polygon mirror motor and the focus of the laser diode set the ceiling for detail. Additionally, the mechanical stepping motor responsible for advancing the paper must be incredibly precise; even a micro-step error can lead to horizontal banding that ruins the perceived resolution.
| Hardware Component | Impact on Precision |
|---|---|
| Printhead Nozzles | Controls drop volume and spray consistency. |
| Stepping Motor | Determines the accuracy of vertical paper movement. |
| Laser Diode | Defines the spot size of the electrostatic charge. |
| Fuser Assembly | Affects how much toner "spreads" during melting. |
A printer test page helps diagnose hardware limitations by providing a baseline. If a printer rated at 1200 DPI produces results comparable to a 600 DPI machine, it may indicate a clogged nozzle, a dirty corona wire, or a worn-out stepper motor. Hardware precision is the "ceiling" of print quality; no software can compensate for mechanical instability.
Interpreting High Resolution Results
Interpreting a high-resolution test page requires a discerning eye and, occasionally, a magnifying loupe. When a printer claims 2400 x 1200 DPI, it often means it can place dots at those coordinates, but the dots themselves might overlap. This is known as "addressable" vs. "optical" resolution. On the test sheet, look for the "resolution wedge," a series of lines that get closer together. The point at which you can no longer see white space between the lines is the true effective resolution of the system.
- Visual Acuity: Humans with 20/20 vision can generally perceive details up to 300-600 DPI at a normal reading distance.
- Moiré Patterns: Interference patterns that appear when the printer's grid conflicts with the image's grid.
- Color Registration: How well the cyan, magenta, yellow, and black dots align to create sharp edges.
High resolution is most beneficial when printing vector graphics or high-resolution photography. However, if the test page shows "plugging" in small fonts (where the centers of letters like 'e' fill in), the resolution is being undermined by excessive ink or toner. True high-resolution results should look effortless, with clean white spaces and perfectly defined boundaries between contrasting colors.
Calibrating Fine Line Accuracy
Fine line accuracy is the hallmark of a well-calibrated printer. It refers to the device's ability to print a single-pixel line without it appearing fragmented or overly thick. This is particularly important for CAD drawings, barcodes, and fine-art etchings. Calibration involves adjusting the horizontal and vertical alignment to ensure the printhead is perfectly square to the paper path. Without this, lines may appear "skewed" or have "stair-stepping" artifacts that degrade the professional quality of the output.
- Horizontal Alignment: Ensures the printhead fires at the exact same position during left and right strokes.
- Vertical Alignment: Coordinates the paper advance with the printhead's passes.
- Vacuum Platen: In high-end printers, this holds the paper perfectly flat to maintain a consistent focal distance.
Testing for fine line accuracy usually involves a grid of 1-point lines. If the grid looks wavy or if the intersections are bloated, the printer requires calibration. On the test page, look for the "registration marks" in the corners; these should overlap perfectly. If you see a "halo" of one color peaking out from behind another, the alignment is off, which effectively lowers the resolution and clarity of the final print.
Factors Affecting Visual Definition
Visual definition is the subjective perception of how "sharp" a print looks, and it is influenced by several environmental and material factors beyond the printer's internal specs. The interaction between the ink/toner and the paper is the most significant variable. For example, highly absorbent inkjet paper will cause dots to "feather," reducing resolution. Conversely, coated photo paper keeps the ink on the surface, preserving the tiny dot size and maximizing the effective DPI of the hardware.
| Factor | Effect on Definition |
|---|---|
| Paper Porosity | High porosity leads to more ink spread and lower sharpness. |
| Humidity | High humidity can swell paper fibers, causing alignment issues. |
| Ink Viscosity | Affects how cleanly the droplet breaks from the nozzle. |
| Viewing Distance | Closer viewing requires higher DPI to maintain the illusion of detail. |
A comprehensive printer test page often includes a section for "Substrate Testing," where the same pattern is printed on different areas or paper types. This helps users understand that resolution is a system-wide attribute. Even the most expensive high-DPI printer will produce poor results on low-grade recycled paper. By managing these external factors, users can ensure that the visual definition of their documents matches the technical potential of their printing hardware.

Comments