Diagnosing print quality issues like horizontal streaking and banding begins with a systematic printer diagnostic test page to isolate specific hardware failures. These visual reports help identify if the distortion originates from clogged printhead nozzles, a depleted toner cartridge, or an aging drum assembly. Horizontal artifacts often point toward mechanical feed inaccuracies or voltage fluctuations within the fuser unit. By analyzing the CMYK color blocks and nozzle check patterns, you can differentiate between simple ink coagulation and complex encoder strip contamination. Utilizing these built-in maintenance tools ensures precise calibration of the media-feed drive, effectively resolving repetitive banding patterns and restoring professional-grade output clarity.
Identifying Horizontal Streaks on Printouts
Horizontal streaks, often referred to as banding, appear as distinct lines or gaps that run across the width of the page, perpendicular to the direction of the paper feed. These artifacts are most visible in large blocks of solid color or high-resolution images. Identifying the specific nature of these streaks is the first step in hardware diagnostics. If the lines are white or empty, it typically indicates a blocked nozzle or a physical obstruction in the print path. If the lines are dark or colored, it suggests excess material or a compromised component like a leaking cartridge or a damaged drum.
In inkjet printers, these streaks usually align with the travel of the print carriage. In laser printers, the interval between streaks can provide a clue to the failing internal component. By measuring the distance between repeating lines, you can often pinpoint whether the issue lies with the developer roller, the fuser, or the organic photo-conductor (OPC) drum. Consistently identifying these patterns on a standardized printer test page ensures you are not chasing a software glitch when a mechanical failure is the true culprit.
Common Causes of Horizontal Lines
Horizontal lines are frequently the result of interrupted flow or mechanical irregularities within the printing assembly. In the inkjet domain, the primary suspect is often dried ink clogging the microscopic nozzles of the printhead, preventing a continuous spray of droplets. For laser printers, the issues are more diverse, ranging from a depleted toner reservoir to a scratched drum surface. The following factors are commonly responsible for these visual defects:
- Nozzle Clogging: Dried pigment or dye blocking the ink ejection ports.
- Drum Scratches: Physical damage to the OPC drum in laser printers, leading to recurring marks.
- Dirty Corona Wires: Dust buildup on the wires responsible for electrostatic charging.
- Fuser Issues: Failure of the fuser to properly melt and bond toner to the substrate.
- Encoder Strip Contamination: Smudges on the transparent strip that guides the print carriage position.
Environmental factors like high humidity can also cause toner to clump or paper to swell, resulting in uneven application. Understanding these technical triggers allows for a systematic approach to troubleshooting rather than relying on guesswork.
Cleaning Clogged Inkjet Printheads
When an inkjet printer produces horizontal streaks, the printhead nozzles are likely obstructed by desiccated ink. Modern printers include automated maintenance cycles designed to purge these blockages using high-pressure ink bursts. If the initial "Clean Printhead" command via the driver software does not resolve the banding, a more intensive "Deep Cleaning" may be required. This process forces a larger volume of ink through the nozzles to dissolve stubborn deposits. However, users should be mindful that deep cleaning consumes a significant amount of ink and fills the waste ink absorber pad.
If software-based cleaning fails, manual intervention might be necessary for printers with removable printheads. This involves using a lint-free cloth moistened with distilled water or a specialized printhead cleaning solution. Gently blotting the nozzle plate can break down the surface tension of dried ink. Never use isopropyl alcohol on thermal inkjet heads, as it can degrade the delicate internal membranes. After manual cleaning, always run a nozzle check pattern to verify that the ink flow has been restored to its nominal state across all color channels.
Inspecting Laser Printer Toner Cartridges
In laser printing, horizontal streaks are often a symptom of a failing toner cartridge or an integrated drum unit. To diagnose this, first remove the cartridge and inspect the surface of the OPC drum. This green or blue cylinder is light-sensitive and should never be exposed to bright light for extended periods. If you notice a line of toner or a physical scratch on the drum that corresponds to the streak on your paper, the unit likely needs replacement. Additionally, check the wiper blade, which is responsible for scraping excess toner into the waste bin; a nicked blade will leave a persistent horizontal line.
| Component | Visual Symptom | Possible Fix |
|---|---|---|
| OPC Drum | Repeating dark lines | Replace Drum/Cartridge |
| Developer Roller | Light horizontal fading | Gently shake cartridge |
| Wiper Blade | Thin, sharp streaks | Replace waste assembly |
| Doctor Blade | Uneven toner density | Clean or replace unit |
Gently rocking the cartridge from side to side can sometimes redistribute the toner powder, temporarily resolving streaks caused by low-density areas within the hopper.
Resolving Roller and Paper Path Debris
The paper path is a complex series of rollers and guides that must remain pristine for high-quality output. Horizontal streaks can be caused by "pick-up" or "feed" rollers that have accumulated paper dust, oil, or adhesive residue. When a roller is dirty, it can slip or leave a physical imprint on the page, appearing as a repetitive streak or smudge. Cleaning these rollers involves using a damp, lint-free cloth to wipe the rubber surfaces. In laser printers, the transfer roller is particularly sensitive; oils from skin can interfere with the electrostatic transfer of toner, resulting in horizontal voids.
Furthermore, debris stuck in the paper path can scratch the media as it passes through. Check for small fragments of paper from previous jams or stray staples that might be dragging against the page. Inspect the fuser entrance and exit guides for any buildup of "ghost" toner. Regular vacuuming of the printer interior with a specialized ESD-safe vacuum can prevent these particles from migrating onto the rollers. Maintaining a clean internal environment ensures that the mechanical movement of the paper remains fluid and free from contaminants that degrade print quality.
Adjusting Driver Quality Settings
Sometimes, horizontal streaks are not mechanical but are caused by software configurations. If the printer is set to "Draft" or "Economy" mode, it reduces the number of passes the printhead makes, which can result in visible banding. Increasing the print quality to "High" or "Best" often resolves this by increasing the Dots Per Inch (DPI) and slowing down the carriage movement for more precise ink placement. Additionally, ensure that the "Media Type" setting in the printer driver matches the actual paper loaded in the tray. Using "Photo Paper" settings on plain paper can cause over-saturation, while the reverse can lead to streaky, under-saturated lines.
Bidirectional printing is another common software-related cause. This feature allows the printhead to spray ink while moving in both directions to save time. If the printhead is slightly out of alignment, the lines from the left-to-right pass won't align perfectly with the right-to-left pass, creating a "zipper" effect or horizontal streaks. Disabling bidirectional printing in the "Advanced" tab of the driver properties forces the printer to print in a single direction, which often eliminates banding issues at the cost of speed.
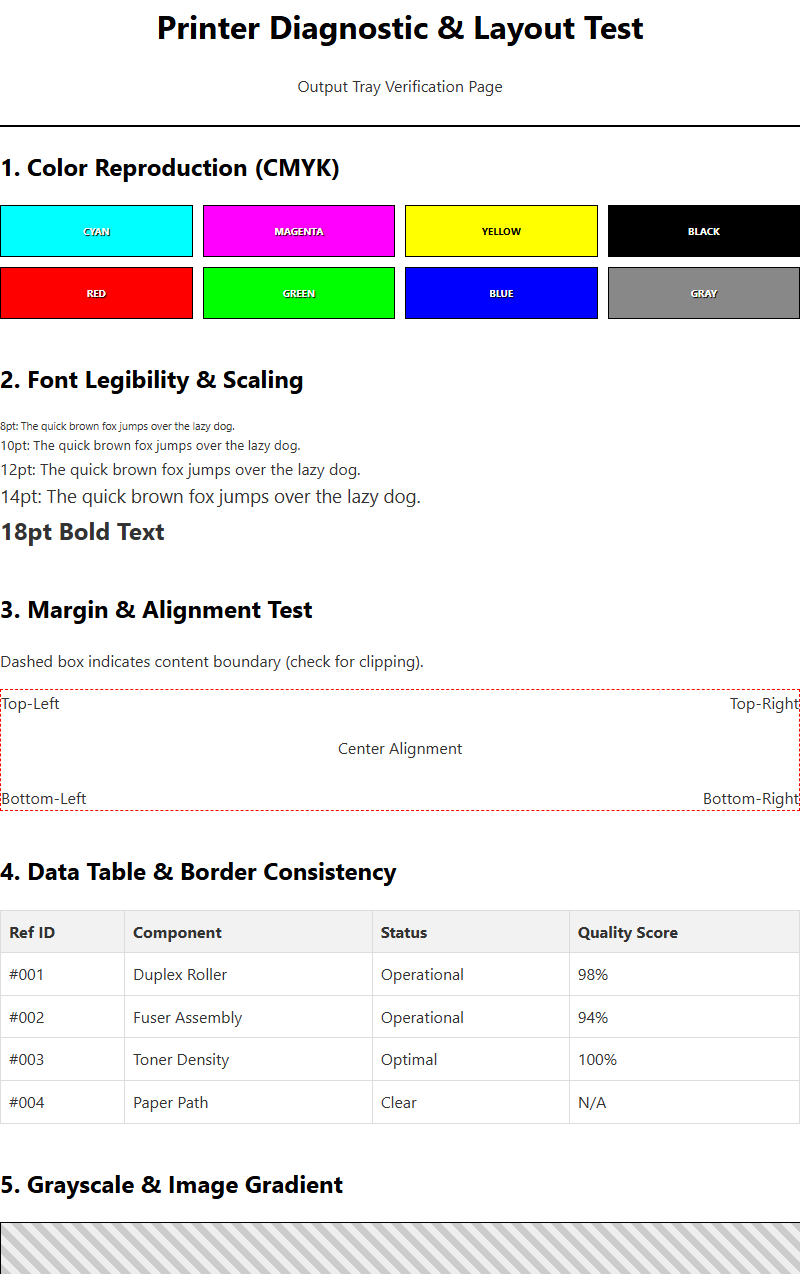
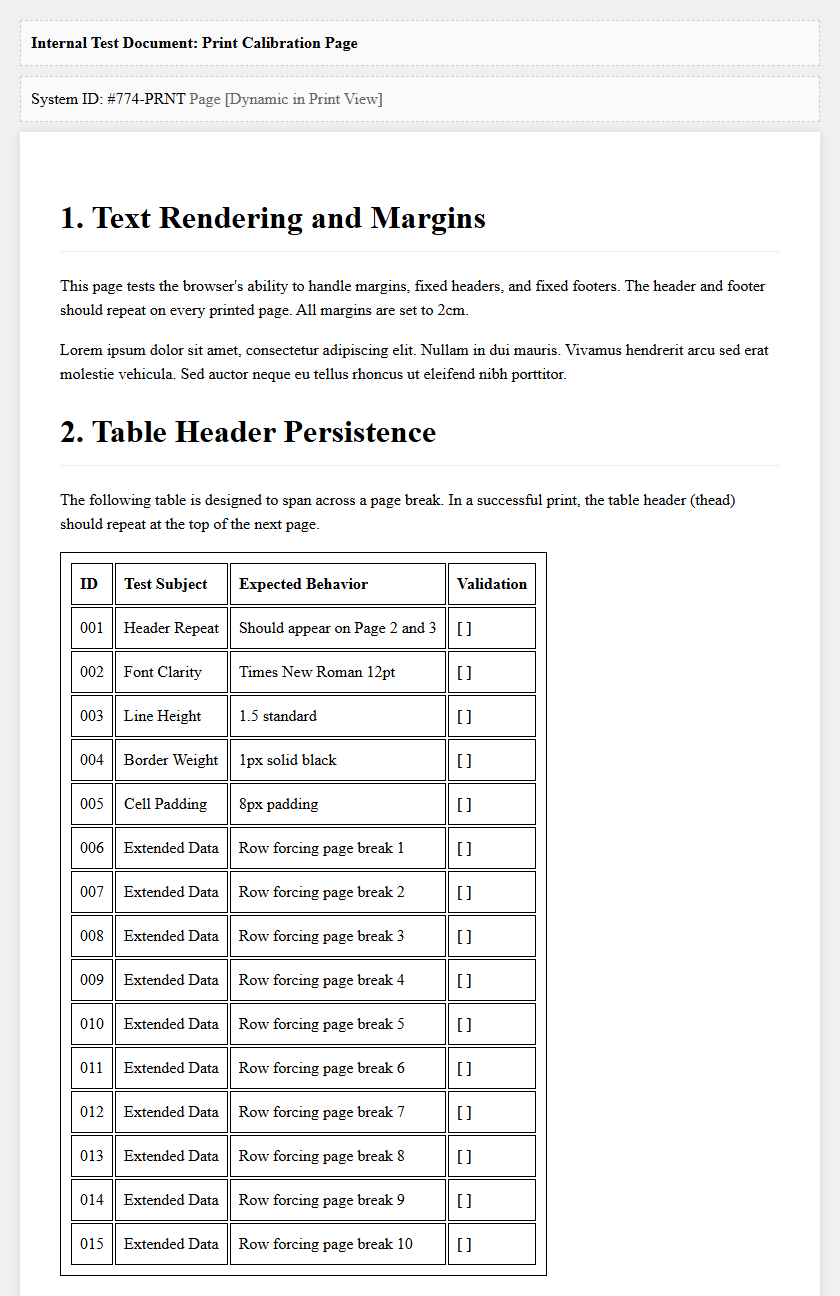
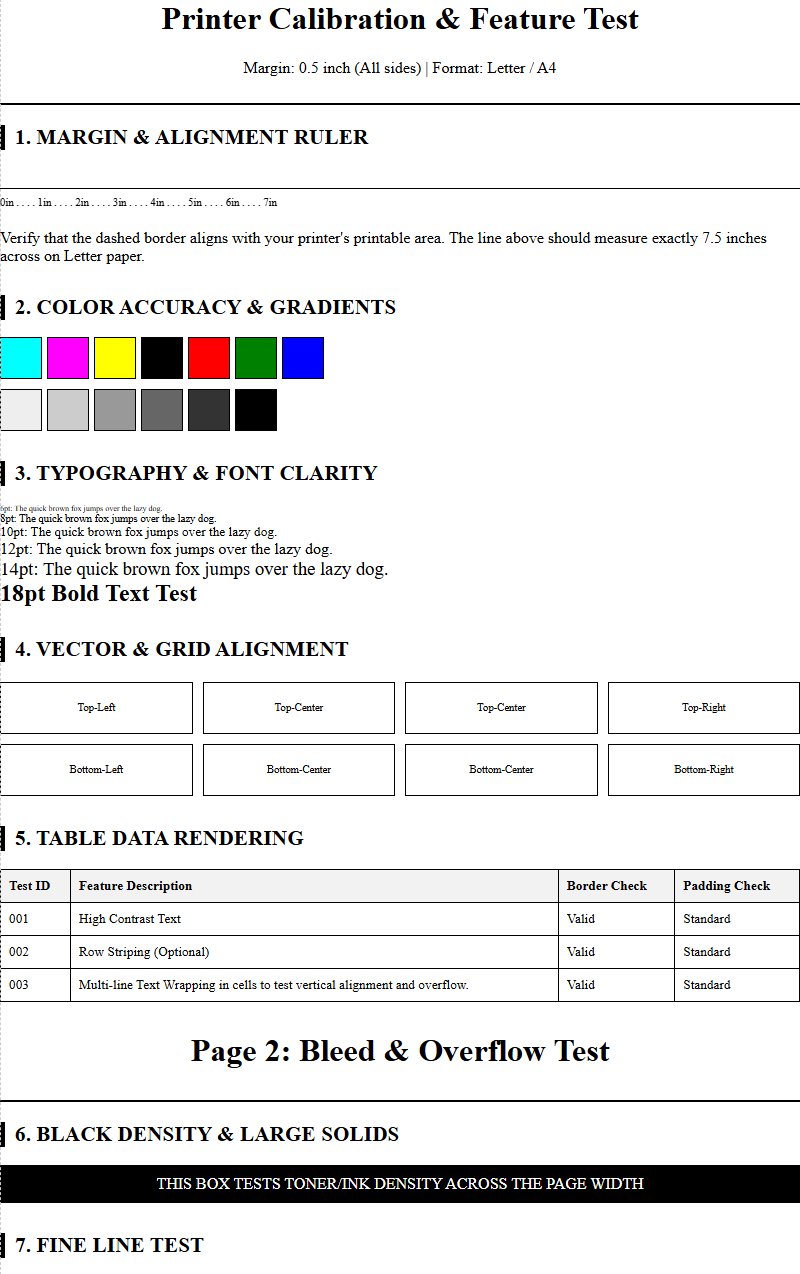
Using Diagnostic Test Pages for Calibration
Standardized diagnostic test pages are essential tools for troubleshooting horizontal streaks. These pages typically feature solid bars of Cyan, Magenta, Yellow, and Black (CMYK), as well as fine-line grids. By examining which specific color bar contains the streaks, you can isolate the problematic ink tank or toner cartridge. For example, if streaks only appear in the magenta block, the other color channels are functioning correctly, narrowing your focus significantly. These pages also include alignment patterns that help the printer's optical sensors or the user's eye to calibrate the vertical and horizontal offset of the printhead.
- Print a Nozzle Check page to see if every orifice is firing.
- Print a Printhead Alignment page to synchronize carriage passes.
- Analyze a "Color Band" test to check for consistent saturation levels.
- Use a "Leading Edge" test to see if streaks begin immediately or after a certain distance.
Calibration should be performed whenever a new cartridge is installed or if the printer has been moved. Regular use of these diagnostic tools prevents minor misalignments from escalating into severe print quality failures that waste expensive consumables.
Verifying Ink and Toner Levels
Low consumable levels are a primary, yet often overlooked, cause of horizontal streaking. As an ink cartridge nears depletion, the pressure within the reservoir drops, leading to inconsistent delivery to the printhead. This manifest as intermittent horizontal gaps where the ink fails to fire. In laser printers, low toner levels result in "faded" streaks where the magnetic roller cannot pick up enough powder to cover the drum uniformly. Most modern printers use an internal chip to estimate levels, but these can sometimes be inaccurate, especially with third-party or refilled cartridges.
Always verify the status of your consumables through the printer's onboard display or the companion software utility. If you suspect a "false low" reading, some cartridges can be gently shaken to redistribute the remaining material, which may clear the streaks for a few more pages. However, if levels are below 10%, replacement is the most reliable solution. Utilizing high-yield (XL) cartridges can provide more stable internal pressure over a longer duration, reducing the frequency of streaks caused by the end-of-life fluctuations of the consumable's internal mechanics and chemistry.
Troubleshooting Paper Compatibility Issues
The interaction between the printer and the paper substrate is critical for streak-free results. If the paper is too thick or has an unusual texture, the printhead might physically graze the surface, a phenomenon known as "head striking," which leaves horizontal smears. Conversely, if the paper is too thin or has high porosity, ink can bleed through or feather, creating an appearance of uneven banding. Humidity is also a major factor; damp paper can curl or wave, causing it to hit the internal components or move unevenly through the fuser assembly, leading to distorted horizontal lines.
To rule out paper as the cause, always test with a fresh ream of high-quality, 20lb or 24lb multipurpose paper stored in a cool, dry place. For laser printers, ensure the paper's GSM (Grams per Square Meter) rating falls within the manufacturer's specified range for the fuser. Heavy cardstock requires the "Thick Paper" setting to slow down the feed rate and increase the fuser temperature. If streaks only occur on specific media like labels or transparencies, the issue is likely related to the surface tension or heat resistance of that specific material rather than a mechanical fault.
Preventive Maintenance for Streak Performance
Consistency in print quality is best maintained through a proactive regimen. Preventing horizontal streaks requires more than just fixing them when they appear; it involves managing the printer's environment and usage patterns. Inkjet printers, in particular, suffer when left idle, as the ink in the nozzles can dry and solidify. Printing at least one color test page per week keeps the nozzles "wet" and prevents clogs. For laser printers, keeping the interior free of toner spills and dust prevents the buildup of debris that causes scratches on the drum or buildup on the fuser rollers.
- Firmware Updates: Ensure the printer's logic is optimized for the latest consumable formulas.
- Power Cycling: Use the power button to shut down, allowing the printer to properly "park" and seal the printhead.
- Environment Control: Maintain a stable temperature and humidity level to preserve paper and toner integrity.
- Genuine Supplies: Use OEM cartridges to ensure the lubricants and chemical compositions match the hardware specs.
By integrating these steps into a monthly routine, you significantly extend the duty cycle of your components and ensure that every printer testing page you produce is sharp, vibrant, and free of distracting horizontal banding.


Comments